Monthly Archives: November 2019

Another Example for the Decision Table Test Design Technique

we can use the following function to create a decision table. int discountcommission(double price, int items) returns the percent discount , when given the price of the items. Items Discount Commission items < 100%15 ≤ items ≤ 506%51 < items 12% for all sales that’s over $1000.00 additional 1% discount will be given. Let’s try … Continue reading Another Example for the Decision Table Test Design Technique

From the blog CS@Worcester – Shams&#039;s Bits and Bytes by Shsms Al Farees and used with permission of the author. All other rights reserved by the author.

Time to cover up

For this post, I looked for some info on code coverage. Garrett Levy’s article “The Importance of Code Coverage,” covers the types of code coverage and why they are important. It is a short read and it helped clear up some uncertainties I had.

The article starts off by explaining the reasons for code
coverage. Put simply, code coverage calculates the behavior of test code and sees
which lines and branches are tested. This is useful because testers can see
where their test code is incomplete and missing test cases.

Levy then describes four types of coverage. First, statement
coverage is the amount of code statements that were used during testing. Next,
branch coverage is the number of branches caused by conditional statements that
have been tested. Function coverage test which functions have been used during
testing. And finally, line coverage tests which code lines have been used
during testing. By using all four, a tester can easily see what cases are missing
in the tests.

I found Garrett Levy’s article, “The Importance of Code
Coverage,” to be a quick read that helped me get a clearer idea of code
coverage.

Article Referenced:
https://blog.cloudboost.io/the-importance-of-code-coverage-9b4d513f39b4

From the blog CS@Worcester – D’s Comp Sci Blog by dlivengood and used with permission of the author. All other rights reserved by the author.

FPL&S 3: Component Interaction, Custom Services, and Fear of Commit

After completing the file upload portion of the project last week, I found myself in fear of committing my changes. I have always had this problem: I want each commit to be concise, change as little as possible, and even have perfect whitespace. This minimizes changes and makes it easier to track down commits where bugs are introduced, but moving forward like this will slow me down, as it has in the past.

But once I made that first commit, things starting progressing quicker. It was time to start adding more Components. Once I could interact with the files I was uploading, it was time to be able to delete files. With more functionality and interaction with the cloud storage, it was best to remove this behavior from the Components and move them to a Service. This custom service class handles all interaction with the cloud storage service, so there aren’t some components adding files and others deleting files. Everything is nicely encapsulated, and user interaction only needs to forward actions to the Service.

I do wonder if there are downsides to this design, and whether Angular might have features I’m missing that may be better suited. However, I definitely believe that UI Components in any framework should delegate user interaction to another class that contains the logic. Even so, is importing a Service class the proper avenue? I have also considered passing commands in each Component up to the main app Component, which would have a single reference to the custom Service I created. This would quickly complicate the application architecture, however, because changes in the cloud storage will require updates in the children Components. For example, the list of Files will have to update, and a file shouldn’t be removed from the UI unless the delete action is successful, requiring a callback to be passed down to children.

The software engineering practices I’ve studied and written about this past semester are at the front of my mind. My current solution is rather simple, and although I am anticipating possible problems, I am not over-engineering and adding unnecessary complexity. I am following Clean Code principles from Robert C. Martin; making code easy it read, making it work, and refactoring when necessary.

The overall design of my final project is beginning to solidify. I naively thought I would download all file metadata from the cloud storage when loading the web page and then maintain them from there, but I’ve realized that all of this data is going to have to be stored in another database, which I will access using a REST API. This will store all the file data and URLs to the files themselves and will be a good chance to practice with data synchronization between databases.

Through the next week I will implement the database. Once I have this synced client-side, I can add Components to search/filter the files and load the files that are selected by the user.

From the blog CS@Worcester – Inquiries and Queries by ausausdauer and used with permission of the author. All other rights reserved by the author.

Final Project-Week 1

I will be completing a final project for my CS-343 class. I plan to implement a workout planner using angular and webstorm. The general idea of the website will start with the homepage. On the home page there will be any workout that the user has created. Here it will show the workout types, how many reps/sets and what each workout is. Along the side bar there will be a list of muscle groups. The user will be able to click on these side bars to display a list of different exercises that they could choose from. When the user clicks on an exercise, the tab will open up to a display a picture or video of the workout. From here the user will also be able to set their reps and sets count in which they want to add to the workout. To get started on this process I will be designing each of the slides for each workout. Once these slides are created, I will host them together in a folder. These will then be able to be used and manipulated by implementing a new component called workouts. This will contain and html file for designing the basic template of the slides and their layout. The next will be a css file. This file will allow for me to implement more stylistic changes to the pages. The last two components in the workout section will be .spec and a typescript file. The typescript file is where all the code that will allow for the user to manipulate and change pages. This will also include the code which will allow for the user to take add their reps and sets to the workout. For the first week I have been working putting together each of the slides that will be used for the site.

The tentative plan for these slides will be to make them
images and incorporate the other elements on top of the image. Each image will
have a unique ID which will allow for the code to distinguish what workout the
user is currently looking at. Once this large section has been completed, I
plan on moving onto the homepage design where the workout will be displayed. On
the homepage the user will be able to remove workouts that they no longer want
or remove their whole workout plan entirely and start from scratch. Due to the
set up of the app, the workouts will not save once disconnected because that
would require saving the data somewhere, while the app is offline.

From the blog CS@Worcester – Journey Through Technology by krothermich and used with permission of the author. All other rights reserved by the author.

Mockito, not the lovely beverage Mojito

Does your unit test have a stunt double? You know someone to jump in there and take the hit during testing instead of using real dependencies? Well, it could if you used Mockito. I found a great tutorial on setting up Mockito for various environments and situations here: https://www.vogella.com/tutorials/Mockito/article.html But what is Mockito? Don’t confuse it with that lovely mint based rum concoction. It’s a JAVA based mocking framework. It’s used to mock interfaces so that dummy functionality can be used in unit testing. But what is mocking? In OOP mock objects are simulated objects that mimic the behavior of real objects (stunt doubles!). In Test Driven Development mock objects meet interface requirements of real objects allowing developers to write and unit-test functionality. This allows the developers to focus on the behavior of the system while testing without worrying about dependencies. This Martin Fowler article does a great job explaining Mocks: https://martinfowler.com/articles/mocksArentStubs.html So grab a Mojito and enjoy some reading! #CS@Worcester #CS-443

From the blog Home | Michael Duquette by Michael Duquette and used with permission of the author. All other rights reserved by the author.

Final Project First Blog

The first task for the project was the “Proposal”

This is the first week that we started working on the final project for CS343 Software Constr, Des & Archit, my team and I decided to create a simulation for a the order system that we were working on during the semester.

We started by putting the proposal, dividing the work between us and agreed on the layout for the design. However, we always can change the layout after we are done with all the coding.

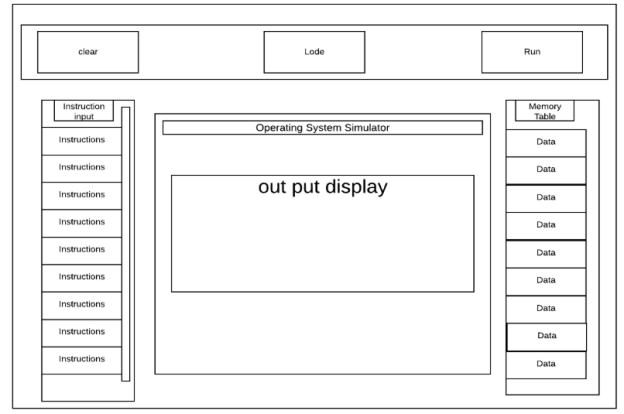
Our project will be about creating a simulated operating system that will be running on a Spring Boot Rest API server and will have an angular user interface.

The important steps that we will fellow during the time we are working on the project:

  • The first step will be to design web page layout.
  • Then start working on the the operating system java code.
  • The first two steps can be done at the same time. 
  • The next step will be to implement the rest API on the operating system java code .
  • And in the end the last step will be to write the typescript in the angular app to interact will the rest API.

We agreed that the project will be divided into: in the top there will be one upper menu that will have three buttons one to load the job, one to clear the job input and one to run the next instruction. On the both sides of the app page these will be the first pull down text box to add instructions for a new job and on the other side there will be a table that shows the whole memory table. And for sure there will be output text box.

The data type that will be used in the project for each component is: The input and the memory table will be arrays of strings and the output will be a string.

From the blog CS@Worcester – Shams&#039;s Bits and Bytes by Shsms Al Farees and used with permission of the author. All other rights reserved by the author.

Getting Checkstyle-ish

After today’s CS443 class, I decided to look further into Checkstyle. “How Open-Sourced Projects use Checkstyle,” by Sider Team is a thorough article about Checkstyle. I focused on the sections containing the Checkstyle overview, the default check item categories, and the default coding styles included with Checkstyle. After doing this, I would recommend to others to read through the fourteen categories of default check items. Sider Team has provided descriptions with simple, clear examples for each category.

In the section with the default coding styles, the two
styles we used in class are mentioned. Sun Java coding style was a popular
style that is no longer maintained and possesses outdated rules. Google Java
coding style, on the other hand, is a newer and still actively maintained style
that has become popular since its debut in 2013.

After reading Sider Team’s article “How Open-Sourced Projects use Checkstyle,” I feel I understand Checkstyle, and coding styles in general, better.

Article Referenced:
https://blog.sideci.com/an-overview-of-checkstyle-and-how-it-is-used-in-open-sourced-projects-8dc288f65fdb

From the blog CS@Worcester – D’s Comp Sci Blog by dlivengood and used with permission of the author. All other rights reserved by the author.

Gitlab Review Apps deploying to Heroku

**Gitlab Review Apps with Heroku** First a couple of assumptions: you currently have an app setup that deploys from Gitlab to Heroku. You have variables setup in gitlab under CI/CD for your HEROKU_API_KEY and your organization has identified a need to review code before submitting to your QA or pre-production environment. With the help of the gitlab-ci.yml file we can setup a review environment that will automatically build, deploy and tear down a review environment. So how do we accomplish this? Magic! Well, OK maybe not magic but it’s a pretty slick process of using branches and the Heroku API. Ready to take a peak behind the curtain? Let’s get started! **Heroku setup steps:** There aren’t any! All the work to be performed is done within git. The review app (test app or whatever you want to call it) is all handled in the gitlab-ci.yml and by creating a branch of your repository. **Gitlab setup steps:** We need to make a few modifications to the .gitlab-ci.yml. Open the .gitlab-ci.yml in your favorite text editor. I prefer to use DPL to deploy from Gitlab to Heroku. The syntax is easy to follow and much cleaner. Add this near the top of the YAML: before_script: – apt-get update -qy – apt-get install -y ruby-dev curl – gem install dpl This tells gitlab to check for updates, install ruby (needed for dpl) and install dpl. I like to use a variable for passing around the review app name. Add a variable section to the YAML like this: variables: REVIEW_APP_NAME: “$CI_COMMIT_REF_SLUG-$CI_COMMIT_SHORT_SHA” The $CI_COMMIT_REF_SLUG is the name of the branch the commit was performed from and the $CI_COMMIT_SHORT_SHA is the 7 digit commit id. Now we can use REVIEW_APP_NAME wherever we need to. ***Note that using the $CI_COMMIT_SHORT_SHA will allow multiple review apps to run without collision. Now let’s look at the stages section of the YAML. This is what mine looks like: stages: – review – staging – production On Heroku I have both a staging and a production app defined and the push to both is based on the branch I am working in. I also created a pipeline in Heroku that both apps are assigned to. With a click of a button I can promote the app in staging to production. Add the – review to your stages and we’ll setup the start_review and stop_review sections of the YAML next. **Review Magic:** Copy and paste the following into your YAML below the stages section: start_review: stage: review script: – cd ./frontend – echo “$REVIEW_APP_NAME ” $REVIEW_APP_NAME – >- curl -n -X POST https://api.heroku.com/apps -d ‘ { “name”: “‘”$REVIEW_APP_NAME”‘”, “region”: “us” } ‘ -H “Content-Type: application/json” -H “Accept: application/vnd.heroku+json; version=3” -H “Authorization: Bearer $HEROKU_API_KEY” – dpl –provider=heroku –app=$REVIEW_APP_NAME –api-key=$HEROKU_API_KEY environment: name: review/$CI_COMMIT_REF_NAME url: https://$CI_COMMIT_REF_SLUG-$CI_COMMIT_SHORT_SHA.herokuapp.com on_stop: stop_review only: – branches except: – master – staging Let’s review what’s going on here. First we are specifying that this is a review stage. Since I am deploying an Angular app on Heroku and have both a frontend and a backend in my repository (I know nested repositories aren’t best practice but it’s what I have to work with on this project) I first cd into my frontend folder so that the deployment takes place from there. You may not need to do this based on your configuration. I echo the $REVIEW_APP_NAME so that it is in the gitlab logs when the pipeline is run. The curl (Client URL) statement creates the API Post request to create the empty app named $REVIEW_APP_NAME. The – dpl statement performs the gitlab deployment to the newly created Heroku App. The environment settings are for gitlab and define what happens once the deployment completes. The on_stop section calls the stop_review section of the YAML. You will notice I tell gitlab that only branches are used and to exclude the master and staging branches. Now copy this into the YAML: stop_review: stage: review script: – echo “environment is being stopped!” – >- curl -n -X DELETE https://api.heroku.com/apps/$REVIEW_APP_NAME \ -H “Content-Type: application/json” -H “Accept: application/vnd.heroku+json; version=3” -H “Authorization: Bearer $HEROKU_API_KEY” variables: GIT_STRATEGY: none when: manual environment: name: review/$CI_COMMIT_REF_NAME action: stop This is all pretty straight forward. The stop_review only runs on the review stage. The curl statement creates and passes the DELETE API call to delete the app named $REVIEW_APP_NAME. It is processed manually either by stopping the job in the gitlab pipeline or stopping it in the environments section of the project repository. Once you click ‘stop’ the delete command is sent to Heroku and the app is torn down and deleted. Now save the YAML and open up a terminal session. Create a review branch and push it up to the upstream repository: git checkout -b review git add . git commit -m ‘Review App setup’ git push -u origin review Log back into Gitlab and check your repository pipelines. You should see your latest job running. Log into Heroku and check your dashboard. You will see the new deployment popup once Gitlab finishes processing it. After reviewing the app on Heroku when you are ready to tear it down go back in to gitlab and either go to the Operations/Environment section of the repository or the CI-CD/Pipelines section. If you choose to stop the app under Operations/Environments you will see the review app listed there/ On the right hand side of the screen will be a big red stop square. Click the square and answer the popup confirmation prompt to stop the app. Confirm the app has been closed/torn down by checking on Heroku (you may need to refresh your browser to see it drop off). If you choose to stop the app under the CI-CD/Pipeline you will see the pipeline running. Click the running stage under the Stages column and click the stop button to the right of stop_review. Confirm the app has been closed/torn down by checking on Heroku (you may need to refresh your browser to see it drop off). There, now you magically have a review app that get’s served and torn down automatically. #CS@Worcester #CS-448

From the blog Michael Duquette by Michael Duquette and used with permission of the author. All other rights reserved by the author.

Gitlab Review Apps deploying to Heroku

**Gitlab Review Apps with Heroku** First a couple of assumptions: you currently have an app setup that deploys from Gitlab to Heroku. You have variables setup in gitlab under CI/CD for your HEROKU_API_KEY and your organization has identified a need to review code before submitting to your QA or pre-production environment. With the help of the gitlab-ci.yml file we can setup a review environment that will automatically build, deploy and tear down a review environment. So how do we accomplish this? Magic! Well, OK maybe not magic but it’s a pretty slick process of using branches and the Heroku API. Ready to take a peak behind the curtain? Let’s get started! **Heroku setup steps:** There aren’t any! All the work to be performed is done within git. The review app (test app or whatever you want to call it) is all handled in the gitlab-ci.yml and by creating a branch of your repository. **Gitlab setup steps:** We need to make a few modifications to the .gitlab-ci.yml. Open the .gitlab-ci.yml in your favorite text editor. I prefer to use DPL to deploy from Gitlab to Heroku. The syntax is easy to follow and much cleaner. Add this near the top of the YAML: before_script: – apt-get update -qy – apt-get install -y ruby-dev curl – gem install dpl This tells gitlab to check for updates, install ruby (needed for dpl) and install dpl. I like to use a variable for passing around the review app name. Add a variable section to the YAML like this: variables: REVIEW_APP_NAME: “$CI_COMMIT_REF_SLUG-$CI_COMMIT_SHORT_SHA” The $CI_COMMIT_REF_SLUG is the name of the branch the commit was performed from and the $CI_COMMIT_SHORT_SHA is the 7 digit commit id. Now we can use REVIEW_APP_NAME wherever we need to. ***Note that using the $CI_COMMIT_SHORT_SHA will allow multiple review apps to run without collision. Now let’s look at the stages section of the YAML. This is what mine looks like: stages: – review – staging – production On Heroku I have both a staging and a production app defined and the push to both is based on the branch I am working in. I also created a pipeline in Heroku that both apps are assigned to. With a click of a button I can promote the app in staging to production. Add the – review to your stages and we’ll setup the start_review and stop_review sections of the YAML next. **Review Magic:** Copy and paste the following into your YAML below the stages section: start_review: stage: review script: – cd ./frontend – echo “$REVIEW_APP_NAME ” $REVIEW_APP_NAME – >- curl -n -X POST https://api.heroku.com/apps -d ‘ { “name”: “‘”$REVIEW_APP_NAME”‘”, “region”: “us” } ‘ -H “Content-Type: application/json” -H “Accept: application/vnd.heroku+json; version=3” -H “Authorization: Bearer $HEROKU_API_KEY” – dpl –provider=heroku –app=$REVIEW_APP_NAME –api-key=$HEROKU_API_KEY environment: name: review/$CI_COMMIT_REF_NAME url: https://$CI_COMMIT_REF_SLUG-$CI_COMMIT_SHORT_SHA.herokuapp.com on_stop: stop_review only: – branches except: – master – staging Let’s review what’s going on here. First we are specifying that this is a review stage. Since I am deploying an Angular app on Heroku and have both a frontend and a backend in my repository (I know nested repositories aren’t best practice but it’s what I have to work with on this project) I first cd into my frontend folder so that the deployment takes place from there. You may not need to do this based on your configuration. I echo the $REVIEW_APP_NAME so that it is in the gitlab logs when the pipeline is run. The curl (Client URL) statement creates the API Post request to create the empty app named $REVIEW_APP_NAME. The – dpl statement performs the gitlab deployment to the newly created Heroku App. The environment settings are for gitlab and define what happens once the deployment completes. The on_stop section calls the stop_review section of the YAML. You will notice I tell gitlab that only branches are used and to exclude the master and staging branches. Now copy this into the YAML: stop_review: stage: review script: – echo “environment is being stopped!” – >- curl -n -X DELETE https://api.heroku.com/apps/$REVIEW_APP_NAME \ -H “Content-Type: application/json” -H “Accept: application/vnd.heroku+json; version=3” -H “Authorization: Bearer $HEROKU_API_KEY” variables: GIT_STRATEGY: none when: manual environment: name: review/$CI_COMMIT_REF_NAME action: stop This is all pretty straight forward. The stop_review only runs on the review stage. The curl statement creates and passes the DELETE API call to delete the app named $REVIEW_APP_NAME. It is processed manually either by stopping the job in the gitlab pipeline or stopping it in the environments section of the project repository. Once you click ‘stop’ the delete command is sent to Heroku and the app is torn down and deleted. Now save the YAML and open up a terminal session. Create a review branch and push it up to the upstream repository: git checkout -b review git add . git commit -m ‘Review App setup’ git push -u origin review Log back into Gitlab and check your repository pipelines. You should see your latest job running. Log into Heroku and check your dashboard. You will see the new deployment popup once Gitlab finishes processing it. After reviewing the app on Heroku when you are ready to tear it down go back in to gitlab and either go to the Operations/Environment section of the repository or the CI-CD/Pipelines section. If you choose to stop the app under Operations/Environments you will see the review app listed there/ On the right hand side of the screen will be a big red stop square. Click the square and answer the popup confirmation prompt to stop the app. Confirm the app has been closed/torn down by checking on Heroku (you may need to refresh your browser to see it drop off). If you choose to stop the app under the CI-CD/Pipeline you will see the pipeline running. Click the running stage under the Stages column and click the stop button to the right of stop_review. Confirm the app has been closed/torn down by checking on Heroku (you may need to refresh your browser to see it drop off). There, now you magically have a review app that get’s served and torn down automatically. #CS@Worcester #CS-448

From the blog Home | Michael Duquette by Michael Duquette and used with permission of the author. All other rights reserved by the author.

UML, U of what?

What’s UML? Go ahead look it up, I’ll wait. No, not UMass Lowell it’s Unified Modeling Language. The current UML Standard, 2.0, has been around since 2005. With 14 different diagram standards UML allows individuals to work at a much higher level of abstraction. I’m familiar with UML from creating ERD diagrams while doing RDBMS work. As a developer it allows me to write pseudo-code quicker, cleaner and platform independent. From a developers stand point, let’s take a look at an example and break it down. I found the example below at https://medium.com/@smagid_allThings/uml-class-diagrams-tutorial-step-by-step-520fd83b300b I really enjoy the content at Medium.com, the articles, reviews and tutorials are all helpful and well written. This is a typical Class diagram representing 4 classes: Animal, Duck, Fish, Zebra. Notice how each of the four blocks are structured the same. Let’s focus on the Animal block. In the upper box notice that Animal is written with a bold font. This indicates that Animal is a concrete class. Abstract classes would be italicized. The next box down is where you define attributes. Public attributes are denoted using a + while private attributes use a -. Looking at our example this would translate into JAVA like this: public Int age; public String gender; The lower box is for methods or functions. The same convention is used for dentoing public or private methods. In the Animal class the example would translate to: public isMammal(){ }; public mate(){ }; Note the example is missing the return types for methods. The convention is to follow the paranthesis with a colon and list the return type. In our example isMammal would be +isMammal () : boolean Relationships between the classes are denoted using lines, arrows and diamonds. In our example the solid line with the white filled arrow indicates inheritance. The article/tutorial above has a great png showing the different relationship lines. The number of online resources for information related to drawing UML diagrams is staggering. For more information and to take a deeper dive into UML go to the source and check it out https://www.uml.org #CS@Worcester #CS343

From the blog Michael Duquette by Michael Duquette and used with permission of the author. All other rights reserved by the author.