Author Archives: dcafferky

Software Analysis and Design Tools

I chose the article “Software Analysis and Design Tools” because I think it’s important to know how to put design knowledge to work using the common tools and practices. Software design and analysis allows the requirements of an application to be converted to actual code. I chose Tutorials Point for this article because I’ve used them quite a bit as I’ve learned different topics in computer science.

The first tool that is mentioned is a data flow diagram. This is basically a graphical representation of the path of data in an information system including incoming, outcoming, and storage. It’s important to know that this flow does not convey underlying “how” the data actually flows, it just shows the path. The two types of DFD’s are logical and physical and they use a set of components to represent data flow and relationships. This includes entities, processes, data storage, and data flow which are organized into different levels which represent a layer of abstraction.

DFD Components

The next tool used is called a structure chart which is actually derived from a data flow diagram. It shows a system in much more detail down to the lowest functional modules and describes the functions of these modules. The actual chart depicts a hierarchy of modules where each layer performs a specific task. The charts use special symbols to represent things like conditions, jumps, loops, data flow, and control flow.

SC Modules

The next tool is called a HIPO diagram which stands for Hierarchical Input Process Output. This diagram represents a hierarchy or modules in a system and depicts all the functions and sub-functions of a module. They are a good tool to represent system structure and allow designers and managers to picture the overview of a system.

HIPO diagrams

There is also a diagram called IPO which stands for Input Process Output. This diagram shows a good representation of control and data flow in a module as the HIPO diagram does not depict the flow of any data.

IPO Chart

Some of the other tools mentioned in the article include pseudo code, decision tables, entity-relationship models, and data dictionaries.

After reading this article I think I realized there’s a step in the software design implementation that I’ve been overlooking. Creating these models and diagrams mentioned is a pre-cursor to choosing a design pattern or implementing any code. Creating a usable understanding of how a system will work is a crucial first step in any design. I think this article did a really good job or covering some of the more popular software analysis and design tools. When it comes time to design an application I will definitely make sure I’ve represented the system using one of these tools before I think about the actual design pattern or architecture I want to use.

From the blog CS@Worcester – Software Development Blog by dcafferky and used with permission of the author. All other rights reserved by the author.

What is system testing?

I chose this topic because I tend to forget exactly what kinds of tests are being done when system testing is mentioned. The term is very vague so I thought it’d be smart to write my own explanation of it. I chose the specific article “What is System Testing?” because I’ve used articles from this website before and have found them to be helpful.

To start, system testing is the testing of a complete and integrated software system. The important part of this is to recognize an entire system and not just one program. Interfaces, programs, and hardware are integrated frequently and there needs to be a way to test how they all work as a system. System testing is how this can be achieved.

System testing is one type of black box testing (as opposed to white box testing). System tests examine how software works based on a user’s perspective. One of the things being tested are the fully integrated applications in an end to end testing scenario. This checks for how components interact with each other as well as the system as a whole. Inputs in the application will be tested and compared to what is the expected outputs are. Lastly, a user’s experience is also part of the system testing to ensure the system flows and can be navigated smoothly by the end user.

While system testing is extremely important it’s not the only type of testing needed and it’s important to realize when it needs to be conducted. Typically it will be towards the end of the development cycle as most of the system needs to be operating correctly in order to properly execute the test cases. Unit testing and integration testing will come prior to system testing and usually acceptance testing will follow.

While there are quite a few types of system some of the more popular types include usability, load, regression, recovery, and migration.

After reading this article I definitely have a better and clear understanding of what system testing is. I think this article gave good explanations and included a helpful video as well. In order to actually implement system testing on a project I’d need to do some further reading on one of the specific types in order to decide what type best covers my system. I haven’t had the need to really implement system testing so far mainly because my programs have been relatively simple. As I head to the work force this type is testing will become very important working on much larger systems.


From the blog CS@Worcester – Software Development Blog by dcafferky and used with permission of the author. All other rights reserved by the author.

What is microservices architecture?

I chose the topic after googling about the different types of software architecture and realizing I’d never read about microservices. I chose this specific article titled “Microservices” because I know Martin Fowler’s blog contains reputable information as he’s also been referenced in class. Microservices architecture is a way of designing applications as groups or suites that can be deployed independently as a service. While he mentions there is no exact definition, this style usually has similar characteristics around capability, automated deployment, endpoints intelligence, and decentralized control of data.

The microservice style is a newer and more common approach for enterprise applications. It’s a single application as a suite of small services. Each service runs in its own process and usually communicates with an HTTP resource API.

One key feature of microservices architecture is componentization via services. The different services of an application are a way to break down the software by components. These services are out of process components that communicate using web service requests. An advantage of using services as components instead of libraries is that they can be deployed independently. Therefore only requiring a single service to be deployed when there is a change.

A second key feature of microservices architecture is that it is organized around business capabilities. This approach combats the negative effects of separate teams working on an application as management usually splits focus between the technology layer, leading UI teams, server-side logic teams, and database teams. Services allow teams to be cross functional and include a full range of skills as products can be split up by individual services and communicate via a message bus.

Some of the more brief features of microservices architecture include the idea that a team should own a product over it’s lifetime and not just treat it as a project. Additionally microservices usually follow a decentralized governance which is less constricting and allow each service to take advantage of different technology that best suits the service.  Lastly decentralized data management is common using microservices. Typically each service will manage its own database.

After reading this article I definitely have an idea of what microservices architecture is but I think I’d need a more beginner level article to explain it. There were definitely some terms and concepts that Martin referred to that I wasn’t familiar with. One thing I did like about the Article was that he mentioned how well known companies use some of the technology he was talking about such as Amazon and Netflix. Seeing as microservices are mainly used for enterprise applications I have yet to gain any experience with them but most likely will in the near future.


From the blog CS@Worcester – Software Development Blog by dcafferky and used with permission of the author. All other rights reserved by the author.
What is Functional Testing?

For this blog I’ll be covering the basics of functional testing based on the article I read titled “Functional Testing Tutorial“. Although this topic is a pretty broad topic, it will compliment my previous blog covering “What is non-functional testing?” Functional testing is when each function of an application is tested and verified that it satisfies the specifications and requirements. Most functional testing is black box testing and does not deal with any of the actual code. To test all of the functions in an application testers provide input to the function and verify the output with what is expected. This is carried out either by manual effort or automated testing.

Aside from testing each individual function, functional testing also checks system usability, system accessibility, and error conditions. Basically a user should not have difficulty using a system and in an error condition, the correct error message or procedure should be followed. In order to carry out functional testing there is a basic testing process that must be followed. First identify the test data or input, then calculate the expected outcome and values, execute your test cases, and last conduct a comparative analysis to make sure all expected outputs match the actual outputs.

The article moves on to compare functional and non-functional testing to give an idea when each is used. Functional testing is usually done first and can be manual or automated. The testing coverage is used to ensure business requirements are met based on inputs. Functional testing is more a description on what the product or system actually does. There are a lot of ways to implement functional testing for a system. Some of the most popular types are Unit Testing, Smoke Testing, Sanity Testing, Integration Testing, White Box Testing, Black Box Testing, User Acceptance Testing, and Regression Testing. A few of the popular tools used to execute these tests include Selenium, Junit, and QTP.

After reading this article I’m confident I’ll be able to classify a type of testing between functional and non-functional. The article didn’t go too specific into the execution of functional testing but that’s because there are just too many types to generalize the implementation. When I want to actually execute and implement functional testing I’ll have to read more in depth into one specific type in order to actually test a system. I think the most important concept of functional testing is to remember that the business requirements are most important. That being said it will be important to make sure the business requirements are fully understood through the development cycle to ensure proper test coverage.


From the blog CS@Worcester – Software Development Blog by dcafferky and used with permission of the author. All other rights reserved by the author.

Alpha vs Beta Testing

For this week’s blog I chose the article titled “Alpha Testing vs Beta Testing.” I chose this article because it covers two types of testing I haven’t read too much about. I also like the comparison type so I can see different situations why I might choose one over the other.

To start, alpha testing is a type of acceptance testing. It’s used to identify all the possible issues in a product before it gets released to users. The idea of this type of testing is to simulate real users by using blackbox and whitebox methods. The article mentions this type of testing is usually done by internal employees in a lab type environment. The overall goal is perform tasks that the typical user will be doing frequently. This testing is done near the end of the software development cycle but before beta testing if beta testing is being done.

Beta Testing is another form of acceptance testing done by real users in a real environment. It’s mainly used to gather feedback and limit product risks before the product gets released to anyone and not just a small testing group. This would be the last type of testing before a final product gets shipped to customers.

While beta testing and alpha testing share some similarities there are some key differences. The first being that in beta testing reliability, security, and robustness are checked which is not true for alpha testing. Another difference is how issues are addressed. For alpha testing it’s not uncommon to make code changes before an official release. With beta testing code changes will usually be planned for future versions after the product is released.  Lastly, with beta testing you are getting feedback from real users and this will usually be a more accurate analysis of how a product will perform over alpha testing.

For larger product firms, a product release will usually incorporate both alpha and beta testing. Below is a typical flow chart of the process.

alpha.png

To clarify, the pre alpha phase would be a prototype where not all features have been completed and the software has not been officially published. The release candidate phase is when any bug fixes are small feedback based changes have been made.

In conclusion, this article was really great comparing alpha and beta testing. It goes into more details with some advantages and disadvantages of the two as well as some entry and exit criteria however this goes beyond the scope of this blog. After reading about these two types of testing I would definitely want to include both in a product release strategy however I would choose beta testing if I could only choose one. I think real user feedback in a real time and natural environment is most valuable before releasing. At the same time it would be easy to argue that terrible feedback in a beta testing cycle could be prevented with prior alpha testing.

From the blog CS@Worcester – Software Development Blog by dcafferky and used with permission of the author. All other rights reserved by the author.

Pipe and Filter Architecture

For this week’s blog I chose an article on the pipe and filter architecture appropriately titled “Pipe-And-Filter.” I chose this article after googling what some of the most common software architectures are and learning that pipe and filter was commonly implemented. This article seemed like a good length with straightforward information and diagrams to help with understanding the material so that is what I chose it.

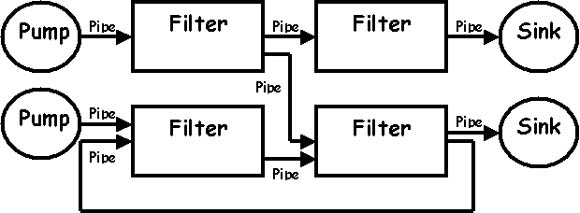
To begin, this architecture consists of any number of components referred to as filters due to the fact that they filter data before passing it through connectors called pipes to other components. All of the filters work at the same time and this is usually implemented in simpler sequences although is not limited to that.

pipe1

Above is a simple diagram to show how the architecture flows. It’s important to know that filters can transform the input data from any number of pipes. The pipes pass data between filters however it is unidirectional implemented by a buffer until the downstream filter can process it. The pump is where the data originates such as a text file or I/O device. Lastly the sink is the end target of the transformed data such as a file, database, or output to a screen.

One good example of this architecture would be a Unix program. One program’s output can piped into another program’s input.

pipe2

Above is a more complex diagram to show how pipe and filter can start to become complex. Different sources or pumps can interconnect data into their respective streams. An application that uses this architecture will typically link all the components together and then spawn a thread for each filter to run in.

One interesting functionality of this pattern is a recursive filter technique. This is implemented by having a filter inside of another filter.

One common issue with this type of architecture concerns what kind of data types are allowed in a certain pipe. If only one type is allowed, filters need to parse for this which can slow an application down. You may also limit yourself to what pipes can connect to which filters.

After reading this article I have a good idea of pipe and filters main concepts. One thing I wished the article had discussed more in detail would be specific implementations of this architecture. I can’t directly see how I would need to use these concepts in any of the coding I’ve done so far. I can see a general use for this model for an application that takes in a lot of raw data and needs to output it in a useful format for making business decisions. In summary this was a well written article but I need to do some further reading on implementation examples.

From the blog CS@Worcester – Software Development Blog by dcafferky and used with permission of the author. All other rights reserved by the author.

Black Box vs. White Box vs. Grey Box

For this post I chose an article called “Black box, grey box, white box testing: what differences?” I chose this article because grey box is something I haven’t seen explained and I thought it would be a good idea to get the concepts of all three types explained to use as a reference down the road.

The first type explained is black box testing. This is described as testing having a user profile. You are testing for functionality and that a system does what it is supposed to do but not how to do it. In other words, the internals or code of a system is irrelevant to your tests. The priority is testing user paths and that all the system behaves correctly on each path. Some benefits of black box testing are that the tests are usually simple to create which also makes them quicker to create. Drawbacks include missing vulnerabilities in underlying code as well as redundancy if there is already other testing being done.

The next type of testing is white box. This would be testing having a developer profile. You have access to a systems internal processes and code and it’s important to understand that code. Things white box testing is aimed at checking is data flow, handling of errors/exceptions, and resource dependencies. Advantages of white box testing include optimizing a system and complete or near to complete code coverage. Disadvantages include complexity, takes a lot of time, and it can get expensive.

The last type of testing is grey box testing. As the name suggests it is a mixture of both black and white box testing. The tester will be checking for functionality with some knowledge of the internal system however still does not have access to source code. One advantage of grey box testing is impartiality, basically a line still exists between tester and developer role. Another advantage is more intelligent testing. By knowing the some of underlying system you can target your testing to better cover the functionality. The main disadvantage that still exists is the lack of source code access. Without this you cannot provide complete coverage of testing.

After reading the article it seems going with only one of these types of testing would never really be enough. I would argue that white box testing seems to be the most important. Being able to actually test a system internally and cover your code is extremely important. Without access to the code, a functionality that fails testing is almost useless as it could be many things that caused it to fail. I feel like the description of grey box testing is a little vague. While the tester may not have access to the source code, I’m unsure as to how much they actually know. In conclusion this was a good refresher on black and white box testing as well as a good intro to grey box testing.


From the blog CS@Worcester – Software Development Blog by dcafferky and used with permission of the author. All other rights reserved by the author.

Intro to Layered Pattern

For this post I chose the article “Software Architecture Patterns” which focuses on the layered architecture pattern. I chose this article because up to this point I’d only focused on design patterns so I wanted to shift my direction. After some googling it seems the layered pattern is one of the most common so I thought it’d be a good way to move into software architecture.

At the most basic understanding, the layered pattern consists of components organized into horizontal layers with each layer having a specific role in an application. The most common layers you will find across standard applications include presentation, business, persistence, and database. Each of the layers forms an abstraction around the work that it does. That means for example the presentation layer just needs to be able to display data in a correct format, it doesn’t need to know how to get that data. A useful feature that goes along with this idea is called separation of concerns. The components in a specific layer only deal with logic that pertains to their layer.

One of the key concepts to the layered pattern is having open and closed layers. If a layer is “closed” this means any requests must move to the layer directly below it. An open layer allows a request to bypass that layer and move to the next. The idea of isolated layers decreases dependency in an application and allows you to make a change to one layer without necessarily needing to change all the layers. This makes any refactoring a lot easier to do.

The layered pattern is a good starting pattern for any general application. One thing to avoid when using this pattern is referred to as the sink-hole anti pattern. This is when you have a lot of requests passing through layers with little to no processing. A good rule to keep in mind is the 80/20 rule where only 20% of requests are simple pass throughs. In an overall rating of this pattern, it is great for ease of deployment and testability and not so great for high performance and scalability.

After reading this article I think the layered design is pretty interesting. For applications with sensitive information it seems like this would be a good way to control requests and protect data. I also like the idea that each layer is typically independent of the others. This makes changing code and functionality much easier as you should only need to worry about components in the layer being changed. Moving forward I’m not sure if I will use the layered pattern very soon but it has got me started thinking on how to approach a software project. Before this article I have not given much thought to architecture. I think this article gave me a solid intro in what I can expect in further architecture readings.

From the blog CS@Worcester – Software Development Blog by dcafferky and used with permission of the author. All other rights reserved by the author.

Non-Functional Testing

For this post I chose the article “What is Non Functional Testing?” on Software Testing Help’s website. I chose this article because I like the content on this site that I have read previously and I often forget the difference between functional and non-functional testing. I’m hoping by covering it in a blog it will help commit it to memory and also give me my own quick reference if I need it in the future.

To start it’s important to remember the two broadest types of testing are functional and non-functional. Non-functional testing in a general sense addresses things like application performance under normal circumstances, the security of an application, disaster recovery of an application, and a lot more. These types of testing are just as important as meeting requirement of any application. They are what contribute to the quality of an application.

To follow are the most popular non-functional techniques as a quick reference and a quick explanation:

  1. Performance Testing: Overall performance of a system. (meets expected response time)
  2. Load Testing: System performance under normal and expected conditions. (test concurrent users)
  3. Stress testing: System performance when it’s low on resources. (low memory or disk space, max out)
  4. Volume Testing: Behavior with large amounts of data. (Max database out and query, check limit of data failure)
  5. Usability Testing: Evaluate system for human use. (ease of use, correct/expected outputs)
  6. User Interface Testing: Evaluate GUI. (Consistent for its look, easy to use, page traversals)
  7. Compatibility Testing: Checks if application can be used with other configurations. (different browsers)
  8. Recovery Testing: Evaluates for proper termination and data recovery after failure. (loss of power, invalid pointer)
  9. Instability Testing: Evaluates install/uninstall success. (correct system components, updating existing installation)
  10. Documentation Testing: Evaluates docs and user manuals. (document availability, accuracy)

In conclusion this covers a good portion of the main types of non-functional testing. This will really just serve as a quick reference or lookup to remind me of the different types of testing that categorize as non-functional. This isn’t changing the way I code but it has reminded me the importance of non-functional testing. Just meeting the requirements during the development of an application does not ensure you will output something with high quality. I would argue that non-functional testing responsibility falls more on the developers to know what to do more than the client. A client requesting requirements for an application likely will not even think of a lot of the testing types mentioned above. I think it’s important for the developers to openly communicate with clients about non-functional testing so that they can come up with the best testing plan together.

Overall this was another good article on Software Testing Help. It was exactly the details I needed and nothing more. Looking ahead I might as well do a similar blog on functional testing to complete my own testing type’s reference.

From the blog CS@Worcester – Software Development Blog by dcafferky and used with permission of the author. All other rights reserved by the author.

Singleton Pattern Revisited

For this post I chose the article “Singleton Design Pattern” written by the team at Source Making. I chose this article for two reasons: 1) Source Making is a good resource that covers topics such as design patterns, antipatterns, UML, and refactoring. 2) While we covered the Singleton design pattern in class, I felt like I needed to take a look at it again from another source.

To start, the article touches on what the intent of the Singleton pattern is. First, it ensures that there is only once instance of a class with a global point of access. Second, it uses encapsulation in the sense of initializing on first use.

To use the Singleton pattern you need to make the single instance objects class be able to create, initialize, and enforce. The instance itself must be a private and static type. Next you need a function that encapsulates the initialization and provides access to the instance. This function also needs to be declared public static. When a user needs to reference the single instance they will call the accessor function (getter).

Additionally there are three criteria which must be met:

  1. Ownership of the single instance can’t be reasonably assigned.
  2. Lazy initialization is desirable. (delayed creation)
  3. Global access is not otherwise provided for.

The author makes some additional remarks about the Singleton pattern. He mentions that this pattern is one of the most widely misused patterns among developers. One of the most common mistakes is attempting to replace global variables with Singletons. One advantage he mentions is that you can be absolutely sure that you have only one instance however he also points out that most of the time it is unnecessary. He also advises to always find the right balance of exposure and protection for an object to allow for flexibility. Using a Singleton however can lead to not thinking carefully about an objects visibility.

After reading the article I definitely have a better understanding of how the Singleton pattern works and why I would use it. After reviewing the Duck Simulator slides from class and seeing some additional information in this article, I have a good grasp on the concept now. I think the most interesting concept of the Singleton pattern is the concept of lazy initialization. I like the idea of no instance being created until it is actually needed. After reading this article I would give it a “C” for content. Had I not been exposed to the Singleton pattern in class, this article would not have been much use to me. But because I already had a basic idea of the pattern, the article just helped reinforce the concepts and provide some more examples.

From the blog CS@Worcester – Software Development Blog by dcafferky and used with permission of the author. All other rights reserved by the author.