Author Archives: csrenz

Test Case VS Test Scenario

For this week’s blog, I chose to read the Test Scenario VS Test Case from the softwaretestinghelp website.

Test Case – a concept which provides detailed information on what to test, steps to be taken and what the expected result would be. It is more about documenting details. It’s important when testing is in another place than the development team. Easier to get the devs and QA team in sync. There is only a one-time documentation of all the test cases and can be easily tracked in the future. Test cases are also helpful to when reporting bugs. Testers have the reference to the case ID’s and do not require mentioning every detail of the case. It is also helpful to new testers since all the test are already laid out.  But it is time and money consuming as it requires more resources to detail everything.

Test Scenarios – a concept which provides a one-line information about what to test. It is more about thinking and discussions rather than listing everything. It is more important when you have a time constraint and most members understand what is happening.  It is better because it can save time and makes everybody think about what to test. A good test coverage can be achieved and it reduces repeatability.  But, if created by a specific reviewer or other users, they might not be in sync and cause confusions. This type of test also requires more discussion and team efforts.

I think this is a great read as it talks about the standard or old way of testing against the preferred testing by the new generation of software testing community. Test Case is the standard way of testing systems. While using a Test Scenario is new, it offers easier documentation when it comes to testing (assuming everybody understands what the system does). Although it seems like it is not beneficial since most companies change employees here and there, I can see test scenarios saving a lot of time just in the documentation. Learning about it opens up a lot of possibility in the way we think about testing but then again, there are already automated testing so test scenarios might not offer much in the future.

From the blog CS@Worcester – Computer Science by csrenz and used with permission of the author. All other rights reserved by the author.

Integration Testing

In this week’s blog, I will be talking about Integration Testing from Software Testing Fundamentals.

The International Software Testing Qualifications Board definition:  Integration Testing is a test performed to expose defects in the interfaces and in the interactions between integrated components or systems.

Integration testing is a level of testing where units are tested as a group making sure they all work when put together. It is performed after Unit Testing and before System Testing. Developer themselves or independent testers are responsible for performing Integration Testing. There are different kind of approaches to Integration Testing:

  • Big Bang is an approach where all or most of the units are combined together to be tested in one go when the testing team receives the entire software bundle. Kind of like System Testing but it only tests the interactions between units and not the entire system.
  • Top Down is an approach where top-level units are tested first before the lower level ones.  This approach is taken when the development of the software was also from top to bottom.
  • Bottom Up it is basically like Top Down instead you go from the bottom to the top.
  • Sandwich/Hybrid is a combination of Top Down and Bottom Up.

I picked to read this blog because it offers useful analogies to make it easier to understand. There was also a gif at the bottom of the blog where it shows what happens when you do not do an Integration Testing. There were also tips on how to do Integration Testing properly. One of them was to “ensure that you have a proper Detail Design document where interactions between each unit are clearly defined. In fact, you will not be able to perform Integration Testing without this information.” I think that was pretty much the main point of that you have to take from Integration Testing. That you need to know how the system works or the design of it, else Integration Testing would not make any sense to do. Another take on from this blog is to make sure that every unit is unit tested before you start Integration Testing.

Lack of Integration Gif:

https://giphy.com/embed/3o7rbPDRHIHwbmcOByvia GIPHY


From the blog cs-wsu – Computer Science by csrenz and used with permission of the author. All other rights reserved by the author.

Dynamic and Static Testing

This week’s post is going to be about Dynamic and Static testing from testbytes. Static and Dynamic testing are the two major methods of software testing.

Static Testing is done manually or with a set of tools. This type of testing is useful in finding flaws. It is mainly done in the early stages of the development cycle, also referred to as verification testing. Specifications, design documents, source code, test plans, test scripts, test cases, and web content, all have to pass the static testing. Some advantages of Static Testing are: identifying flaws in the code since it is done in the early stage of development, the testing is conducted by trained software developers, and it is a fast and easy way to find and fix errors. Some disadvantage to using it are:  it demands a great amount of time when you’re doing it manually, not all automated tool works with the language, and that automated tools only scans the code.

Dynamic Testing is done when the code is executed and checks how the software performs in a run-time environment. This testing checks the functional behavior and performance of the system. The purpose of this testing is to ensure that the finished product is designed according to the specification given by the clients. It is also known as validation or execution testing. Some advantages to Dynamic Testing is that it identifies weak areas in a run-time environment and it can be applied to any application. Some disadvantages are: it is not easy to find a trained professional for dynamic testing, and it is difficult to trace vulnerability in the code and would take longer to fix the problem.


At first, I thought that Static and Dynamic testing are different kinds of testing but it’s actually more like a primary and secondary test. I really like this blog because it lists the advantages and disadvantages, for me it makes it easier to understand if the layout is like that. Also, they mentioned that eighty-five percent of flaws of the software can be detected during Static Testing, I think that is really interesting. You would’ve thought that most of the flaws in the software would be found in the Dynamic Testing where they test the end product.

From the blog CS@Worcester – Computer Science by csrenz and used with permission of the author. All other rights reserved by the author.

The Four Levels of Software Testing

This week’s blog is about the four levels of software testing.  There are four main levels of testing that needs to be done before a program is ready for use: unit testing, integration testing, system testing, and acceptance testing.

Unit Testing

Unit testing is the first round of testing. In Unit Testing, the program is assessed with the focus on specific units or components of the software to determine whether each of them is working correctly. A unit can be referred to as a function, an individual program or even a procedure. The white-box testing method is usually used to do this kind of job since it is based on the analysis of the internal structure of the system or component.

Integration Testing

Integration testing, on the other hand, allows you to combine all of the units within a program and can be tested as a group. It is designed to find interface defects between modules or functions. It is very useful because it measures how efficiently the units are running together.

System Testing

System testing is the test ran after the application is actually completed and tested. The goal of this test is to check whether the system met all the requirements and see if it meets the Quality Standards. This test is done by testers that were not part of the development team. It is performed in an environment that’s somewhat the same as production. System testing verifies that the application meets the technical, functional, and business requirements that were set by the customers.

Acceptance Testing

Acceptance testing is the final test. This test basically determines if the application is ready to be released. During this phase, the users test the systems to find out if the application meets the business’ needs. Once this is completed, the application is ready to be delivered to production.

I find this blog interesting because at first, it looks like a really simple process to create an application and put it out on production but there are actually different levels to it. This has changed the way I think about software development. Just thinking about the process of testing the application, I could already see it having a great importance in software development. Also, you could be moving back and forth on the different levels of testing when the specification changes.

From the blog CS@Worcester – Computer Science by csrenz and used with permission of the author. All other rights reserved by the author.

The Differences Between Black Box, White Box, and Gray Box Testing

For this week’s blog post, I chose this blog by Lucie Saunois. It talks about the differences between Black box, Grey box, and White box testing for software or applications.

Black Box Testing

Black box testing reviews only the functionalities of an application. Testers do not really know the internal structure of the application. Testers typically have a “user” profile. This method aims at checking if the final stage of the application works like its supposed to. Common things the tester would look for in a Black box testing are missing or incorrect functions, interface, performance, program initialization, and external database access errors. To do this test, each different user has their own scenario to test, and all functionalities must be tested.

White Box Testing

White box testing reviews the functionalities of an application as well as its internal structure.  All of the internal components of the application are tested through the source code. Testers have a “developer” profile and not a “user” profile unlike in Black box testing. White box testers need to have competence in programming since they need to understand the source code. It is mostly done in the developing stage of the application. Therefore, it allows them to test the data flow and the handling of exceptions and errors. Scenarios for this test are created by the testers based on the source code. Testers only check if the code produces the expected results.

Gray Box Testing

Gray box testing is a compilation of both Black and White box testing. Gray box testing tests both the functionalities and the function of an application. In this test, the testers know the functionalities and also the internal structure of the application, however, they do not have access to the source code.


This blog explaining the differences between each kind of testing is really easy to follow. The way they were describe was easy to understand. She also wrote about their benefits and drawbacks of each method of testing. I really find her examples interesting towards the end of the blog where she uses an analogy by comparing it to testing a car system. I think finding blogs like these would help anyone understand the different testing methods out there, it is simple but very informative.


From the blog CS@Worcester – Computer Science by csrenz and used with permission of the author. All other rights reserved by the author.

Model-Based Testing

This week’s blog is going to be about “The challenges and benefits of model-based testing” by Greg Sypolt.  In this blog, Greg talked about what model-based testing(MBT) is, how it works, how model-based testing differ from other kinds of testing, the challenges that are faced when using model-based testing, and the benefits of using it. Model-based testing is a kind of test where test cases are automatically generated from models. It focuses on the models based on the system requirements or specifications. The model-based testing works by generating tests automatically from models created by the software developers and testers, then it runs assertions for both generation of tests and execution, and reports the testing results. Model-based testing is different because it is more in the software development process than a scripting task. It focuses more on building a testable application and creating models based on user’s perspectives.  There are many challenges to address before you can use model-based testing to its full benefits. Software developers and testers have to be trained on model-based testing. The tool has to be scalable and be able to handle complex models and provide a reliable test coverage. Fine-tuning the MBT tool could also be challenging. However, it will offset the long-term goal of reduction of test maintenance. Test coverage is guaranteed and there is zero test suite maintenance.

I think this blog post is very helpful in introducing model-based testing. It is fairly brief but still shows you the idea behind model-based testing. This blog post is really interesting since model-based testing is a move away from the traditional testing. Instead of having a set of particular tests with defined test objectives and deliverables that should be achieved, model-based testing is done from models and not from the source code. A thought-provoking section of the blog for me is where he talked about the challenges of model-based testing. Greg said that model-based testing requires a shift in mindset and culture in how to develop and test applications. It made me think of how different it really is from the traditional way of testing. Learning about model-based testing changed the way I think about software testing since it is an approach that I haven’t really seen before. Now, I wonder in the future, what else kind of testing we are going to come up with.

From the blog CS@Worcester – Computer Science by csrenz and used with permission of the author. All other rights reserved by the author.

Tips on writing a better test in JUnit

Writing Better Tests With JUnit by Tobias Goeschel

For this week’s blog, I chose “Writing Better Tests With JUnit” by Tobias Goeschel. The blog contains different tips and suggestions on how to write a better test in JUnit. It also emphasized the idea that having a readable test code is at least as important as writing a readable production code and that the focus of the test must be on behavior instead of implementation. Another tip was to group tests by context. Grouping the tests by context would help us organize and focus on behaviors that should be grouped together. It would also help to understand the behavior more quickly and easily.  Tobias also talked about enforcing the Single Assertion Rule. The rule was to use a single assertion if possible, but not it does necessarily mean that there could only be one assertion called, there are times when you would want to have multiple assertions. He also emphasized choosing meaningful names for the tests, it would be easier to know what the test is testing and eliminate unnecessary comments. The blog also talked about using other dependency injection frameworks like Spring to keep the tests fast and to avoid overly complex configurations. Lastly, he talked about avoiding test inheritance if possible since navigating the class hierarchy to get an idea of what is happening would make the test harder to understand.

I really find this blog useful. It stresses the idea of test behavior, not implementation. The blog also has some code in it where you can see how the tests are implemented. There are also different patterns that are useful when testing in the blog like the “Triple A” pattern which stands for “Arrange(preconditions and inputs)  Act(things happen, methods are tested)  Assert(see if the result was right)”.  The other thing that I thought was thought-provoking is the use of inheritance. He said that it should be avoided if possible but when I read his explanation, it makes so much sense not to use inheritance. The way he emphasized that tests are as important as production code changes the way I think about coding now. I feel like writing test cases before writing the actual code might be a better approach to writing software.

From the blog CS@Worcester – Computer Science by csrenz and used with permission of the author. All other rights reserved by the author.

Introduction CS-443

Renz here! This is just an introduction to CS-443.

From the blog cs-wsu – Computer Science by csrenz and used with permission of the author. All other rights reserved by the author.

The Decorator Design Pattern

What is the Decorator Design Pattern?

The Decorator pattern applies when there is a need to dynamically add as well as remove responsibilities to a class, and when the sub-classing would be impossible due to the large number of sub-classes that could result. Also, use it when you want the capabilities of inheritance with sub-classes, but you need to add functionality at run time.

Intent

  • Attach additional responsibilities to an object dynamically.
  • Decorators provide a flexible alternative rather than making many subclasses to extend functionality.
  • Client-specified embellishment of a core object by recursively wrapping it.
  • Wrapping a gift, putting it in a box, and wrapping the box.

Discussion

Say, you are working on a UI and you want to add borders and scroll bars to your windows. You could define the inheritance like… Window class interface, then you have concrete objects WindowWith_Scrollbar, WindowWith_Border etc..  This type of architecture creates a lot of subclasses and not much room for modularity.  It will be hard to change the concrete classes if you want to add some additional functions to them.

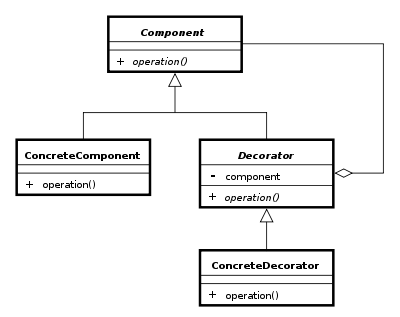
The Decorator pattern suggests giving the client the ability to choose what features they want.  There might be a problem of chaining features together to produce custom objects as well. The solution to such problem is to encapsulate the original object inside an abstract wrapper interface. Both the decorator objects and the core object will inherit from the abstract interface. Then the interface uses recursive composition to allow an unlimited number of decorator to be added to each core object.  One thing to note is that the interface must remain constant when successive layers are specified using the decorator pattern.

The decorator pattern hides the core components of the objects inside the decorator object. Trying to access the core object directly would be a problem.

UML Diagram

400px-Decorator_UML_class_diagram.svg


Example

One example is making a pizza ordering system. You can use the decorator pattern to implement a simple pizza ordering system by creating a pizza(component) and a plain pizza(Concrete Component) that is just the base or dough. Then the decoratorPizza(Decorator) which has the plain pizza and other functions. Lastly, the toppings(Concrete Decorators) for your pizza like: mozzarella, the sauce, pepperoni, etc.

In this example, you have an interface pizza and a plain dough. The decorator then adds the desired toppings to the pizza.


Conclusion

I chose this particular topic since we are creating a simple web app for scheduling classes. I thought that it was helpful since we might be adding pop up windows to our web app.

The Decorator Pattern is useful when you see yourself making something that is extensible and where you can interchangeably choose which components/functions you want on your object.  I think that with the decorator pattern, there is a lot of potential when using it. You could create something that has many functionality and is still easily changeable.

source: decorator pattern

From the blog cs-wsu – Computer Science by csrenz and used with permission of the author. All other rights reserved by the author.