Category Archives: Explanations

Converting a Project to Gradle

A few weeks ago, a few classmates of mine asked for some help with converting code to Gradle and I created a quick guide. I’d like to go through and create another guide with more detail.

Assumptions

  • You have Gradle installed.
  • You know which language you are using.

Instructions

The first step is to run gradle init in the project folder that you wish to convert to gradle. I would recommend if you’re unsure about the process or the settings you’ll use, just create an empty folder somewhere and practice creating a gradle project in that. Then, delete it.

Note that depending on the options you choose, you may be asked questions I do not cover here. Just do your best to figure out what it means and use the internet for research. Worst case, you can always modify the settings afterwards.

When you run gradle init, you will be asked some questions about your project. You simply type the number corresponding to the option you want and then press enter (or simply press enter without a number for the default option). In our classes, we always used libraries. If you have a main method, you’ll probably want application.

Next, it will ask you for the language you want to use. This is probably the simplest question. In our classes, we’ve used Java but you can use any of the displayed programming languages.

Next, is the build script DSL. If you don’t have a strong opinion on this, just use the default.

Similarly, next is the testing framework. Use whatever you’re comfortable with. In our classes, we’ve used JUnit Jupiter.

Next you can name the project anything you like.

This last step where it asks for source package for Java is a step where many people mess up. The default option is an undesired package name, since it will include capital letters. I recommend using a lowercase package name.

Now, you can open lib/build.gradle. You can remove the lines and comments for api and implementation. These are auto-generated, but not necessary. Next, if you plan on using GitLab’s ci, modify the testRuntimeOnly line. Notice how the testImplementation line has a version number following a colon. Modify the testRuntimeOnly line so it has the same version as the testImplementation. After these steps, my dependencies looked like this:

dependencies {
// Use JUnit Jupiter API for testing.
testImplementation 'org.junit.jupiter:junit-jupiter-api:5.6.2'

// Use JUnit Jupiter Engine for testing.
testRuntimeOnly 'org.junit.jupiter:junit-jupiter-engine:5.6.2'

}

Now, gradle will have created a gradle/lib, gradle/app, etc folder. Locate your package which will be a subdirectory of gradle/lib/src/main/java in my case. The main folder will contain your source files and the test folder will contain your tests. Move all of your source files into main/PACKAGE_NAME and move all of your tests into test/PACKAGE_NAME. You can delete the files gradle generated for you.Then, if you’re using java, you’ll need to go into each java file and add a package declaration. Make sure its the first line and that there is only one. It should look like:

package PACKAGE_NAME;

Where PACKAGE_NAME is replaced with the package name. You can then run tests with the gradle test command. If you want to have GitLab run your tests for you when you push a new commit, download .gitlab-ci.yml (ideally the newest version so not from this link) and add it to your repository. Now, things should hopefully work.

Closing Comments

It’s taken us a while to become familiar with Gradle so I think it was worth me writing all of this down (albeit hastily) to help other people in the future, and especially to help me remember it if I ever use Gradle again in the future.

From the blog CS@Worcester – The Introspective Thinker by David MacDonald and used with permission of the author. All other rights reserved by the author.

Creating a Transpiler

A transpiler is a program that converts code from one programming language to another programming language. This is comparable to a compiler, which is a transpiler that converts into machine code. It is also related to an interpreter, which behaves similarly, except rather than writing new code, it performs the code.

In my work on the Sea programming language I’m making, I took a long time writing a custom system for transpiling. However, while it succeeds at managing indentation pretty well, it makes actually transpiling statements much more challenging. So, recently I’ve gone back to the drawing board and have decided to pursue the classic model. If it ain’t broke, don’t fix it.

I’m working off of David Callanan’s Interpreter Tutorial. While it’s a very useful tutorial, the code is admittedly pretty poor, as it contains a few files with hundreds of lines. I’m also using Python exceptions to carry errors, since as far as I’m aware, Python has one of the safest exception systems (unlike C++). I can safely catch and handle exceptions to create useful messages for the user. The tutorial, on the other hand, is manually passing around errors from function to function. That said, the explanations are decent and it is a very useful tutorial. I’ll just have to make a lot of modifications and refactoring after each episode in the tutorial. That said, let’s go over how a transpiler works fundamentally:

The Process

The first step in transpilation is reading the source file. The lexer goes character by character and matches them to a set of predefined tokens. These tokens define a significant part of the syntax of a language. If it doesn’t recognize symbols, it can give an error that alerts the programmer. If there aren’t any errors, the lexer will go through the entire file (or files) and create a list of these matched tokens. The order of the list encodes the order that elements appeared in the file. Empty space and otherwise meaningless syntax symbols are not passed on.

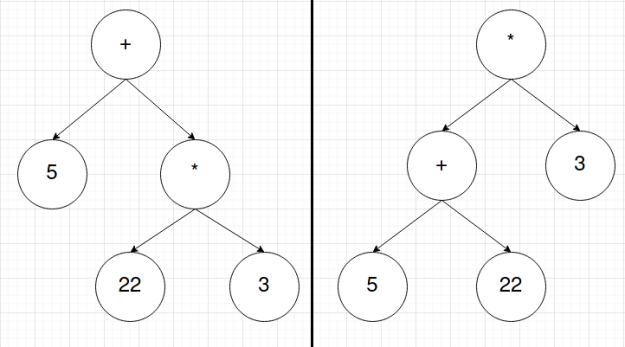
Next, the list of tokens is sent to the parser. The parser will then go through the list of tokens and create an Abstract Syntax Tree (AST). This is a tree of tokens whose structure encodes the order of operations of the language’s syntax. In this stage, the order of the list is lost; however, that order isn’t important. What matters is in what order tokens should be. For instance, the list of tokens for 5+22*3 might look something like [INT:5, PLUS, INT:22, MUL, INT:3] and the list of tokens for (5+22)*3 might look like [LPAREN, INT:5, PLUS, INT:22, RPAREN, MUL, INT:3]. The ASTs for these token lists will look something like this respectively:

Created on https://app.diagrams.net/

Lastly, you then traverse the tree using depth-first-search (DFS), or more specifically, Preorder Traversal of the tree. This means we start at the root node and we the work our way down the left side and then down the right side. This is incredibly simple to implement using recursion. Each new node you check can be treated as the root to a new tree where you can then proceed to repeat the search. This occurs until the entire tree is traversed.

In this final stage, this is also where transpilers, compilers, and interpreters differ. Until now, the same code could be used for all three. At this point, if you want a transpiler, you use the AST to write new code. If you want a compiler, you use the AST to write machine code. If you want an interpreter, you use the AST to run the code. Notice this is why there is such a performance benefit to using a compiler over an interpreter. Every time you interpret code, assuming there is no caching system in place, the interpreter has to recreate the entire token list and AST. Once you compile code, it is ready to be run again and again. The problem then comes from compiled code potentially being more complicated for higher-level language features, and thus making it a pain to write a new compiler for every CPU architecture, due to different architectures using different machine instructions.

From the blog CS@Worcester – The Introspective Thinker by David MacDonald and used with permission of the author. All other rights reserved by the author.