Category Archives: #git

CS448 Sprint 1 – Retrospective

This past Tuesday 2/27/2024 marked the conclusion of Sprint 1 for CS448 – Capstone. My team worked generally well together and we managed to complete all of our assigned tasks as well as some extra we added during the Sprint.

During this Sprint, I was involved in addressing a few different tasks and issues:

Issue spent most time on – “Create General and Pipeline” https://gitlab.com/LibreFoodPantry/client-solutions/theas-pantry/gitlab-profile/-/issues/10. This issue was in the “General” (#gitlab-profile) repository and consisted of three separate parts: 

  1. Moving settings from configuration files set up for integration with Dev Containers to .gitpod.yml extensions for GitPod integration.
  2. Refactoring the ‘commands’ folder to ‘bin’ to keep up with industry standard file naming. This includes updating script paths and .gitlab-ci.yaml environment variables to refer to bin.
  3. Adding the AlexJS linter to pipelines as well as the bin/lint.sh test script file.

Also, as a part of this issue I also implemented some minor typo and similar fixes so that all linters pass for a successful integration pipeline. Originally, these were three separate issues that were combined during the Sprint.

Issue #2 – “Familiarize ourselves with GuestInfoFrontend to Understand What Goes into CheckoutGuestFrontend”

https://gitlab.com/LibreFoodPantry/client-solutions/theas-pantry/inventorysystem/checkoutguestfrontend/-/issues/37. This issue included all team members and was intended to prepare each of us for Sprint 2, during which we intend on tackling some front-end Epics/issues in CheckoutGuestFrontend. So, I reviewed the GuestInfoFrontend repository structure and began to strategize a possible plan of action for building out CheckoutGuestFrontend.

As mentioned, my Team added additional tasks to our Sprint Backlog during the sprint as we found we would have extra time leftover after completing our original tasks. We chose to take on “Verifying that all Thea’s Pantry projects have the correct extensions, linters, and pipeline stages” for the Documentation and General repositories as we had already set up the settings and thereby familiarity with these repos. https://gitlab.com/LibreFoodPantry/client-solutions/theas-pantry/documentation/-/issues/10

https://gitlab.com/LibreFoodPantry/client-solutions/theas-pantry/gitlab-profile/-/issues/12

I created our new issues; we were able to complete the task for the Documentation repo as it was relatively simple in terms of not needing to make many changes/add linters, and make some progress in the General repo but pushed the issue into Sprint 2.

Reflecting back on the sprint, there were a few things that come to mind which worked really well – as a team we scheduled out our tasks well between standups and managed to have full attendance at each. Also, when we needed to add tasks we elected to stay within the repositories we had already been working in and were somewhat familiar with, which was a good choice as switching would have likely wasted time getting familiar with the new repo, as well as wasted time for another team who would have needed to become familiar with ours. 

However, we struggled somewhat with getting used to navigating the GitLab issue board, merges, child issues etc. and sometimes it felt like some team members were in different places where a solution may not have been fully communicated to all teammates. As a team, I feel we can improve on some of our internal communication and do a better job planning out our sprints and creating something of a road map, especially as we prepare for Sprint 2 which is considerably longer than the first. Personally, I think I can improve my time management and also be a bit more involved in the process of planning out our next Sprint and creating issues with relevant descriptions and linking to organize our tasks and get a better feel of how to use GitLab to its maximum potential.

From the blog CS@Worcester – Tech. Worth Talking About by jelbirt and used with permission of the author. All other rights reserved by the author.

Week 14 – Blog for both CS-343 AND CS-348

So for this blog, I wanted to find a topic that is applicable to both classes, so I wanted to look more into GitHub and the ways it functions compared to GitLab.

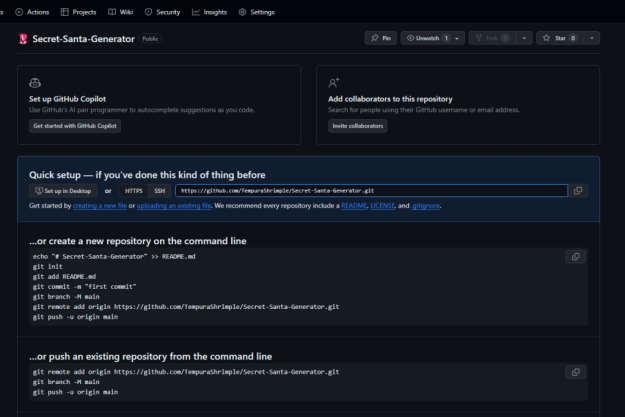
I duplicated by Secret Santa Generator repository from GitLab: https://gitlab.com/worcester/cs/cs-348-01-02-fall-2023/students/bpoole/secret-santa-generator and duplicated it in GitHub here: https://github.com/TempuraShrimple/Secret-Santa-Generator

To do this, I had to open up the local repo on my PC, create a new blank repository on GitHub, and run the following commands:

Once this was done, my repository was transferred over to GitHub successfully, without harming my GitLab repository in any way shape or form. Everything, including the history of the repository, was included with this transfer, which I think is really cool.

One difference I immediately noticed between GitHub and GitLab is that GitHub allows you to add a short description on the right-hand side of the repository, allowing a quick way to figure out what the program intends to do without having to look at the README.md. Obviously if you want more information, the README.md is very important in that case.

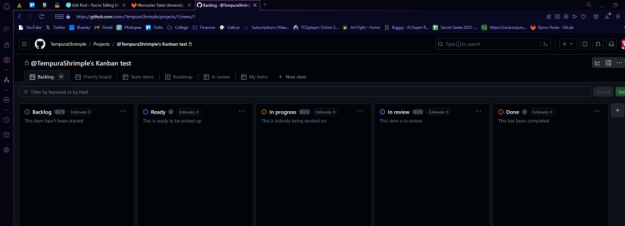
Both sites have a really good planning structure, with GitLabs’ issue boards, and GitHub’s project tab, which is structured very similar, but I think GitHub’s might be better as it allows you to choose from a lot of different templates like Kanban, Team retrospectives, and bug tracking, which I think is really cool. You’re also able to customize it as you please, so you’re able to set up a scrum structure like we did in GitLab for many of our projects. However, after looking into it, if you want to utilize Scrum, it seems GitLab is definitely structured better with preset pillars that are made with Scrum in mind. However, it’s a toss up on which would be better to utilize in this case for project management, in my own humble opinion.

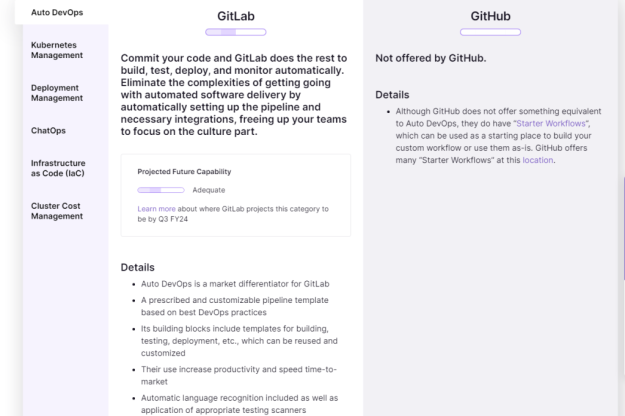
GitLab also has some advantages in the construction and development aspects of this comparison, as after looking into it, GitLab is able to automate releases and builds of code once they are ready to be done so, and GitHub doesn’t have this capability at all.

https://about.gitlab.com/competition/github/?stage=Configure

This seems extremely useful for a program that has set deadlines and not enough time to do these things during, say, a Sprint. It allows a lot more flexibility with the work being done in a repo and can allow a lot more efficiency and productivity. I will definitely look into this more later on when I start using this repo I cloned myself.

All in all, after looking things over, it seems like GitLab has a lot of additions that make it better over GitHub in all sorts of ways, and I’m surprised GitHub is used more than it. I should probably introduce my friend I’m working with on GitHub for his game engine for this if he ever develops a much bigger team, as many of the planning-oriented inclusions GitLab has would be extremely beneficial!

From the blog CS@Worcester – You're Telling Me A Shrimp Wrote This Code?! by tempurashrimple and used with permission of the author. All other rights reserved by the author.

Sabbatical Restart

Summer is over, and it’s time to really get to work on my Sabbatical project.

I did do some work this summer – I’ve read 3 of the books on my Sabbatical Reading List (and added a few more to the list) and I’ve finally de-lurked on the OpenMRS developer mailing list and in some of the online meetings, and I’ve made a decision to convert all of my course materials to Markdown (the better to track changes on GitHub – see a future post). But, it’s all been pretty passive.

So, the Friday before the Labor Day Weekend, I decided it was time to get back to the “develop code in OpenMRS” part of the project.

Since it had been a couple of months since I had set up  my development environment and tried to build the OpenMRS code, I decided that starting over from scratch (mostly) would not be a bad idea. Here is what I did:

  1. Read OpenMRS’s Getting Started as a Developer wiki page. I had already set up my OpenMRS ID, and signed up for the developer mailing list. I already had a GitHub account, as well.
  2. Read Development ProcessfromOpenMRS Developers’ Guide, and got the code:
    1. Fork openmrs-core repository.
    2. Clone my fork onto my computer.
    3. Set the OpenMRS repository as my upstream remote so that I can pull changes from the main project into my local working copy.
  3. Set up development environment based on Get Set Up from the OpenMRS Developers’ Guide. I chose the section on Manual Installation because Iwantto be able to develop code fortheOpenMRS core application. I followed the general outline of this section, but went about some of the software installations differently.
    1. Install MySQL. Because I am setting up my development environment on a Mac, I installed MySQL using Homebrew
    2. Install Maven using Homebrew
    3. Install Git using Homebrew (actually, I already had Git installed, but I made sure it was up-to-date)
    4. BuildtheOpenMRS code:
      cd openmrs-core
      maven clean install
    5. RuntheOpenMRS web app through the jetty server:
      cd webapp
      mvn jetty:run
    6. The first time you run the web app, it will take you through the Setup wizard
  4. Set up Eclipse. I already had Eclipse installed, but I made sure that my version was up-to-date. Eclipse had been updated to a new major version (Luna) since the last version I installed (Kepler). 1
  5. Git IDE Integration: Since EGit is already installed in current versions of Eclipse, and I’ve already forked and cloned the repository, I really only needed to do the To import as a Maven project section, to get the the projected into Eclipse.
  6. Build the OpenMRS code under Eclipse. I followed the steps in the following section:
    1. How to run the build
    2. How to run Junit
    3. How to Run Web Application

Now that I have a working environment that builds and runs, the next step is to choose a ticket to work on.

  1. In the past, I had just downloaded the newest version, and replaced what I already had installed. I figured that there must be a way to do the update without having to reinstall and reconfigure all of my plugins. It turns out that you can add the release’s repository to the Available Software Sites: http://wiki.eclipse.org/FAQ_How_do_I_upgrade_Eclipse%3F

From the blog On becoming an Eccentric Professor... » CS@Worcester by Karl R. Wurst and used with permission of the author. All other rights reserved by the author.

All Aboard the Coding Train!

cue Ozzy Osbourne laughter…

This blog is coming to you direct from Amtrak Northeast Regional Train 95, where Stoney Jackson and I are on our way to POSSE 2014 at Drexel University in Philadelphia, PA. This is becoming an annual tradition for us.

So, why is it called the Coding Train? Because we are spending the 5 hour train ride writing code!

When we did this for the first time last year, we worked on the code for the grading scripts that I had started writing in bash (https://github.com/kwurst/grading-scripts/tree/bash-version). Stoney started adding error checking, and then a Python version – neither of which he finished, but we learned a lot about how GitHub works for collaborative development.

This year we discussed a number of options for what project we would sprint on (after we spent a lot of time on professor-talk about curricula, and courses, and learning outcomes, and assessment) but we ended up back on the same project. This time our starting point was the Python conversion of the original scripts that I had started in December, and which I had just begun to refactor this month (https://github.com/kwurst/grading-scripts/tree/master).

Stoney has been doing some serious refactoring on the code, adding one major new feature: a JSON configuration file so that I don’t need 15 different scripts – just different configuration files to pass to a single, more general script. He’s also undertaken a major cleanup of the code, and added the project’s first unit test!

I, on the other hand, have been installing tools that Stoney suggested – git flow and git bash prompt, and in the process having to debug my Mac’s installation of Homebrew and cleaning up my .bashrc file (being completely ignored by my shell) and my .bash_profile file (full of lots of cruft from previous installs.)

Stoney has just pushed his branch, so now it’s time for me to pull it, and test it on some data on my computer. And we’re almost to Philadelphia, so just in time…

From the blog On becoming an Eccentric Professor... » CS@Worcester by Karl R. Wurst and used with permission of the author. All other rights reserved by the author.
Code Break: GitLab API Part 1 – Creating student accounts

Now that we have the CS Department’s GitLab server set up, and CS-140 Lab 1 is rewritten and tested using the new server, I’ve started to think about how to automate my interactions with the server. I had already  written some Bash scripts to interact with the Bitbucket server to get student code, convert it to PDF files, and put it back on the server after grading. Those scripts should still work fine with GitLab, since it’s just git on a different server.

One thing that I had not been able to automate previously is the step of issuing a pull request for students to merge my grading branch into their repository. This was not too much of an issue when there were only 6 students in the summer class (so only 3 repositories per lab assignment), but it was going to take more time with ~48 students in the spring class. While reading RSS feeds, I came across a post mentioning the GitLab API. This could be the solution to my problems! And there’s a Python module for the API! I had already been writing Python scripts to make my grading easier, and had been starting to rewrite my Bash scripts in Python.

I started playing with the GitLab API in Python, and had managed to create a merge request (GitLab’s term for pull request.) I had also noticed that you could create GitLab accounts through the API. This seemed like something I should pursue – creating ~48 accounts per semester seemed like something that should be automated.

Since I intended to post my code on Github, one of the first issues I had to address is how to avoid publishing my private token for GitLab. I could have put in a dummy token before pushing my code, but I would have to remember to do that before every time I committed my code. The solution to this issue was solved through the use of the .gitignore file. If I put my token into a file, then I could add a line to my .gitignore file so that it would not be committed.

# Private GitLab Token - not to be stored in repository #
########################################################
gitlabtoken.txt

Then I could just read the token out of the file, and use that string.

# Get my private GitLab token
# stored in a file so that I can .gitignore the file
token = open('gitlabtoken.txt').readline().strip()

After importing the pyapi-gitlab module, I could use that token, along with the server’s URL to create a GitLab object. Notice, that I had to turn ssl verification off, since we only have a self-signed certificate.

# Create a GitLab object
# For our server, verify_ssl has to be False, since we have a self-signed certificate
git = gitlab.Gitlab(GITLAB_URL, token, verify_ssl=False)

Creating a user account is pretty simple using the API:

# Create the account  
success = git.createuser(name, username, password, email)

The returned success value is a boolean — either it worked, or it failed (but you can’t tell why…).

One thing that’s a bit odd about the createuser call, is that you have set a password for the user, but the notification email to the doesn’t include the password. (If you create a user account from the web interface, it generates a random password, includes it in the notification email to the user, and requires the user to change their password when first logging in.) And, the password you set doesn’t seem to work either!

So, I’m just telling the students that they should use the “Forgot Password” link to have a password reset email sent to them, and then proceed from there. (If this is ever fixed, I’ll have to generated a random password.)

Getting the class list as a CSV file from the Blackboard Grade Center is pretty easy, and the first three rows contain the student’s last name, first name, and username. I can use those three strings to generate the name, username, and email needed for the createuser API call.

The only challenge with processing the CSV file is that Blackboard puts some strange character at the beginning of the file, so the file has to be opened with utf-8 encoding. (And the header line needs to be thrown away.)

The last thing I wanted to add is a way to have optional verbose output, so that I could see if the user creation was working. (I decided that it should always notify the user if the account creation failed.)  To do this I had to learn two new things about Python: how to parse arguments1, and how to send output to stderr.

I used the argparse module:

import argparse
# Set up to parse arguments
parser = argparse.ArgumentParser()
parser.add_argument('filename', help='Blackboard CSV filename with user information')
parser.add_argument('-v', '--verbose', help='increase output verbosity', action='store_true')
args = parser.parse_args()

and used the verbose argument to determine what to print:

if not success:
    sys.stderr.write('Failed to create acccount for: '+name+ ', '+username+', '+email+'\n') 
elif args.verbose:
    sys.stderr.write('Created account for: '+name+', '+username+', '+email+'\n')

Full code is on Github here.

  1. I already knew how to do simple argument parsing, but I wanted to learn how to deal with optional arguments.

From the blog On becoming an Eccentric Professor... » CS@Worcester by Karl R. Wurst and used with permission of the author. All other rights reserved by the author.
Catching Up on GIT

Howdy all,

Luckily Jon and I have been working internships all summer using some sort of variation of a Version Control System.  I guess I didn’t learn as much as I thought in 401 for GIT as I really needed.  My git-foo has improved significantly (Jon’s is still way above mine, though. )  Right now I’m working on my james-dev branch (at least the one I push to) and usually branch when I’m trying something new.  I’m really digging the issue tracker but, I think one day this week I am going to take some time out, probably with Jon, and really get our Wiki in gear.

In other news, old news that I never mentioned, Joe was MIA for a while and I finally got in contact with him and he said he was too busy and couldn’t commit I emailed Karl about it but I never got a response, I’m sure he’s just enjoying summer.

From the blog jamescelona » WSU CS by jamescelona and used with permission of the author. All other rights reserved by the author.

The trickiness of using Git in an Eclipse project workspace

I know there is a Git plugin for Eclipse, but I prefer to do things the old school way with terminal commands. So when it came time to make sure my Eclipse project folder was being tracked by our remote repository on Github, I thought I could just clone our repository and then create a new Eclipse project in that same directory. Except Eclipse does not let you create a new project in a directory that already exists. And I wasn’t going to try to clone into a directory after it had already been populated by local Eclipse files; who knows what kind of problems that would have created.

If there is an elegant solution to this problem, I didn’t find it. I changed the name of the cloned directory, then created my Eclipse project using the original directory name now that it was unused and available. Then I moved all the Git files into the new directory, and deleted the now-empty one with the changed name. And everything works great.

From the blog Code Your Enthusiasm » WSU CS by Jon and used with permission of the author. All other rights reserved by the author.

Odd-sounding warning in Git is not a big deal

As I am preparing to make my first commits to our project, and I get bombarded with several of these warnings, one for every changed file:

warning: LF will be replaced by CRLF in res/layout/activity_main.xml.
The file will have its original line endings in your working directory.

I have no idea what this means. Luckily, Google had my answer here: LF stands for line feed, and is what Linux systems use to delineate newlines in files. CRLF stands for carriage return line feed, which is what Windows uses for newlines. That makes sense as I am working in Windows. It looks the impact of this change is pretty insignificant and the warnings can be disabled by entering the following in the Git shell:

git config core.autocrlf true

From the blog Code Your Enthusiasm » WSU CS by Jon and used with permission of the author. All other rights reserved by the author.

Using Git in Windows

With our GitHub repository ready, and now that my Android development environment has been setup, it was time to install Git so I can actually start working. Git is a Linux tool and all my previous Git experience has only been inside that environment. But luckily Git has been ported to Windows, so I can use Git on my Windows machine without having to run it inside a VM. There are several options for running Git in Windows, and first I chose msysgit, the official Git for Windows project. I then abandoned that in favor of the GitHub application, which promised seamless connection to the GitHub website, including automatic maintenance of SSH keys.

The GitHub app has a nice GUI interface, and seems to be very easy to use. But I honestly haven’t used it much–the app also installs a Git shell, which I vastly prefer to the GUI. The Git shell emulates a Linux terminal, inside a Windows command prompt. Several of Linux commands are emulated inside the shell, such as cp, mv, rm, ls, cd, and others. Tab completion is also implemented which is wonderful. The emulated commands are not as powerful as their real versions (for example, typing “ls” works, but my preferred “ls -lh” doesn’t), but it’s still great to have this option. You can even open text files for editing from within the command prompt– just type notepad instead of nano or gedit. Lastly, a hugely useful addition to this Windows implementation that isn’t even in the Linux original:  the prompt in the shell uses symbols to help you keep track of your added, modified, and removed files, and changes color depending on your commit status!

From the blog Code Your Enthusiasm » WSU CS by Jon and used with permission of the author. All other rights reserved by the author.

Organizing our GitHub repository

Our Android project will have an online repository hosted at GitHub. I’ve never used GitHub, though at work I use a local install of the similar Gitorious service. So far, we don’t have anything in the repo besides a GPL notice. The repository does have an integrated wiki that I have put some work into already. James and I discussed how to organize the repo and we decided we wanted to follow a professional approach that an actual project team working on commercial software might follow. Here is an excellent description of the model we will be using.

Basically, there will be four permanent branches. The first two branches, jon-dev and james-dev, are personal development branches that will hold snapshots of the project as we are working on it. We will keep our individual work separate in these branches so nothing one person does can affect the other. Here we also have the freedom to absolutely break the app while not affecting the snapshots in the next two branches. The code in these branches cannot be guaranteed to  build into a perfect working app, but that is to be expected because this is the entry point for brand new contributions.

The third branch, develop, is where James and I will merge our work from our individual branches after we have gotten our code working the way we want. Snapshots in the develop branch should build into a relatively stable app, similar to nightly builds in a major open source project, though bugs may still be present.

The fourth and final permanent branch, master, is reserved for major releases of the app. Once the code in the develop branch has enough features implemented, and has been tested thoroughly, it can be merged into the master branch and tagged as a milestone build. Apps build from code in the master branch should be considered stable and without major bugs.

We can also create temporary hotfix branches as we need to. For example, if a bug is discovered in the master branch, we can create a branch to fix the bug, merge it back into master after the fix has been tested, and then delete the temporary branch.

From the blog Code Your Enthusiasm » WSU CS by Jon and used with permission of the author. All other rights reserved by the author.