Category Archives: CS-343

State Design Pattern

            In keeping with my recent learning about Java Design Patterns, as outlined by the Gang of Four, I have recently been doing research on the State Design Pattern. I came across an extremely useful article which details the Design Pattern logic, implementation, upsides and downsides, as well as giving an overall evaluation. The article is titled “State Design Pattern in Java,” by Denis Szczukocki, and starts by explaining that the main usage for the State pattern is “to allow the object for changing its behavior without changing its class.” It is also cleaner than a project cluttered with if/else statements for controlling object behavior. The basis is that an object who’s behavior is dependent on a specific state can easily change states and therefore change behaviors without the creation of a new object and the classes responsible for this behavior will be “tightly coupled.” Within the pattern, there will be 2 essential classes and a number of extra classes dependent on the number of states required. The first is the context class. The context class delegates object behavior to the other class, the state class, but the context class is the one used by the client. The state class is usually an interface, with the concrete state classes implementing this interface and dictating behavior. The article gives the example of a package with 3 states: ordered, delivered, and received. There is a package class, which is the context class, and contains methods to move to the next/previous states and print the status as well. When an instance of the package class is created, really what happens is that an instance of the first state (ordered is created). When ready, the package object can move to the delivered state, and then the received state, all of which have different behaviors. The three behaviors in the PackageState interface common to all concrete states are next, previous, and printStatus, each which has a different behavior depending on the concrete class of the package. The article then notes that a possible downside to the State design pattern is that, “the state becomes hardcoded, which is a bad practice in general.” This taught me how to use the State Design Pattern and why it is good practice. I plan to use this in future projects when I can in order to practice, as well as to implement good project design practice. It is understandable and not terribly difficult to implement, so I know this can help me in my future work. 

Source: https://www.baeldung.com/java-state-design-pattern

From the blog CS@Worcester – Marcos Felipe's CS Blog by mfelipe98 and used with permission of the author. All other rights reserved by the author.

Software Frameworks

https://techterms.com/definition/framework

            The link above leads to a website article that explains what a software framework is while giving some examples. The two main reasons I chose to write about this topic is because of one, it’s listed as one of the topics to be covered in class and two, I’m not too familiar with the definition of a software framework. According to the article, a software framework is essentially a set of tools that act as a foundation for software developers. These may include preset classes, APIs, compilers, code libraries, and predefined functions among other things. Examples of software frameworks include Microsoft’s .NET framework, Android Application Framework for Android, Cocoa Touch for iOS, and Cocoa for Mac OS X.

            From the definition given, the practicality of a software framework seems pretty apparent to me. Rather than creating classes and functions from scratch that will most likely see reuse, set them together in a ready to use package in order to save time and effort. It’s similar to how someone would buy ingredients at the supermarket rather than making each one from scratch. I’d imagine that software frameworks also have the added benefit of increasing portability for software that uses a specific framework. Take for example my computer which has .NET framework on it. If I were to create a piece of software using .NET, then another machine which has a similar version of same framework would be able to run my software with no additional setup needed. To be fair this is only speculation on my part; I haven’t checked whether or not this is true yet. But then again, I remember having to install a newer version of .NET framework in order for my computer to run software correctly so I might be on the right line of thinking.

In the case of porting software to machines with different operating systems, I’m not sure what role frameworks would take. I am pretty confident that software frameworks aren’t limited by operating systems. One example being Java Collections Framework or JCF for short which, as far as I know, isn’t limited to an operating system like .NET is. When a difference of frameworks is a factor, I assume that a software developer would have to make up for a lack of a framework’s components in a machine in some way. And that’s on top of the usual changes needed for porting software between operating systems.

From the blog CS@Worcester – Rainiery's Blog by rainiery and used with permission of the author. All other rights reserved by the author.
Decorator Design Pattern

In this class we have learned Few design pattern and when you look at history of pattern there are several design pattern out there that I haven’t learned. Well today I am going to tack about Decorator design pattern where I am going to show you how I used it to make my code look professional. With Example. Let’s start with what is Decorator Design pattern and how can we implement it in code.

Decorator is a structural design pattern that lets you attach new behaviors to objects by placing these objects inside special wrapper objects that contain the behaviors. The intent is to attach a responsibility to an object at runtime. Sometimes we want to add a responsibility to an object A, not its whole class. … This can be done by wrapping A in another object that adds the responsibility. In other world clint has freedom to create object and then extend it by adding a varity of future to it. just like weapping a gift, putting it in a box and weapping the box.

What are success and failure of using this pattern? So let’s start with successes when you use this pattern in code extend an object’s behavior without making a new subclass., You can add or remove responsibilities from an object at runtime.,  also You can combine several behaviors by wrapping an object into multiple decorators. Now the failures so  It’s hard to remove a specific wrapper from the wrappers stack., The initial configuration code of layers might look pretty ugly.

now let me give you example of how I used it in code.this is just Class diagram. With Step by step about how to implement it.

Step 1: Create an interface FlyBehavior.java witch is blue print to the class which we will Decorate.

Step 2: Create concrete classes implementing the same interface. like FlyWithWings.java and FlyNoWay.java witch will create dynamically.

Step 3: Create abstract decorator class implementing the Shape interface like Duck.java witch contain refrence to interface.

step 4: Create concrete decorator class extending the Duck.java class. RedHeadDuck.java

Step 5: Use the RedHeadDuck to decorate DuckSimulator objects. witch will verigy the outPut.

Now how this pattern have connection with other pattern. Adapter changes the interface of an existing object, while Decorator enhances an object without changing its interface. Decorator lets you change the skin of an object, while Strategy lets you change the guts. Composite and Decorator have similar structure diagrams since both rely on recursive composition to organize an open-ended number of objects.

Reference:https://www.geeksforgeeks.org/the-decorator-pattern-set-2-introduction-and-design/

https://refactoring.guru/design-patterns/decorator

From the blog CS@Worcester – </electrons> by 3electrones and used with permission of the author. All other rights reserved by the author.

REFACTORING

As I was reading some articles, websites for my previous assignments, I came across the term refactoring a lot. However, that was not the only time seeing that as it is part of the course syllabus. I decided to learn more about refactoring and write something on it for my weekly blog post. After going through some resources, articles I finally settled on this blog post that talks about refactoring. The structure of this blog is made simple, easy to learn and understand especially for beginners and those new to the term. It also provides links to some terms, books and some other IDEs mentioned.

This blog defines refactoring as the process that involves editing and cleaning up previously written software codes without changing the function of the code at all. Blog talks about the importance of refactoring, reasons for refactoring and how to perform refactoring. It also provides some techniques on how to perform refactoring. Each technique is well explained and broken down into subtopics and/or steps with some diagrams provided. Also, blog talks about when refactoring is not needed, best practices for refactoring and general summary refactoring.

In this blog I learned that the basic purpose of refactoring is to make codes efficient and maintainable, reduce technical cost, improves readability, and help prevent future bugs. A term that I found interesting as I was reading about the importance of code refactoring is code rot. Further research from Wikipedia explained it as a software decay that is a slow deterioration of software quality over time leading to software becoming unusable or in need of upgrade. Refactoring is important as it help to avoid this code rot.

I also learn that the best time to refactor is before any update or additions to an existing code. This is so as it improves the quality of code and should be done in small steps as possible. Other practices include planning refactoring project and timeline carefully, testing frequently and involving Quality Assurance teams and striving to focus on progress.

I thought that refactoring is always needed especially dealing with very high coded software programs and systems, but I learned from this blog that refactoring is not needed when an application needs to be completely improved.

Some techniques of refactoring I learned are Red-Green Refactor, Refactoring by Abstraction, Composing and Simplifying methods. Before applying the Red-Green Refactor technique, there should first be consideration of what needs to be developed. These developments need to pass basic testing before improvements can be implemented. Refactoring by abstraction is used when there is a large amount of refactoring to be done. I learned that extraction, one of the processes in Composing method, involves breaking down of codes into smaller pieces to find and extract fragmentation. This code is then removed to a separate method and replaced by a call to a new method. This process also involves classes, interface and local variables.

I hope others find this blog useful as well.

https://www.altexsoft.com/blog/engineering/code-refactoring-best-practices-when-and-when-not-to-do-it/

From the blog CS@Worcester – GreenApple by afua3254 and used with permission of the author. All other rights reserved by the author.

More on Code Smells and Refactoring

Similar to how code and design smells were covered in class. I was interested in digging more into code smells and seeing how they influence development of code and how they can be rectified. I found that this would be a useful topic to further delve into because being able to pick up smells from your code will help prevent further mess in the future. To supplement my learning in this topic I got around to watching a seminar or conference video on code smells in java, which was hosted by Stanly Lau, a software development coach/mentor and also someone having experience of looking at companies code and giving advice on code smells and refactoring. In his seminar he basically went over code smells and refactoring techniques used to remove to code smells; in the seminar this is done by an example he goes over with the participants.

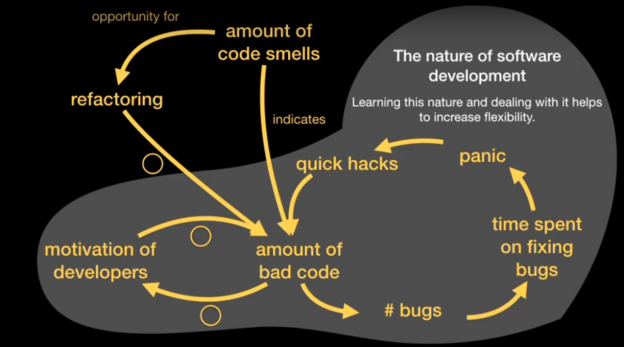
Besides going over code smells, what I really like from this seminar, was how he explains the significance of catching code smells in our code; he explains this via system diagrams to show that code smells are in a reinforcing loop relationship with bad code, and bad code is in a balancing loop with developer motivation; because of this we need to reduce bad code via refactoring. Refactoring is important because it instigates flexibility and helps to remove bad code or code smells. And flexibility is important in order to deal with change and he states “[i]f you cannot deal with change or how to improve with change easily, then you are probably in the wrong business”. The was a powerful I really appreciated, that change is inevitable in programming and in order to deal with change we must make our code more flexible, and that is where finding code smells and refactoring comes in.

I also enjoyed watching Stanly going over his example code of detecting and refactoring the code smells. His methodology appeared that he would look at the code and try to understand what is going on with the code (reading before coding) and then would see if he can detect any code smells such as comments, duplicated code, feature envy, long methods, primitive obsession, or magic number. Afterwards he would choose a means to refactor that code smell; the aspect of refactoring that he describes as ‘making small steps without breaking the code for too long’ is what I found helpful and will incorporate next time I am reviewing my code. Rather than just choosing a technique such as extraction method, I should be compartmentalizing steps to fix a problem and then work on improving on that refactoring. Overall it was a supplement for my learning in code smells as I was able to see a demonstration and also learn some more techniques use ide’s as well.

I attached the links to video as well as the diagram that explains effects of code smells in a developers environment below.

From the blog CS@Worcester – Will K Chan by celticcelery and used with permission of the author. All other rights reserved by the author.

Decorator Design Pattern

I decided that I wanted to talk a little more for the design patterns. This week I will present you another type. Decorator Design Pattern. Decorator design pattern is used to add additional features or behaviors to a particular instance of a class, while not modifying the other instances of same class.  It is a structural pattern, which provides a wrapper to the existing class. The reason why this pattern is in structural design patterns is because they show us how to glue different pieces of a system together in a flexible and extensible fashion. These patterns help us guarantee that when one of the parts changes, the entire application structure does not need to change.

What is the intent of this pattern? In software engineering, decorator design pattern is used to add additional features or behaviors to a particular instance of a class, while not modifying the other instances of same class. The intent of the this pattern is to provide a flexible alternative to sub-classing for extending functionality. This pattern is very important to understand because once you know the techniques of decorating, you’ll be able to give your (or someone else’s) objects new responsibilities without making any code changes to the underlying classes. You can attach new responsibility to an object dynamically. This is exactly the intended use of the decorator pattern. Per the Gang of Four – “Attach additional responsibilities to an object dynamically”.

When to use this pattern? Decorator Design Pattern has several requirement indicators to suggest that it is potential solution e.g.

  1. We have an object that requires the extension.
  2. Several objects that support the extension by “decoration”. Usually, those objects share a common interface, traits, or superclass, and sometimes, additional, intermediate super-classes .
  3. The decorated object (class or prototype instantiation), and the decorator objects have one or several common features. In order to ensure that functionality, the decorated object & the decorators have a common interface, traits, or class inheritance.

What are the benefit and disadvantages?

·  Sometimes we want to add responsibilities to individual objects, not to an entire class. Decorators provide a flexible alternative to subclassing for extending functionality.

·  Avoids feature-laden classes high up in the hierarchy.

·  A decorator and its component aren’t identical.

·  Lots of little objects.

There are a lot of examples and reading that you can do for this design. I would suggest you https://howtodoinjava.com/design-patterns/structural/decorator-design-pattern/ . This is a very good website where it gives details what the Decorator Pattern is and it gives you an example to understand it better. Also https://dzone.com/articles/decorator-design-pattern-in-java . What I like about this website is that it has all the important part in points. Touch only the important part without going to much in details for a beginner.

From the blog CS@Worcester – Tech, Guaranteed by mshkurti and used with permission of the author. All other rights reserved by the author.

UNIFIED MODELING LANGUAGE(UML)

Since we have been using and seeing a lot of UML diagrams in class and in previous assignments, I decided to look for some resources on UML diagrams to broaden my knowledge and understanding. I finally settled on this resource because it gives simplified tutorials on UML diagrams making it easy to understand especially for beginners. Each part is broken down into various topics and subtopics. Page gives useful resources on UML as well.

This resource gives a clear and simplified definition of UML diagram. It has various topics that explains the roles of UML diagrams and goals of UML in Object Oriented Design. It explains the building blocks of UML diagrams which are Things, Relationship and Diagrams. It gives detailed explanations about nine kinds of UML diagrams or format uml diagrams, the three types of UML modeling and UML notations. It also gives sample examples of UML diagrams when explaining some concepts which makes it easy to understand when reading. Page also talks about the 2 broad categories-Structured and Behavioral with each divided into subcategories

In this tutorial, I learned that UML diagram is not a programming language and relates to Object Oriented Design. Initially I thought it was only a pictorial language to build software system, but this page makes it clear that it uses non-software systems as well. UML diagrams are also made for different users, not just developers to understand a software and non-software system. I must say that through UML diagrams in class, I was able to really understand the way a program is structured as well as relationships between the classes, interfaces etc. even before looking at the codes.

In the architecture part of the tutorial, I learned about the roles that UML diagrams plays in different perspectives of a system. These are the design, implementation, process, and deployment. Looking at these perspectives, all the diagrams that I have seen support this. These diagrams make clear of classes, interfaces etc., assembled in a physical state giving an idea about the flow a system/program has. Another important thing that I learned is that UML diagrams helps support the representation of physical nodes of a system that forms the hardware.

I learned that UML notations are very important to make a model that is very meaningful and is something that should be emphasized from the beginning. Some of these notations are Class, Object, Interface, Collaborations, Actor Notations, among others. I learned that the only difference between the Class and Object notations is that name is underlined in Object notations but has same structure and components as the Class Notation. I got confused when I saw a diagram of Active Class Notation as it looked similar to Class notation but I learned that the differences is that Active Class has solid borders and are used to describe concurrent behavior of a system.

I hope others find this source useful

https://www.tutorialspoint.com/uml/uml_standard_diagrams.htm

From the blog CS@Worcester – GreenApple by afua3254 and used with permission of the author. All other rights reserved by the author.

Docker

Hey guys welcome to week 4 blog. This week I am going to talk about Docker and why is Important. we learn about this in last few classes and I am writing about this platform because it help me and you getting deep understand about how to operate and use this application in seitan way. so let’s start this with what is Docker? so docker is tool that designed to make it easier to create, deploy, and run application by using Containers. It includes packages, libraries and other dependencies. You probably wondering how this Work. Well it’s work on Virtual machine. It kind a uses Linux machine. And importantly, it’s open source!!!

you wondering, who is Docker for? Docker is a tool that is designed to benefit both developers and system administrators, making it a part of many DevOps toolchains. For example developers can focused on writing code without worrying about the system that it will ultimately be running on. it also allows them to get a head start by using one of thousands of programs already designed to run in docker to run in Docker containers part of the application. I have used programing platform call QT. Qt is software development platform where you can write code and make you own application and it require a C++ language to run your software. but Docker run on command line. this make developer really easy to developer application and Quicker too.

This container can be thought of as necessitating three categories of software: Builder, Engine, and Orchestration. the main point of using this is making application build faster and docker is way to do it.

Now I will tell you why Docker is good for data Science. When I started as a Data Scientist my focus was always on finding the best algorithm by conducting experiments that would improve my model’s performance. I never really thought much about how I would share my findings and code with others, other than Most of this was the environment setup. In many cases, it would be time-consuming and I would give up and get on a call with the main Developer. when you data Scientist you deal with data a lot and also as algorithms. when you run data in Docker you build Docker Image , Run Image.

Sours: https://opensource.com/tags/docker

https://www.docker.com/blog/

From the blog CS@Worcester – </electrons> by 3electrones and used with permission of the author. All other rights reserved by the author.

Simple Factory Pattern

Last week I gave you a small introduction in design pattern and explained their benefits in codes. Today I want to talk about one of this design patterns. The Factory Pattern. The reason why I choose this pattern is because I had to use it in one of my projects in java. The Simple Factory is not actually a Design Pattern; it is more of a programming idiom. But it is commonly used, so we will give it a Headfirst Pattern Honorable Mention. Just because Simple Factory is not a REAL pattern does not mean we should not check out how it is put together.

So, what is a simple factory pattern? The Factory Method Pattern defines an interface for creating an object but let us subclasses decide which class to instantiate. Factory Method lets a class defer instantiation to subclasses. As with every factory, the Factory Method Pattern gives us a way to encapsulate the instantiations of concrete types. As in the official definition, you will often hear developers say that the Factory Method lets subclasses decide which class to instantiate. They say “decide” not because the pattern allows subclasses themselves to decide at runtime, but because the creator class is written without knowledge of the actual products that will be created, which is decided purely by the choice of the subclass that is used.

When to use the Factory Design Pattern in Java?

Static Factory methods are common in frameworks where library code needs to create objects of types which may be sub classed by applications using the framework.        

Some or all concrete products can be created in multiple ways, or we want to leave open the option that in the future there may be new ways to create the concrete product.

Factory method is used when Products do not need to know how they are created.

We can use factory pattern where we have to create an object of any one of sub-classes depending on the data provided

There are a lot of examples about the Factory Design online. A lot of website gives a good explanation. I decided to choose the Headfirst Design Patterns by Elisabeth Robson; Kathy Sierra; Bert Bates; Eric Freeman. The chapter four shows talk about this pattern and shows a very good explanation and an example also. Another website that it helped me to understand it better was javarevisited. Again, it explains it with details and examples how it works.

https://javarevisited.blogspot.com/2011/12/factory-design-pattern-java-example.html#:~:text=Factory%20design%20pattern%20is%20used,just%20change%20in%20one%20class.

From the blog CS@Worcester – Tech, Guaranteed by mshkurti and used with permission of the author. All other rights reserved by the author.

You Ain’t Gonna Need It

Hi everyone and welcome to the week 4 of the coding journey blog. For this week’s post I will be talking about a principle called YAGNI which is an abbreviation for you ain’t gonna need it. Now this may seem like a simple topic, but it is very important concept that often gets overlooked in the early stages of programming.

You ain’t gonna need it is one of the key principles to extreme programming and the XP co-founder has states that you should always implement things when you actually need them, never when you just foresee that you need them. The basic concept behind this principle is to do the simplest amount of work that would also get the program to work. The goal is to cut down drastically on unnecessary work, and as a result of this there will be higher productivity rates as well as a more simple to understand code. Efficiency is key when it comes to programming. A software can have many lines of code and functions, but this will be an issue if there are much simpler ways to implement those same functions with a lot less work. The process will take a lot longer with more features and down the line make it much more difficult to maintain.

There are a lot of problems that can occur if you try to implement a feature early when it is not necessary at the moment. There are three things that could happen which include having the wrong feature, having the right feature but it is built wrong or the most ideal option is having the right feature that is built right. Now with these results of the features there is also the outcome of costs. The different costs include cost of building, cost of delay, cost of carry and cost of repair. The cost of building is all the effort spent on analyzing, programming and testing a feature. The cost of delay is the lost opportunity to build and release another feature now. The cost of carry is the complexity added by the feature to code, which makes the software harder to modify and debug. The cost of repair is the effort spent on modifying a feature because it is not exactly what you need now. Now these concepts are the input and output as they go hand in hand. If you make the wrong feature then you have to pay the cost of building, carry and delay. If you make the right feature but it’s built wrong then you have to pay cost of repair, carry and delay. Now with the best option if you make the right feature and it is built right then you just pay cost of carry and delay.

In my personal case, I plan to follow the YAGNI principle in all my future projects because it help simplify projects and saves time. It improves my productivity and prevents unnecessary work and problems.

Check out these additional resources: https://medium.com/better-programming/yagni-you-aint-gonna-need-it-f9a178cd8e1

YAGNI

From the blog CS@Worcester – Roller Coaster Coding Journey by fbaig34 and used with permission of the author. All other rights reserved by the author.