Category Archives: CS-343

Final Project

My final project has not been an easy task to deal with thus far. After going far in depth with one of my designs, I came to discover that the use of angular material alongside bootstrap which caused quite a few problems. I have decided to do a full overhaul into angular material. The reason I am choosing angular material is because there seems to be more typescript capabilities while bootstrap seems to be heavy on javascript and css. By going down this path I have been able to make steady progress with my current version of my application which at the time is mostly an interactive sidebar. The main concern I will have this week is being able to make the workouts appear on the home page. I would like to be able to use angular to create a visually appealing layout which will allow for the user to go through the different workouts and select the ones that they would like to use. If I was able to have more time on something like this my end goal would be to add in I/O devices such as being able to print your workout after it has been created. Due to time restraints I will have to remain with simply being able to select and track the wanted workouts on the app. Another large problem I will have to come up with a solution with is whether or not there will be a way to save workouts, or have the workouts appear and when the next desired workout regime is needed, to simply delete the old and then add to the new one. Another issue I have run into is being able to seamlessly add in new workouts to the app without having any effect on the previously existing workouts. This next week will be the time to grind out any and hopefully all of these problems. I have been diving deeper into angular material in order to get a better understanding. I have also been researching more html and css as I have not had much prior experience with these. This has caused me quite a bit of stress because very minute changes have broken the entire app, but I believe that by completing this I will have gained the necessary knowledge of what will be needed in the future. I am excited to complete this app but it is also been an extremely difficult time which will all pay off in the end.

From the blog CS@Worcester – Journey Through Technology by krothermich and used with permission of the author. All other rights reserved by the author.

CS-343 Final Project – Part 3

Over the past week, my work on my CS-343 Final Project has been focused on creating a more interesting layout for my components. I have not changed the function of the program or added any more features yet, but I think I have made some great progress towards making the GUI look more like I planned it to in my wireframe. The program currently looks like this:

I managed to create this layout by making use of Angular’s Grid List material. Using material.angular.io as a reference, I was able to figure out how to import this tool into my project and use it to arrange components with the <mat-grid-list> and <mat-grid-tile> tags in my app.component.html file. By combining this information with what I learned about CSS and HTML last week, I was able to create the layout pictured above.

In addition to working on the layout, I made some major changes to the project’s organization. One significant change was the creation of a new Angular component: the options-menu. Previously, the input forms for changing width and height were simply parts of the app.component.html file. I decided it would make more sense to create a new component so that these options and the new options I plan to add this week will stay organized in my new layout. Another major change I made was in the way data is passed between components. Before, I simply had the input forms in the app component update the size of the rectangle by searching for it by its id. Now, the forms actually pass data from the options-menu to the rectangle using a data service. I decided to implement this method of data sharing after reading about it in this article on angularfirebase.com (see the section on Unrelated Components). I had difficulty understanding how a data service works at first, but I eventually understood it by messing with my own. Creating a data service has definitely made passing data between components far simpler than it was before, and I plan to add more to it this week.

As I am due to present my completed project this Friday, I have less than a week to finish working on it. My plan for this week is to finish adding the features I planned for the project in the beginning. This includes making a simple puzzle game that can be played in the rectangle area, as well as more options to configure it besides the width and height. I would also like to work on cleaning up my layout to make it more visually appealing. Finally, if I have time, I would like to create a back-end server that will allow users to store their scores form playing the game. It seems like a lot to add, but making this layout and creating a data service have only made me more comfortable working with the Angular framework. I think I will be able to complete much of what I have planned in time for Friday.

From the blog CS@Worcester – Computer Science with Kyle Q by kylequad and used with permission of the author. All other rights reserved by the author.
CS343 Final Project – Blog 1

Since this semester began, I’ve known exactly what I wanted to do for my final project, and even before the semester I’ve had this project kicking around my head. Ever since I saw my good friends personal site years ago, I thought it may be exciting to create my own, even before I even considered doing computer science. So, it should be obvious then, when I found out we would be creating a web page for our final project I knew this was the perfect opportunity to finally begin this project.

I knew that this personal – or rather, professional – site would be an interactive resume of sorts, a really incredible showing of capability that I could link to on resumes and in online professional profiles (LinkedIn, Handshake, etc). Consider this exchange:


“Have you done any web development?” asks a potential employer.

“Well sir/madam/neither, if you simply navigate to [web address] you’ll see the extent of that experience”.

“My goodness, this website looks amazing! I have no choice but to make you the president”.


As such it has to look good, like really good, you don’t become the president for nothing (you get it for being related to someone important). So, if I wanted a website that would make someone important adopt me, I needed to perfect the aesthetics of the website. I would need interactive elements and animations, a pleasing color palette, a readable layout, and of course sections on who I am and what my accomplishments are. I will, of course, not be linking this blog to it considering the beginning of this paragraph.

The first element I knew I wanted was a sticky header, or a toolbar that would “stick” to the top of the page once you scrolled down far enough for the top of the toolbar to touch the top of the page. This would mean that users could change page even while far past the header of the site. Another element I wanted was large tiles representing each page that would expand to fit the whole screen when clicked. However, I realized that it was incredible difficult to implement and also redundant considering I already had a way to access any other page at any point a user may be on said page.

I would reach the previous conclusion long after I had already begun, starting with the sticky toolbar. Folks online have implemented similar designs, so I began with those that were most effective and simple as a template. The way it works is actually very clever: a typescript method is used to check the yOffset of the page and if it goes past the offset of top of toolbar the toolbar is changed from a regular element to one that is fixed at the top of the page. As such, the elements on the page below would normally be covered slightly by this bar, however I have it dynamically add to the top-margin of the page to shift the content down appropriately. When this happens, by painstakingly finding the exact right values, it all appears perfectly seamless.

This work took, no joke, 4 hours or more, as I added scaling for page width such that when the page is shrunk horizontally as it would be on mobile the header and toolbar grow in height to accommodate the text and buttons correctly. However, I’ve already gone long on this blog so I will continue in the next one!

From the blog CS@Worcester – Press Here for Worms by wurmpress and used with permission of the author. All other rights reserved by the author.

Final Project pt.2

Zac Loureiro

My last final project blog left off with us having a connection established between Java rest api and a SQLite database. We accomplished this through use of Java imports that were available to us. The next step was finding out how to actually access our database with queries that are sent with our backend Java rest api. We started with a simple get method, in the rest api format it is a @GetMapping method. We were just trying to run a query to get all the ‘artists’ in our database, ‘artists’ being music artists is one of the tables in our database. The query in SQLite would be “select * from artists”. There are a series of methods available with the sql imports in Java to help execute this query using the backend. Here is a look at our complete method:

@GetMapping(“/artists”)

public ResponseEntity<Object> getAllArtists() throws SQLException {

   PreparedStatement statement = conn.prepareStatement(“select * from artists”);

   ResultSet rs = statement.executeQuery();

   ArrayList<Map<String, String>> results = new ArrayList<>();

   while (rs.next()) {

       Map<String, String> temp = new HashMap<>();

       temp.put(“ArtistId”, rs.getString(“ArtistId”));

       temp.put(“Name”, rs.getString(“Name”));

       results.add(temp);

   }

   return new ResponseEntity<>(results, HttpStatus.OK);

}

The line @GetMapping(“/artists”) establishes our path for the rest api. The lines PreparedStatement statement = conn.prepareStatement(“select * from artists”); 

and

ResultSet rs = statement.executeQuery();

are available via the sql imports. The first of these two lines creates the query as a variable “statement” of type “PreparedStatement” within our connection. Then a variable “rs” of type “ResultSet” is set equal to “statement.executeQuery()”. This sets “rs” equal to the result of the query, which in this case is all the artists in the database. Then the data of the artists is loaded into an ArrayList of type Map<String, String> and returned. Returning an ArrayList of Maps is best for functionality when we got to working on our front end code. Since artists had two fields “ArtistId” and “Name”, which are both Strings, saved the data in a Map<String, String> so that both variables were easy to access. This way we could pinpoint any artist in the database when we began to search for specific artists. Our next task was to create methods that allowed our users to search for a specific artist by name. We needed to also add a post method to allow users to add an artist to our database.

From the blog cs@worcester – Zac&#039;s Blog by zloureiro and used with permission of the author. All other rights reserved by the author.

Final Project pt.1

For my final project in my Software construction, design, and architecture class, my partner and I had the idea of creating a web page that was able to access data of a SQLite database. The structure of this project was to connect to a database using Java as a backend and use Rest api to send out sql commands. We needed to run the backend on a server using a Spring Boot framework available to us. Once our connection was setup and our backend methods to access the database was ready we had to create the front end. We used Typescript and Java Angular to create our front end, or in other words our web page. The typescript code had to connect to the Java rest api so our chain of connections from the top goes; Typescript and Angular -> Java Rest api -> SQLite database. 

Starting the project the very first obstacle we ran into was connection Java rest api to the SQLite database. It was something we had never done before, but thankfully there was helpful resources online. We found out that there was a series of Java imports to facilitate this function. A few imports needed are as follows:

import java.sql.*;

import java.sql.Connection;

import java.sql.DriverManager;

import java.sql.ResultSet;

import java.sql.SQLException;

import java.sql.Statement;

Using these imports we were able to create an object of type ‘Connection’ in order to establish the actual connection to the database. Here is our method:

public static Connection getConnection() {

   if (conn == null) {

       try {

           conn = DriverManager.getConnection(“jdbc:sqlite:” + dbpath);

       } catch (SQLException e) {

           e.printStackTrace();

       }

   }

   return conn;

}

The set method to set our path:

DatabaseSQL.setPath(“C:/…(insert path here)…”);

We are now able to get the connection inside our Java rest api classes that contain our SQLite query methods using this statement:

Connection conn = DatabaseSQL.getConnection();

As I said this information can be found through many sources online so we were lucky such a function was available for us to use at our disposal. We needed the connection to be established before we could proceed with anything else because the entire project relied on accessing the database. However, in order to actually know if our connection was working we couldn’t rely on the absence of errors. We needed to create a rest api method to access the database and give us a result so that we could be sure.

From the blog cs@worcester – Zac&#039;s Blog by zloureiro and used with permission of the author. All other rights reserved by the author.

FPL&S 5: Putting Things Together and Making it Pretty

By now, I’ve become rather accustomed to Typescript, Angular, and even CSS. Once the basic functionality of this project was working, motivation and momentum made it easy to continue adding more features. As evidence 14 out of 21 commits have been made in the past week, and although some are small it shows how easy adding features becomes when you have a good base built.

The database building and making sure it was in sync with file uploads was the most challenging part of this project so far. Two new services were created: one to handle all interactions with the database and another to provide information about the user that is currently logged in. Having Components communicate through a service decouples them from each other and the parent. The Components can simply subscribe to the data they need. This blog post was most helpful in determining the best approach for my needs, but Angular’s documentation filled in the blanks as needed.

An interesting bug I encountered was that uploading a new file overwrote all previous files. This was occurring because I was using the same reference to storage, but a new one is required for each upload. This was a simple solution, but puzzling at first. This was only noticed when I tried deleting a file: other files were still in the database and storage, but the link to all files returned a 404 error.

Then my least favorite part came: improving the UI. I love making things work, but making them flashy and fancy frankly seems like a waste of time, as long as it doesn’t detract from the user experience. Still, I quite enjoyed making it look nicer, despite some frustrations with CSS. The biggest issue I’ve had is CSS styles from outside components affecting the inner ones. I also wish browsers were more standardized. It has been difficult creating a consistent user experience across browsers, save for creating new elements from scratch. In the case of file uploads, for example, it is much simpler to hide the actual element and forward user clicks from a custom text input and browse button.

My last task will be to add some graphs to process information and display it to the user. This is of little use for the project as it stands, but will be incredibly useful for my Independent Study project next semester when I re-brand it. I have to give some credit to the Angular framework for making it easier, but using software engineering principles has allowed for an iterative project. I have a working project at every step with a much bigger end goal in mind.

There is still some polishing I’d like to do, and of course there could always be more features. This project was a great chance to dive into Angular and web development.

From the blog CS@Worcester – Inquiries and Queries by ausausdauer and used with permission of the author. All other rights reserved by the author.

CS-343 Final Project – Part 2

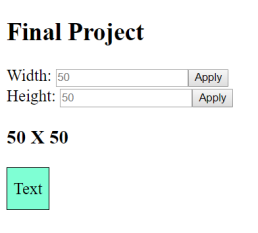
Over the weekend, I have started working on my CS-343 final project by creating a simple Angular application that I will use as a base to build the rest of the project off of. The application simply draws a rectangle with a length and width that are entered by the user. When the user enters a new width or height, they can click a button to update the rectangle without reloading the page or loading a new page. The application currently looks like this:

The Default State – 50 X 50 Rectangle
Editing the Dimensions to 150 X 225 (Note that the text stays centered)

Although this application is extremely basic, writing it has greatly improved my understanding of TypeScript, CSS, and especially HTML. While the in-class activity on Angular helped introduce me to the basics of HTML, researching and working with HTML on my own has definitely made me more comfortable with it.

I started writing this program by creating elements to take user inputs with text fields and buttons, using the class activity as a reference. I researched the HTML tags I needed to create these elements, and I came across a site called w3schools.com that provides documentation of HTML tags (such as <form>) as well as executable example code to demonstrate their uses. This site proved to be a valuable resource for understanding HTML, and I will certainly continue to refer back to it as I continue work on my project. Once my input forms were created, I quickly discovered that submitting data in a form refreshes the page by default, which I did not want to happen. I found out through research that writing ‘onsubmit=”return false”’ in the <form> declaration overwrites this behavior, and I quickly added it to my forms.

Next, I researched how to draw a simple rectangle that I would resize according to the input. I found that I could create one using the <div> tag and specifying its dimensions in its style field. I also discovered that I could change these dimensions code by setting an id for the <div> and using the ‘document.getElementById’ function to edit it from the TypeScript code, allowing me to pass data from my input fields to my rectangle

At this point, I could successfully resize the rectangle using user input. However, the ‘Text’ label was not centered in the rectangle, and I decided I would try to fix that. I came across another page from w3schools that explained how to center text both horizontally and vertically using CSS. I decided I would make the rectangle into its own Angular component so that I could put all the necessary style information into a .css file, and I managed to figure out how to do this by referring back to the class activity.

So far, this project has taught me more about HTML, CSS, and Angular components. It has also led me to several helpful references, such as w3schools.com, which I am sure will help me going forward. Now that I am feeling more comfortable with HTML and Angular, I plan to work on creating more elements that take user input and organizing my components into a more interesting layout similar to my wireframe. I am really starting to enjoy working with HTML and TypeScript, so I am looking forward to making more progress on this project in the coming week.

From the blog CS@Worcester – Computer Science with Kyle Q by kylequad and used with permission of the author. All other rights reserved by the author.

More SPA progress

With the semester coming to an end and the holidays, I’ve been busy and have not made as much progress as I would have liked on my SPA. I did find a better way of obtaining the evolution chains. The looped API calls were a sloppy solution, but I realized I could simply make multiple calls per input. After that I tried to find a way to visually organize the evolution families, but my nested Angular loops make it difficult to style and I haven’t found a satisfactory solution yet.

I have implemented the popup that displays the entire evolution family. The popup blocks interaction with the underlay and forces focus on the popup until dismissed.

A general issue I have ran into is the SPA updating as it fetches data. This causes the images to load at different times, affecting layout. I also have an issue where the page does not always grab the evolution family causing it to occasionally pass a null evolution chain. Searching a second time often fixes this but I am not sure of its cause.

My goals for this project now are to polish up what I have and find some new useful functions to add.

From the blog CS@Worcester – D’s Comp Sci Blog by dlivengood and used with permission of the author. All other rights reserved by the author.

FINAL PROJECT SECOND BLOG

This week we started to code our project, after we finished the UML design now we have the map to our code. Also we are using GitLab to share our work, each time any one of us is done with a part of the code we just push it to GitLab so every one can … Continue reading FINAL PROJECT SECOND BLOG

From the blog CS@Worcester – Shams&#039;s Bits and Bytes by Shsms Al Farees and used with permission of the author. All other rights reserved by the author.

FPL&S 4: User Login, Email Verification, and a Hard Lesson in “this.”

Before creating a database, I needed a way to associate files with a user. This requires user authentication, which is thankfully provided by Google Firebase. In my experience, 3rd Normal Form (3NF) is the best compromise in database normalization, so I strive to achieve this when creating one. Therefore, instead of blindly implementing file storage for a single user, I put some thought in ahead of time of how I would store the data. Currently there are not many data to store, but 3NF is helpful in allowing for additions to a database in the future.

Google’s authentication provides a familiar, smooth interface for users to login or create a new account. In properly-designed, object-oriented software, it is a quick and secure way to implement authentication to quickly launch a product and still easily replace it with your own authentication implementation in the future. The API took a little getting used to (and again, their documentation is not easily converted to Typescript), but it only took a few hiccups to get everything working reliably.

The biggest of the hiccups was “this.”, (pronounced “this-dot”) when referring to member variables. I’ve heard legends of the horror of “this.” in JavaScript. I’ve seen Twitter posts lamenting the language for its strange behavior. But I never expected this.

In typical Java fashion, I was using callbacks for the authentication service. The module would need to update member variables, which are bound to elements through the *ng-if directive. Coming from Java, I naturally assumed calling “this.variable” within the callback would change the value, and the console was printing the correct value, but only within the callback function. As soon as it finished, “this.variable” was the old value. As it turned out, I was referring to two different “this’s”.

The problem is that “this” refers to the context in which a variable is called, not the class in which it is defined. This Stack Overflow post has some good answers describing why and the proper way to use it. My solution was to use arrow functions to pass the correct context to the callback function when I subscribed to it, like so:

ngOnInit() {
    this.angularFireAuth.authState.subscribe((user) => {
        this.firebaseAuthChangeListener(user, this);
    });
}

Subscribing to the authState gives us a user object, which needs to be passed to the custom callback function. ngOnInit() is called to initialize the Component, so the context is the Component itself. Therefore, we can refer to it using “this”, which we do to refer to other services and methods. Modifying the callback function to also take the context means we can modify the member variables of the Component using this argument.

I tried a few other solutions, but this was the simplest and the only one that reliably worked. If there are better TypeScript solutions, I’d love to hear them. For now, I can reliably register users and use their unique IDs to associate them with their file uploads in the database.

From the blog CS@Worcester – Inquiries and Queries by ausausdauer and used with permission of the author. All other rights reserved by the author.