Path testing is widely used to design test cases. Path testing process has 4 steps, which is to draw control flow graph, calculate Cyclomatic Complexity, make set of paths, and then create test cases for the those paths, which would use this formula: E – N + 2P (where E is number of edges, N is number of vertices and P is program factor). Path testing usually use control flow graph, which would help developers find sets of linearly dependent paths of execution. Path testing also use Cyclomatic Complexity to determine the number of linearly independent paths and each path should be a separate test case.
Besides control flow graph, path testing can also use different techniques like decision to decision path, where control flow path can be broken into various decision to decision paths and collapse into individual nodes, and Independent paths. There are various advantages of path testing like making sure that tests are isolated and not redundant to each other, it helps developers focus more on the logic of the programs, and finally, it helps developers to design test cases in a much easier and simpler way.
The school semester is almost over and slowly everything is coming to a completion. This will be my last post for the Testing Class, Over the course of it I have learned quite a lot of valuable skills in the Computer Science field.
The last covered topic of the class was the Technical Review, maybe not as advanced as previous exercises this one let us practice probably one of the most important and widely used techniques, the Technical Review, or simply code review. Some info about that can be found here. This is a form of static white-box testing technique which is conducted to spot the defects early in the life cycle that cannot be detected by black box testing techniques. It should not be lead by a person who wrote the code, or at least one member of the review has to be a somebody not associated with the code.
This is a very good and very easy form of troubleshooting and detecting bugs early in the production, and it should be used as soon as possible after the implementation of the code .
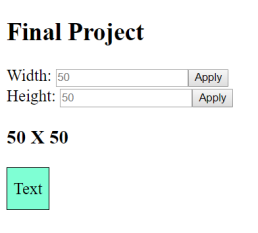
Over the weekend, I have started working on my CS-343 final project by creating a simple Angular application that I will use as a base to build the rest of the project off of. The application simply draws a rectangle with a length and width that are entered by the user. When the user enters a new width or height, they can click a button to update the rectangle without reloading the page or loading a new page. The application currently looks like this:
The Default State – 50 X 50 RectangleEditing the Dimensions to 150 X 225 (Note that the text stays centered)
Although this application is extremely basic, writing it has greatly improved my understanding of TypeScript, CSS, and especially HTML. While the in-class activity on Angular helped introduce me to the basics of HTML, researching and working with HTML on my own has definitely made me more comfortable with it.
I started writing this program by creating elements to take user inputs with text fields and buttons, using the class activity as a reference. I researched the HTML tags I needed to create these elements, and I came across a site called w3schools.com that provides documentation of HTML tags (such as <form>) as well as executable example code to demonstrate their uses. This site proved to be a valuable resource for understanding HTML, and I will certainly continue to refer back to it as I continue work on my project. Once my input forms were created, I quickly discovered that submitting data in a form refreshes the page by default, which I did not want to happen. I found out through research that writing ‘onsubmit=”return false”’ in the <form> declaration overwrites this behavior, and I quickly added it to my forms.
Next, I researched how to draw a simple rectangle that I would resize according to the input. I found that I could create one using the <div> tag and specifying its dimensions in its style field. I also discovered that I could change these dimensions code by setting an id for the <div> and using the ‘document.getElementById’ function to edit it from the TypeScript code, allowing me to pass data from my input fields to my rectangle
At this point, I could successfully resize the rectangle using user input. However, the ‘Text’ label was not centered in the rectangle, and I decided I would try to fix that. I came across another page from w3schools that explained how to center text both horizontally and vertically using CSS. I decided I would make the rectangle into its own Angular component so that I could put all the necessary style information into a .css file, and I managed to figure out how to do this by referring back to the class activity.
So far, this project has taught me more about HTML, CSS, and Angular components. It has also led me to several helpful references, such as w3schools.com, which I am sure will help me going forward. Now that I am feeling more comfortable with HTML and Angular, I plan to work on creating more elements that take user input and organizing my components into a more interesting layout similar to my wireframe. I am really starting to enjoy working with HTML and TypeScript, so I am looking forward to making more progress on this project in the coming week.
Code coverage is a subject that has recently come up in my Testing class and it did catch my attention for its useful functionality. So what’s code coverage? Code coverage is how much of the code that has been executed during the testing process. This process is not only check for every line of code, it also checks if all the branch of conditional and loops is covered. With this process in place, it would surely decrease the number of bugs.
With that being said, how would developers be able to apply this into their code? There are a lot of system and plugins out there that would help doing this job correctly, I will take JaCoCo plugins for Gradle as an example in this post, since I think it is a really good system that gives excellent reports. To enable JaCoCo, add this line to build.gradle:
apply plugin: ‘jacoco’
What is greater about JaCoCo is that it let user define thresholds or conditions that the code coverage has to pass in order for the build system to return pass. For example, consider this configuration below:
jacocoTestCoverageVerification {
violationRules {
rule {
limit {
minimum = 0.8
}
}
}
}
check.dependsOn jacocoTestCoverageVerification
When this task runs, build system will ensure that the build only pass only if the code coverage metric reaches 80%. As simple as it looks like, I think it is an essential quality of life plugin to have for the build system.
With the semester coming to an end and the holidays, I’ve been busy and have not made as much progress as I would have liked on my SPA. I did find a better way of obtaining the evolution chains. The looped API calls were a sloppy solution, but I realized I could simply make multiple calls per input. After that I tried to find a way to visually organize the evolution families, but my nested Angular loops make it difficult to style and I haven’t found a satisfactory solution yet.
I have implemented the popup that displays the entire evolution family. The popup blocks interaction with the underlay and forces focus on the popup until dismissed.
A general issue I have ran into is the SPA updating as it fetches data. This causes the images to load at different times, affecting layout. I also have an issue where the page does not always grab the evolution family causing it to occasionally pass a null evolution chain. Searching a second time often fixes this but I am not sure of its cause.
My goals for this project now are to polish up what I have and find some new useful functions to add.
Does your unit test have a stunt double? You know someone to jump in there and take the hit during testing instead of using real dependencies? Well, it could if you used Mockito. I found a great tutorial on setting up Mockito for various environments and situations here: https://www.vogella.com/tutorials/Mockito/article.html But what is Mockito? Don’t confuse it with that lovely mint based rum concoction. It’s a JAVA based mocking framework. It’s used to mock interfaces so that dummy functionality can be used in unit testing. But what is mocking? In OOP mock objects are simulated objects that mimic the behavior of real objects (stunt doubles!). In Test Driven Development mock objects meet interface requirements of real objects allowing developers to write and unit-test functionality. This allows the developers to focus on the behavior of the system while testing without worrying about dependencies. This Martin Fowler article does a great job explaining Mocks: https://martinfowler.com/articles/mocksArentStubs.html So grab a Mojito and enjoy some reading! #CS@Worcester #CS-443
Before we get started there a couple of assumptions I am making: You have a current Gradle project and you want add Code Coverage testing You are using Junit 5 (Jupiter) for testing Ok first and for most backup your existing project. If following my steps causes you to screw something up that’s on you. Especially since my first step in this adventure clearly states backup your existing project! Backup complete? Ok lets move on. Go to github and fork the gradle-clover-plugin repository: https://github.com/bmuschko/gradle-clover-plugin Now open your projects build.gradle and the plugins build.gradle. Wildly different right?! Now merge the two. My project didn’t have any funky dependencies or imports so I literally copied the plugins build.gradle and overwrote mine. There are about nine different plugins used for the Gradle Clover Plugin. Read the projects build.gradle and understand it. This will help assure there are no failures. Remember I did tell you to backup your project before starting. Once you sort out your build.gradle look in the Gradle Clover Plugin repository and open up the gradle folder. Copy the six *.gradle files to your projects gradle folder. These should be: additional-artifacts.gradle documentation.gradle functional-testing.gradle integration-test.gradle publishing.gradle release.gradle Now back to the Gradle Clover Plugin repository copy the src folder to your project and overwrite your src folder. You will now have three folders in your src folder: funcTest main test funcTest contains all the functional testing scripts while main and test contain an additional groovy folder with scripts specific for Groovy. Now if you just overwrote your src directory your code should still be in the java folders under main and test. If not go to your backup and copy them over. This is why we do backups. Now once again back to the Gradle Clover Plugin repository. Copy the gradle.properties file over from the root of the repository to the root of your repository. Open it up with your favorite editor (I like to use Notepad++ ) and check it out. What are we looking at here? Well this sets your current Gradle version build level and the testing versions as well. You can modify this to test against specific versions of Gradle. TIP: Keep gradleTestingVersion list short and only test against the version of Gradle you need to. This will reduce your build time. Now open a bash terminal and fire off a gradle build. Oh your code failed with a compilation error because of javaDocs and GroovyDocs? Clean up your code! No seriously, I was shocked the first time I ran it that I had 12 errors all related to java docs. Now these were errors that JaCoCo, Spotbugs, Checkstyle and PMD did not report. One of which was: @param firstName was missing a description. It was helpful to have the line numbers right there on the screen and I was quickly able to resolve my issues. Now that you’ve cleaned up your code do another gradle build. Once your build succeeds navigate to the $repository_name/build/reports/tests folder you will see two sub-folders test and functionalTest. Drill into these folder and open the index.html file to see your test results. Now that you are all setup head over to OpenClover and to the gradle-clover-plugin repository and learn how to tweak the setup for your use. #CS@Worcester #CS-443
Before we get started there a couple of assumptions I am making: You have a current Gradle project and you want add Code Coverage testing You are using Junit 5 (Jupiter) for testing Ok first and for most backup your existing project. If following my steps causes you to screw something up that’s on you. Especially since my first step in this adventure clearly states backup your existing project! Backup complete? Ok lets move on. Go to github and fork the gradle-clover-plugin repository: https://github.com/bmuschko/gradle-clover-plugin Now open your projects build.gradle and the plugins build.gradle. Wildly different right?! Now merge the two. My project didn’t have any funky dependencies or imports so I literally copied the plugins build.gradle and overwrote mine. There are about nine different plugins used for the Gradle Clover Plugin. Read the projects build.gradle and understand it. This will help assure there are no failures. Remember I did tell you to backup your project before starting. Once you sort out your build.gradle look in the Gradle Clover Plugin repository and open up the gradle folder. Copy the six *.gradle files to your projects gradle folder. These should be: additional-artifacts.gradle documentation.gradle functional-testing.gradle integration-test.gradle publishing.gradle release.gradle Now back to the Gradle Clover Plugin repository copy the src folder to your project and overwrite your src folder. You will now have three folders in your src folder: funcTest main test funcTest contains all the functional testing scripts while main and test contain an additional groovy folder with scripts specific for Groovy. Now if you just overwrote your src directory your code should still be in the java folders under main and test. If not go to your backup and copy them over. This is why we do backups. Now once again back to the Gradle Clover Plugin repository. Copy the gradle.properties file over from the root of the repository to the root of your repository. Open it up with your favorite editor (I like to use Notepad++ ) and check it out. What are we looking at here? Well this sets your current Gradle version build level and the testing versions as well. You can modify this to test against specific versions of Gradle. TIP: Keep gradleTestingVersion list short and only test against the version of Gradle you need to. This will reduce your build time. Now open a bash terminal and fire off a gradle build. Oh your code failed with a compilation error because of javaDocs and GroovyDocs? Clean up your code! No seriously, I was shocked the first time I ran it that I had 12 errors all related to java docs. Now these were errors that JaCoCo, Spotbugs, Checkstyle and PMD did not report. One of which was: @param firstName was missing a description. It was helpful to have the line numbers right there on the screen and I was quickly able to resolve my issues. Now that you’ve cleaned up your code do another gradle build. Once your build succeeds navigate to the $repository_name/build/reports/tests folder you will see two sub-folders test and functionalTest. Drill into these folder and open the index.html file to see your test results. Now that you are all setup head over to OpenClover and to the gradle-clover-plugin repository and learn how to tweak the setup for your use. #CS@Worcester #CS-443
This is the first in a series of two posts. First we’ll cover the why and the second post will cover the how. Getting OpenClover setup on an existing project took some massaging that will be rather lengthy to explain. OpenClover is based on Atlassian’s Clover product. Atlassian released the source code for Clover and offers OpenClover as a free and open source product. Why OpenClover instead of JaCoCo? Well the code coverage is more complete then JaCoCo and the other alternatives. OpenClover provides plugins for CI servers like Jenkins, Bamboo and Hudson and integrates with ANT, Maven, and Grails. OpenClover also integrates with IntelliJ IDEA and Eclipse. OpenClover covers Java, Groovy and AspectJ while tracking global coverage and per-test coverage. Reports are generated on three kinds of metrics: method coverage, statement coverage, and branch coverage. For a complete list of features see the features page at OpenClover.org I find the ability to integrate OpenClover with my IDE (IntelliJ or Eclipse – I use both) appealing. Being able to run tests from the IDE would be very helpful. I’m not sure if any of the other products available for Code Coverage testing can integrate with an IDE. Follow this link for a general comparison on Code Coverage products. I found it helpful when researching alternatives to JaCoCo. Unlike most reviews/comparisons I have found on line this one includes links to each of the products discussed. Stay tuned for my second post on Implementing OpenClover with an existing Gradle project. #CS@Worcester #CS-443
This is the first in a series of two posts. First we’ll cover the why and the second post will cover the how. Getting OpenClover setup on an existing project took some massaging that will be rather lengthy to explain. OpenClover is based on Atlassian’s Clover product. Atlassian released the source code for Clover and offers OpenClover as a free and open source product. Why OpenClover instead of JaCoCo? Well the code coverage is more complete then JaCoCo and the other alternatives. OpenClover provides plugins for CI servers like Jenkins, Bamboo and Hudson and integrates with ANT, Maven, and Grails. OpenClover also integrates with IntelliJ IDEA and Eclipse. OpenClover covers Java, Groovy and AspectJ while tracking global coverage and per-test coverage. Reports are generated on three kinds of metrics: method coverage, statement coverage, and branch coverage. For a complete list of features see the features page at OpenClover.org I find the ability to integrate OpenClover with my IDE (IntelliJ or Eclipse – I use both) appealing. Being able to run tests from the IDE would be very helpful. I’m not sure if any of the other products available for Code Coverage testing can integrate with an IDE. Follow this link for a general comparison on Code Coverage products. I found it helpful when researching alternatives to JaCoCo. Unlike most reviews/comparisons I have found on line this one includes links to each of the products discussed. Stay tuned for my second post on Implementing OpenClover with an existing Gradle project. #CS@Worcester #CS-443