This week I wanted to learn more about the types of software testing that are out there. In class we already learned about methods like black and white box testing. I wanted to see if there were more methods that we may not have covered.
This article describes 7 of the most common software testing methods. It is important to note that software testing and software development as a whole is always changing. As such there are many more than just seven software testing methods and there will definitely be new methods created in the future. These seven here are just some of the most common.
They are:
Black Box Testing
White Box Testing
Acceptance Testing
Automated testing
Regression Testing
Functional Testing
Exploratory Testing
Something I found interesting about this article is the relationship the author outlined between automated and regression testing. Automated testing is making your tests run automatically and regression testing is testing to verify the system still works as it did before some changes were made. Automated and regression testing go hand in hand because as software is incrementally changed you have to perform regression testing often. This is the real purpose behind automated testing – you can test repeatedly.
Another interesting method that was discussed is exploratory testing. The author refers to it as a “lazy” method of testing but also acknowledges its merits. Exploratory testing is essentially looking at a certain area of an application and exploring for any unexpected behavior. This testing method does not have any test cases. While this testing method does not really apply to the small applications that we work with in class, it may be useful in the capstone course. In that course we are creating a much larger web application with a front and backend so exploring may prove useful.
Because we are using JavaScript in the capstone course, I wanted to look as the tools used for testing in JavaScript, especially since I only have experience with testing in Java.
Because JavaScript is for web development, tests usually have to be run in a browser. This can be in a regular browser in an HTML page with JS scripts, or in a headless browser from the command line which is faster as there is nothing rendering onscreen. You can also run tests in Node.js. jsdom is commonly used with this to simulate a browser with pure JavaScript.
There are also many testing tools with different functions. Some tools have multiple functions and some have only one.
Test launchers are used to launch your tests in the browser or Node.js with user config. (Karma, Jasmine, Jest, TestCafe, Cypress, webdriverio)
Testing structure providers help you arrange your tests in a readable and scalable way. (Mocha, Jasmine, Jest, Cucumber, TestCafe, Cypress)
Assertion functions are used to check if a test returns what you expect it to return and if its’t it throws a clear exception. (Chai, Jasmine, Jest, Unexpected, TestCafe, Cypress)
Generate and display test progress and summary. (Mocha, Jasmine, Jest, Karma, TestCafe, Cypress)
Mocks, spies, and stubs to simulate tests scenarios, isolate the tested part of the software from other parts, and attach to processes to see they work as expected. (Sinon, Jasmine, enzyme, Jest, testdouble)
Generate and compare snapshots to make sure changes to data structures from previous test runs are intended by the user’s code changes. (Jest, Ava)
Generate code coverage reports of how much of your code is covered by tests. (Istanbul, Jest, Blanket)
Browser Controllers simulate user actions for Functional Tests. (Nightwatch, Nightmare, Phantom, Puppeteer, TestCafe, Cypress)
Visual Regression Tools are used to compare your site to its previous versions visually by using image comparison techniques. (Applitools, Percy, Wraith, WebdriverCSS)
Welcome back, I am going to explain why you should be running most of your tests with some sort of code coverage. Code coverage is a software testing metric that analyzes how effective your tests are when ran with your code. Code coverage enables you to see the degree to which your code has been implemented. It also helps you to determine how successful unit tests are by checking the degree to which your code is covered by them. Code coverage percent is calculated by items tested by dividing elements tested by elements by elements found.
Code coverage enables you to improve the efficacy of your code by having a statistical analysis of code coverage. The test cases your currently running without code coverage may be less effective than you realize. Running with code coverage allows you to identify parts of your software that have not been examined by your test cases. This not only makes better code but it saves time because it gives you a clearer picture of where you need to refactor.
Code coverage enables you to identify parts of the software that are not implemented by a set of test cases.
How is code coverage calculated?
Well, that depends on what tools you’re using. However the common tools combine some of the following types:
Line coverage: percent of lines tested
Functions coverage: percent of functions called
Conditions coverage: percent of boolean expressions covered
Branch coverage: percent of branches executed
Are all code coverage types created equal?
When I first learned about code coverage, I assumed that line coverage must be superior, because hitting every line must be most important and probably will include most methods. While this is important it will miss out on a few things. Consider the following code from a stackoverflow answer:
public int getNameLength(boolean isCoolUser) {
    User user = null;
    if (isCoolUser) {
        user = new John();
    }
    return user.getName().length();
}
When you call this method with the boolean variable isCoolUser set to true, you will have your line coverage come back 100%. However, this method has two paths;
boolean is true
boolean is false.
If the boolean is true, all lines are executed, and code coverage will return 100%. What we don’t see with line coverage is that if you call this method with the boolean set to false, you will get a null pointer. Line coverage wouldn’t show you this bug, whilst branch coverage would. For these reasons, best practice is to use a coverage tool that examines multiple types of code coverage
You’ve convinced me, so how do I start?
Code coverage comes built into most IDE’s. In intellij, when you open the run drop-down menu, its two buttons below, “Run with Coverage”. I have found this tool incredibly useful/invaluable in my coding. Since learning of it, I have not run tests without using coverage. There have been a few instances where I created test classes that passed but I wasn’t aware just how terrible they could be. Using code coverage has made me learn more and see my mistakes much more easily. Lines I thought were testing the code, I could comment out and see if it reduces code coverage and learn from that. In Intelli-j’s code coverage, lines that have been executed are green while lines that aren’t are red.
Other code coverage tools are listed below:
SonarQube
JaCoCo
Clover
Selenium
Carina
Cucumber
Good coverage can’t fix bad test writing practices.
If your tests aren’t comprehensive, covering multiple possibilities, coverage won’t save you.
Thanks for taking the time to stop by and read my blog.
I learned quite a bit of information from the following links:
On my last blog post, I talked about boundary class testing and equivalence class testing. I want to once again share a new method of testing that I’ve learned about recently; path testing. This is a thorough way of testing your program. Instead of testing a wide variety of possibilities using a singular input, path testing navigates through the whole program, line by line, and makes sure that every possible path has been used at least one time. This ensures that if any error occurs, you can pinpoint where in the program the error is.
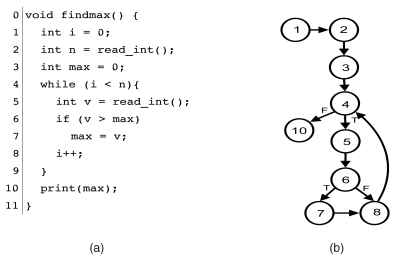
A program flow graph, or control-flow graph, is a form of path testing that visualizes a program using numbers that represent each executable line of code. This directed graph shows the order of which each code statement executes. For any conditions or loops, the graph demonstrates every possible outcome. This allows someone testing the program to locate precisely where an error in the code is held. It also makes it easier to understand the logic behind the loops and conditions in the program, as it allows you to see different results that would be executed depending on the set conditions. This also goes for loops, and you can see what part of the program that the code will loop.
This is an example of what a program flow graph would look like. The graph starts off at line 1 and continues down a straight path until 4. Line 4 is where the first condition in the program is located, and we can see that it either continues to line 5,6,7 and 8, or if the condition is not met, if goes to line 10. At line 8, the program loops back to line 4 to check the condition once again.
This is a simple example of program flow graphs. It is a very useful white-box testing method that is applicable when trying to track an error in a program. Compared to boundary value testing, which is a black-box testing method, path testing is a more detailed method to check for errors. Overall they are both useful techniques to have under your belt as a software developer, and understanding how each of these test methods work means growing as a computer scientist.
When testing a software, it is important to consider what inputs will be used and how they will affect the outcome and usefulness of the test. There are several design techniques for determining input variables for test cases, but the two I will focus on in this post are boundary value and equivalence class.
Boundary value testing is designed to, as the name suggests, test the boundary values of a given variable. Specifically, this test design technique is intended to test the extreme minimum, center, and extreme maximum values of a variable, and it assumes that a single variable is faulty. In normal boundary value testing, the following values are selected for a given variable: the minimum possible value, the minimum possible value plus one, the median value, the maximum possible value minus one, and the maximum possible value. Normal testing only tests valid inputs. Robust boundary value testing, in addition to testing the values of normal testing, tests invalid values. This includes the minimum value minus one and the maximum value plus one.
Equivalence class testing divides the possible values of a variable into equivalence classes dependent on the output that value represents. Equivalence class testing can also be divided into robust and normal where robust testing includes invalid values and normal does not. In addition, equivalence class testing can also be weak or strong. Weak testing only tests one value from each partition and assumes that a single variable is at fault. Strong testing tests all possible combinations of equivalence classes and assumes that multiple variables are at fault.
Something that has haunted me since last semester is Gradle. Gradle is a flexible tool used in the automation process that can build nearly any software and allows for the testing of that software to happen automatically. I know how to use it, but it has been difficult for me to understand how Gradle actually works. So I wanted to do some research and attempt to rectify this.
Gradle’s own user manual, linked below in the ‘Sources’ section, provides a high-level summary of the tool’s inner workings that has been instrumental in developing my own understanding of it. According to the manual, Gradle “models its builds as Directed Acyclic Graphs (DAGs) of tasks (units of work).” When building a project, Gradle will set up a series of tasks to be linked together. This linkage, which considers the dependencies of each task, forms the DAG. This modeling is accessible to most build processes, which allows Gradle to be so flexible. The actual tasks consist of actions, inputs, and outputs.
Gradle’s build lifecycle is comprised of three phases: initialization, configuration, and execution. During the initialization phase, Gradle establishes the environment the build will utilize and determines which projects are involved in the build. The configuration phase builds the Directed Acyclic Graph discussed previously. It evaluates the project’s code, configures the tasks that need to be executed, and it determines the order in which those tasks must be executed. This evaluation happens every time the build is run. Those tasks are then executed during the execution phase.
When considering how to test a software, there are two major options: white box testing and black box testing. Both are uniquely useful depending on the purpose of your test.
White box testing is a technique that examines the code and internal structure of a software. This technique is often automated and used within CI / CD pipelines. It is intended to focus on the implementation and architecture of an application’s code. As such, this testing technique is useful in identifying security risks, finding flaws in the code’s logic, and testing the implementation of the code’s algorithms. Some examples of white box testing include unit testing, integration testing, and static code analysis.
Black box testing is a technique that tests a system and requires no knowledge of that system’s code. This technique involves a tester providing input to the system and monitoring for an expected output. It is meant to focus on user interaction with the system and can be used to identify issues with usability, reliability, and system responses to unexpected input. Unlike white box testing, black box testing is difficult to fully automate. In the event of a failed test, it can be difficult to determine the source of the failure. Some examples of black box testing include functional testing, non-functional testing, and regression testing.
Grey box testing exists in addition to these. It is a combination of white and black box testing which tests a system from the perspective of the user but also requires a limited understanding of the system’s inner structure. This allows the application to be tested for both internal and external security threats. Some examples of grey box testing include matrix testing, regression testing, and pattern testing.
This week I’ll be writing about test automation since the class has already covered this topic; specifically with section five and homework assignment two. According to the link above, test automation is the practice of running tests automatically, managing test data, and utilizing test results to improve software quality. In order for a test to be automated, it must fulfill three criteria. First, the test must be repeatable since there’s no real sense in automating something that can only be run once. Second, a test must be determinant meaning that the result should be consistently the same given the input is also the same every time. Third, the test must be unopinionated which means that aspects that are tested shouldn’t be matters of opinion. These criteria allow automated testing to save time, money, and resources which results in software to be improved efficiently.
Personally, I’ve experienced how efficient test automation is through simply working on assignments; for this class even. I don’t quite remember what assignment I was working on, but I recall using gitlab’s built in automated testing environment. I was nearly finished with the assignment but there was one function that wasn’t working correctly. Instead of having to go to the directory, run the tests, edit the code, and push the changes to gitlab, I had the option of simply running the tests and editing the faulty code on gitlab. The option was extremely convenient and freed up a decent chunk of time, and that was just a minor assignment. I’d imagine that applying automated testing onto larger projects would save even more time.
A transpiler is a program that converts code from one programming language to another programming language. This is comparable to a compiler, which is a transpiler that converts into machine code. It is also related to an interpreter, which behaves similarly, except rather than writing new code, it performs the code.
In my work on the Sea programming language I’m making, I took a long time writing a custom system for transpiling. However, while it succeeds at managing indentation pretty well, it makes actually transpiling statements much more challenging. So, recently I’ve gone back to the drawing board and have decided to pursue the classic model. If it ain’t broke, don’t fix it.
I’m working off of David Callanan’s Interpreter Tutorial. While it’s a very useful tutorial, the code is admittedly pretty poor, as it contains a few files with hundreds of lines. I’m also using Python exceptions to carry errors, since as far as I’m aware, Python has one of the safest exception systems (unlike C++). I can safely catch and handle exceptions to create useful messages for the user. The tutorial, on the other hand, is manually passing around errors from function to function. That said, the explanations are decent and it is a very useful tutorial. I’ll just have to make a lot of modifications and refactoring after each episode in the tutorial. That said, let’s go over how a transpiler works fundamentally:
The Process
The first step in transpilation is reading the source file. The lexer goes character by character and matches them to a set of predefined tokens. These tokens define a significant part of the syntax of a language. If it doesn’t recognize symbols, it can give an error that alerts the programmer. If there aren’t any errors, the lexer will go through the entire file (or files) and create a list of these matched tokens. The order of the list encodes the order that elements appeared in the file. Empty space and otherwise meaningless syntax symbols are not passed on.
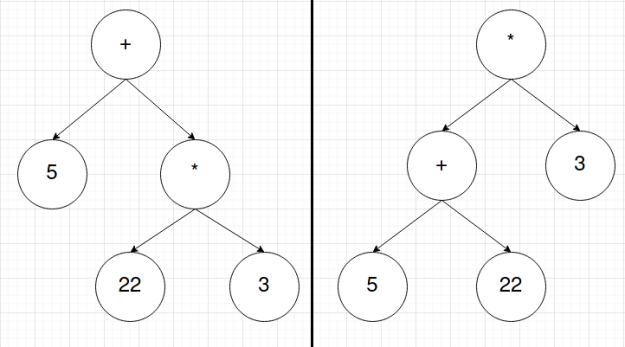
Next, the list of tokens is sent to the parser. The parser will then go through the list of tokens and create an Abstract Syntax Tree (AST). This is a tree of tokens whose structure encodes the order of operations of the language’s syntax. In this stage, the order of the list is lost; however, that order isn’t important. What matters is in what order tokens should be. For instance, the list of tokens for 5+22*3 might look something like [INT:5, PLUS, INT:22, MUL, INT:3] and the list of tokens for (5+22)*3 might look like [LPAREN, INT:5, PLUS, INT:22, RPAREN, MUL, INT:3]. The ASTs for these token lists will look something like this respectively:
Lastly, you then traverse the tree using depth-first-search (DFS), or more specifically, Preorder Traversal of the tree. This means we start at the root node and we the work our way down the left side and then down the right side. This is incredibly simple to implement using recursion. Each new node you check can be treated as the root to a new tree where you can then proceed to repeat the search. This occurs until the entire tree is traversed.
In this final stage, this is also where transpilers, compilers, and interpreters differ. Until now, the same code could be used for all three. At this point, if you want a transpiler, you use the AST to write new code. If you want a compiler, you use the AST to write machine code. If you want an interpreter, you use the AST to run the code. Notice this is why there is such a performance benefit to using a compiler over an interpreter. Every time you interpret code, assuming there is no caching system in place, the interpreter has to recreate the entire token list and AST. Once you compile code, it is ready to be run again and again. The problem then comes from compiled code potentially being more complicated for higher-level language features, and thus making it a pain to write a new compiler for every CPU architecture, due to different architectures using different machine instructions.
This week’s post is yet again about unit testing, but this time focuses on a much more broad question. After spending the past two posts trying to determine exactly what unit test and the variety of patterns available it is only natural that this next post focuses on how to write the tests well. As someone who personally has not written many, I can acknowledge that there may be some best practices I am not aware. Thus for this week’s post I am going to discuss another blog post, this one by Sergey Kolodiy, that goes into how to write a good unit test.
So how do you write a good unit test? Conveniently enough Sergey has compiled some principles, which are that the tests be easy to write, readable, reliable, fast, and truly unit, not integration. Easy to write and readable are pretty straightforward, and go hand in hand, as both just mean the tests should be easy to implement to cover lots of different cases and the output of the tests should easily identify problems. As for being reliable this means the tests must be giving the correct output, in addition to actually detecting bugs rather than just passing. Sergey also brings up a good reason for keeping the tests fast, being that lazy developers might skip the tests if they take too long. Finally there is the truly unit, not integration principle, which sounds more complex than it is. This simply means that the unit test and system should not access any external data or resources, such as a database or network, which will ensure that the code itself is working. Sergey chooses to focus on another very important part of writing good unit tests after this.
The rest of this blog revolves around discussing writing testable code as a good unit testing principle. He states a plethora of examples to show some bad practices, such as using non-deterministic factors. To clarify, this means some variable in a method that can have different values every time it is run; the example he uses helps put this into perspective more effectively. The original purpose of this post was simply to discuss writing the tests themselves, so I do not want to stray too much. I just wanted to mention this part, as it is interesting! If you want to learn more check out the link below.