Post #15

We have begun work on the web application for the final assignment, so I wanted to find out what design patterns and principles are most commonly used in the development of web applications.  The result the came up the most, in my search, was the Inversion of Control (IoC) principle, a design principle used to increase the modularity and extensibility of  programs, especially web applications that expect to experience growth.  This principle is also useful in event-driven programs, which is how it relates to a project like ours  While we don’t really need to consider the growth of our application in the context of our class, it could be potentially useful to follow the Inversion of Control principle as much of our application will be event-driven.  I found it incredibly interesting to learn about the IoC principle and knowing how it works will surely benefit me in the development of other web applications in the future.

IoC is a design principle in which most of a program’s flow of control is received from a framework, rather than being directly implemented in the main parts of the program.  In traditional programming, the code that expresses the purpose of the program calls into libaries to perform tasks, but with IoC, it is the framework that calls the task-specific code.  This principle is given its name because adhering to it effectively inverts the control of the program from implementation to frameworks.  Adhering to the IoC principle serves the purposes of decoupling execution of tasks from implementation, focusing a module on task it is designed for, freeing modules from assumptions, and preventing side effects when replacing a module.  Software frameworks, schedulers, event loops, dependency injections, template methods, and callbacks all follow the IoC principle.

The IoC design pattern is, in my opinion, a difficult one to fully grasp.  The most helpful explanation I found about the pattern was in a YouTube video uploaded by Christian Richards, entitled “Programming – What is… Inversion of Control”.  In the video, Christian provides the example of a program that wishes to make a new user; when constructed, an integer variable is passed in, as a parameter, to the User class’s constructor and is used to dictate what kind of SQL Database Access Layer (DAL) will be initialized and stored in the new user.

The fact that the User class is responsible for a new DAL object to store within itself means that the User class is tightly coupled with the creation of new DAL objects. 

In order to improve the modularity and extensibility of the program, Christian knows that he should adhere to the IoC principle, and decouple the creation of DAL objects from the User class.  The User class should not contain code for deciding which kind of DAL should it should use; instead it should simply know how to work with DALs, and let the implementation dictate which DAL to use.  This can be done by creating an interface to represent DAL objects (let’s call it ‘IDAL’), create concrete DAL objects for each different kind of DAL and implement IDAL in each one, modify the User class’s constructor to take objects of IDAL type, and then modify the main implementation of the program to create and pass in a concrete DAL object to the User constructor, upon construction.  Now, the User class is simply responsible for dealing with the DAL object, rather than deciding which kind of DAL object to use and only then working with it.

Here are excerpts of Christian’s program, before and after adherence to the IoC principle:

class Program
{
static void Main(string[] args)
{
User user = new User(1);
}
}
class User
{
IDAL dal;
public User(int IDALtype)
{
if(IDALtype == 1)
{
dal = new MySQLDAL();
}
else
{
dal = new SqlServerDAL();
}
}


class Program
{
static void Main(string[] args)
{
User user = new User(new MySQLDAL());
}
}
class User
{
IDAL dal;
public User(IDAL IDALtype)
{
dal = IDALtype;
}
}

From the blog CS@Worcester – by Ryan Marcelonis and used with permission of the author. All other rights reserved by the author.

Angular Project: “Clean-up” and Good Style Practices

My teammate and I are currently finishing up our Angular “Blackjack” project. The program seems to be running fine and doing everything we originally intended it to do. Now comes the important task of “cleaning up” our project. Examples of this are going through our program, rectifying any remaining bugs, and fixing any potential style inefficiencies within our code.

In order for us to clean up our code as efficiently as possible, I feel it is a good idea to brush up on ideal Angular style practices. By doing so, we can ensure our code is up to par with Angular standards. There is an excellent Angular Style Guide article that I strongly feel can help us in our “clean-up” task.

The guide is an article directly from the official Angular website. It gives examples of various “Angular style” coding techniques. Each is followed by a suggestion of whether the developer should (“do”) follow the example style, “consider” the style, or abandon the style (“don’t”) for a better alternative. I will outline certain styles mentioned in this article. I will also offer my personal takeaways on these style suggestions, as well as the Angular article in general.

General Naming Guidelines

Angular asserts the best practice is to name project files in a way that specifically identifies the function of that file. Each should follow the standard pattern of ‘feature.type.extension’. For example, our Blackjack project has a “player hand” component. Based on the suggestions of this article, we felt it was most appropriate to name each of the “player hands” companion files as ‘player-hand.component.ts’, ‘player-hand.component.html’, etc. Furthermore, the article suggests that each component, service, etc, along with their companion files, should all be located within the “src” folder in their own sub-directory. When going through the process of “cleaning up” our code, we will ensure that each section (service, component, etc) are in the folders they ought to be, in accordance with Angular standards.

Single Responsibility Principle (SRP)

The Angular article suggests that a project should follow the SRP whenever possible. Based on everything I’ve learned in the Computer Science program so far, it is always best to have a function to do just “one thing” as clearly and efficient as possible. Thus I feel it should follow that in Angular, we should only have the code for one component per file, one service per file, and so on. Though it is technically possible to write code for multiple types within one file, according to this article, it is bad practice to do so. When looking over our code, we will ensure we have all of our components, services, etc within their own appropriately named files.

The Angular article goes in great detail of good Angular style practices, and which ones to avoid. We have referenced this article a great deal during our project, thus I feel it directly relates to this course. I am sure this article will be useful during my professional career when working on additional Angular projects.


From the blog CS@Worcester – Jason Knowles by Jason Knowles and used with permission of the author. All other rights reserved by the author.

Code Review: Strategies

We’ve recently conducted “group code reviews” on a given project, where the goal was to identify any issues and/or bugs we could find within the project’s code. I found this to be a good exercise because I will likely be doing many code reviews during my professional career.

My ultimate goal regarding code reviewing at this point is to learn how to do it as efficiently as possible. Sara Tansey has a great blog on the topic, entitled 7 ways to up-level your code review skills. She identifies several strategies in particular that she feels are important when reviewing code. I will outline a few of these strategies that I found especially relative to our course’s content, along with my personal thoughts and takeaways.

“Prioritize the goals of code reviews with your team.”

I feel this is an important topic which I am glad Sara mentions in her blog. The main idea here is to make sure your team is up to speed with what each individual team member should be looking for. One example I can think of is the following: perhaps “Person A” could be looking specifically for bugs while “Person B” concentrates on code style. Then perhaps each team member can go through the code together and see if there is anything they have missed.

“Run the app and try playing with the features.”

Sara brings up potential difficulties of trying to perform effective code reviews solely on the basis of reading the code. I agree with her stance that code reviewers ought to run the program and “play with” the features as well. I believe this is a good strategy because seeing the program in action may provide some clarification on what the code is doing, and what it is intended to do.

“Always give approval, unless you can prove that there is a bug.”

I believe what Sara is referring to here is a code reviewing team that has the responsibility of either approving or denying a developer’s request to continue with production. Giving approval to proceed barring the existence of bugs makes sense to me. There doesn’t seem to be much of a reason to halt production on the sole basis of “less than optimal code style” in my opinion. I feel if the code works, certain style inefficiencies can easily be addressed based on the feedback of code reviewers.

I enjoyed reading Sara’s blog and feel she brought up many good strategies to conduct efficient and high-quality code reviews. I especially like her suggestion that we ought to be running and going through the apps themselves, rather than just reading the code alone. Running the program might give us some context that we may have missed if we relied on simply reading code lines without actually seeing the app in action. During my professional career, I will adhere to Sara’s suggestions while conducting code reviews for given projects. I will run through the actual program as well.

From the blog CS@Worcester – Jason Knowles by Jason Knowles and used with permission of the author. All other rights reserved by the author.

3 Principles that makes a developer’s life easier

So for this week, I have decided to read another blog and that is “3 Principles to simplify your life as a developer” from the iTexico Blog. The reason I have chosen to read this blog is because I usually do not get a clear grasp of these kinds of principles. With getting a clear understanding of these principles, they will help in applying code, simplicity, and managing the overall process.

As the title applies, this blog post basically goes over 3 principles that are basic but powerful that will make life as developers easier and they are KISS, YAGNI, and DRY. The first principle KISS stands for Keep It Simple, Stupid and the meaning of it is straightforward. The simpler the code is, the simpler it will be easier to maintain in the future. This means that according to the author’s advice, developers should avoid using fancy features from the programming language they are having it in on. It does not mean developers should not use these features, it is to say only use them when there are perceptible benefits to solving a problem. Second principle YAGNI stands for You Aren’t Gonna Need It and the meaning is rather related to programming the first time. We do not want to waste time coding extra features that might not fit to what is needed or in the worst-case scenario, it will not be used. So from the author’s advice, when there is an unexplained anxiety to code extra features, take a deep breath and see the pending work at the moment. The third principle DRY stands Don’t Repeat Yourself and the meaning is clear to understand. We must try to maintain the behavior of a functionality of the system in a single piece of code. This means to keep it in a steady pace to avoid redundancy.

Based on the contents of this blog, like the concept of KISS, I would say this was simple and easy to read. The author gave the meaning of the principle, explained the origin of it, and advice on how to apply it while programming. What I did before to try to understand these principles while coding is that I try my best to not write down a method twice or an extra class unless needed.

What I learned from this blog about the principles is that DRY should be not used all the time in the life as a developer. The idea I got from this blog is that while DRY is a good principle to follow, it will sometimes when violated lead to a solution which is called WET or Write Everything Twice and that is a bit of time spent. For future practice, I should try to apply the KISS and YAGNI principles a bit more while writing down code as it will not only save from being overwhelmed on how the code works but also others that can benefit from it.

Link to the blog: http://www.itexico.com/blog/bid/99765/software-development-kiss-yagni-dry-3-principles-to-simplify-your-life

From the blog CS@Worcester – Onwards to becoming an expert developer by dtran365 and used with permission of the author. All other rights reserved by the author.

#5– Episode 67

Episode 67 – Object Oriented Mistakes

Presented by Joe Zack, Michael outlaw and Allen Underwood, the group addressed many object-oriented mistakes that coders often make. I found this to be an interesting podcast because like many of us upcoming coders, we are taught mistakes that cause problems when attempting to develop in an object-oriented environment. From the previous design patterns episode, we were able to understand the best situations and the proper design pattern that should be used. For example when using domain designs, we have learned not to use domain anemic models. Before we continue, anemic model is the use of a software domain model where the domain objects contain little or no business logical validations, calculations, business rules etc. These are typically called bags of properties with getters and setter without any kind of behavioral type method. The domain model objects cannot therefore guarantee their correctness in any moment due to lack of validation and mutation logic which is usually placed somewhere outside the class being addressed. One would ask, why is this considered an anti-pattern in todays programming world, well first of all, it disrupts the concept of object-oriented design. This design contracts what is implemented when on opts to use the object oriented design. Object orientation allows objects to have states and sessions but anemic causes stateless objects. It is great for just a simple application because there is a clear separation between logic and data unlike object oriented programing. Simple applications also do not require a ton of logic to be implement. They do not need methods with behavioral code in them. After this point, Micheal spoke of another anti-pattern. This pattern was known as the base bean anti-pattern. This is when you inherit functionality from a utility class instead of delegating to that utility class. The issue associated with this practice is that defeats the purpose of inheritance. Inheritance is used for the wrong reasons. The main purpose of inheritance is to create a hierarchical order in which code information can be managed and understood. Wrong implementation of inheritance disrupts object properties and class properties. Overall, design patterns are created for incoming developers and even intermediate developers to have a guide that can be used as a reference. Thy provide us with a way to getting things resolved or better yet, the first solution that solved the problem. It is up to every developer to learn beyond that and recognize how they can utilize the already laid out platform to their own coding needs and development.


Source

https://player.fm/series/coding-blocks-software-and-web-programming-security-best-practices-microsoft-net/episode-67-object-oriented-mistakes

https://en.wikipedia.org/wiki/Anemic_domain_model


From the blog CS@Worcester – Le Blog Spot by Abranti3 Dada Kay and used with permission of the author. All other rights reserved by the author.

CS@Worcester – Fun in Function 2017-11-27 23:31:16

This week’s resource can be found here.

I chose this resource on code review because we’ll be doing a code review ourselves this week, and it not only outlines several types of code review but also includes interesting additional information like statistics about which code review practices produce the best results.

There are a few unexpected benefits of reviewing code. Situations that foster communication between programmers about the code they’ve written help distribute the sense of ownership over any particular piece of code, which is useful because blaming each other for faults in the code doesn’t help anybody. Code review can also serve as a good educational tool for newer developers, as more experienced developers can point out ways to write cleaner code and shortcuts to solve common problems. A more obvious benefit is that human inspection is the best way to find complicated problems in the software’s requirements, design, scalability, error handling, and other non-code aspects like its legibility. Lastly, knowing your code is going to be reviewed demonstrably improves the quality of your code.

There are several methods of lightweight code review that fit in with modern development. Code review can be done in an email thread, for example. The benefit to this is its flexibility, as it doesn’t require everyone meeting at the same time. The downside is that the original coder ends up with a bunch of different suggestions that they have to sort through instead of the group reaching a consensus on what should be done.

Another lightweight method is pair programming, where two programmers work on the same piece of code and check each other’s work as they go. The benefit to this is that code review happens automatically during the development process. The downside is that the coders can’t get much distance from their project, so they lose the advantage of a fresh set of eyes looking at it.

Third is the over-the-shoulder method, in which someone reads your code while you explain to them why you wrote it that way. This is intuitive and very lightweight, but problems can arise if you don’t document what happens at this meeting.

Tool-assisted code review involves using software to help with the review process. Programmers can contribute reviews at different times and without being in the same location using this method, which offers the flexibility of reviewing by email thread with more organization. You still miss out on the benefits of meeting and discussing in person, however.

In addition to making me aware of several different code review options, this resource has provided statistics on how best to use these methods. Code should be reviewed in chunks of under 400 lines, as defects stop being uncovered with anything more. Reviewing 300 lines of code per hour or under and a total review time of under an hour results in the best defect detection. Defect detection drops significantly after 90 minutes of review time. These are very useful things to keep in mind.

From the blog CS@Worcester – Fun in Function by funinfunction and used with permission of the author. All other rights reserved by the author.

Java: The Factory Method Pattern

In this blog post, Justin Albano talks about the Factory Method Pattern and gives us an example.

The Textbook Definition

According to the Gang of Four book that defined the technique, the intent of the Factory Method pattern is as follows:

Define an interface for creating an object, but let subclasses decide which class to instantiate. Factory Method lets a class defer instantiation to subclasses.

Using the Factory Method involves creating two sets of interfaces: “(1) the product interface that constitutes the object to be created and (2) the creator interface that constitutes the object that will instantiate the product.” The UML diagram for the Factory Methods is below:

The author explains the UML diagram as the following:

Using the general pattern, we build a Creator interface, which includes one or more Factory Methods, as well as any number of other methods. This interface may also be an abstract class with defined methods or even a default implementation of the Factory Method that returns a default instance of Product. From this interface, a set of ConcreteCreator classes are created that return desired ConcreteProduct instances that implement the Product interface.

An Example in Java

  • We create an encryption mechanism that allows the user to supply a string of text and a file name, which is then encrypted and written to disk. Using the Factory Method allows us to use multiple encryption algorithms.
  • We create implementations for two encryption algorithms: (1) SHA-256 and (2) SHA-512. “For both implementations, we will use the Apache Commons encryption implementations (org.apache.commons.codec.digest.DigestUtils).”
  • In the end you should be able to do something like this:
    PersistedFile file =
       new PersistedFile("/foo/bar/text.txt", "Hello, world!", new Sha256Encryptor());

    View complete example here

    Colloquial Definition

    A method whose sole responsibility is to abstract the creation process of an object and return that object.

    I chose this resource because I am interested to learn new implementations of popular design patterns such as the Factory Method. This resource gave a detailed explanation along with other patterns that can be good alternatives to the Factory Method pattern like the Template Method pattern and Strategy Pattern. I believe the content of the article is very detailed and informative. The example they used is very interesting and I’m going to implement the code myself to test it out. I plan to use this and many other design patterns in the future. I learned more about the Factory Pattern method and when it is appropriate to use it.

    The post Java: The Factory Method Pattern appeared first on code friendly.

    From the blog CS@Worcester – code friendly by erik and used with permission of the author. All other rights reserved by the author.

    AB Testing – Episode 10 by Brent Jenson and Allen Page.

    Episode 10 by Brent Jenson and Allen Page.

    In this week’s testing podcast episode, Brent and Allen begin by discussing changes that Microsoft made during the absence of Allen in the testing department. Microsoft decided to shift their focus to a quality assurance based system instead of emphasizing on a testing based platform. Although these concepts are closely related in the field of software testing, they each specifically represent something different. Software testing is usually the process of executing a system with the intent of finding defects. By process of testing, we are able to assess or evaluate the capabilities or attributes of a software program’s ability to adequately meet the applicable standards and customer needs but quality assurance on the other end refers to a set of activities designed to ensure that the development and/or maintenance process is adequate to ensure a system will meet its objectives. These new implementations by Microsoft forced engineering managers to move between teams and successfully understand the overall product specifications that need to be accomplished. After this talk, they moved over to duties and abilities of a manager the drives a QA team into either being successful or a failure. Inadequate technical skills and bad manners often lead to the demise of a team according to Brent. He believes that a manager that falls into this category only knows how to “demand more from the sausage crank”. This not only damages the crank but also shifts the focus of the operation. Increasing the fire under the meat provides more desired result. The fire is resource and help that is needed to get the task accomplished. The sausage is the software and the crank is the team members. To be a good testing and QA manager, you have to task the team members with things you would do yourself if you were the worker. Understanding that consistency and confidence in you by your employees pushes the team momentum forward. Another big factor is that product quality directly relates to the team adequacy. The best products more likely than not comes from the best QA and testing teams. Understanding that the well being of a team affects the product they are able to produce is one of the first steps to succeeding in creating a great QA and testing team. Good organizational health has to be the focus of every organization that supplies products and services to users.


    Sources

    https://testingpodcast.com/category/ab-testing/page/7/

    http://www.mosaicinc.com/mosaicinc/rmThisMonth.asp


    From the blog CS@Worcester – Le Blog Spot by Abranti3 Dada Kay and used with permission of the author. All other rights reserved by the author.
    The Decorator Design Pattern

    What is the Decorator Design Pattern?

    The Decorator pattern applies when there is a need to dynamically add as well as remove responsibilities to a class, and when the sub-classing would be impossible due to the large number of sub-classes that could result. Also, use it when you want the capabilities of inheritance with sub-classes, but you need to add functionality at run time.

    Intent

    • Attach additional responsibilities to an object dynamically.
    • Decorators provide a flexible alternative rather than making many subclasses to extend functionality.
    • Client-specified embellishment of a core object by recursively wrapping it.
    • Wrapping a gift, putting it in a box, and wrapping the box.

    Discussion

    Say, you are working on a UI and you want to add borders and scroll bars to your windows. You could define the inheritance like… Window class interface, then you have concrete objects WindowWith_Scrollbar, WindowWith_Border etc..  This type of architecture creates a lot of subclasses and not much room for modularity.  It will be hard to change the concrete classes if you want to add some additional functions to them.

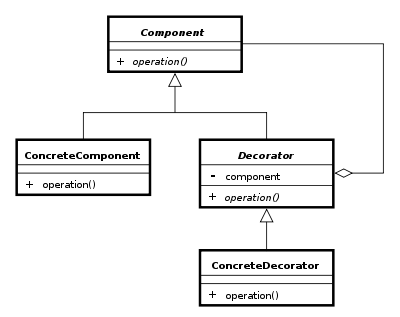
    The Decorator pattern suggests giving the client the ability to choose what features they want.  There might be a problem of chaining features together to produce custom objects as well. The solution to such problem is to encapsulate the original object inside an abstract wrapper interface. Both the decorator objects and the core object will inherit from the abstract interface. Then the interface uses recursive composition to allow an unlimited number of decorator to be added to each core object.  One thing to note is that the interface must remain constant when successive layers are specified using the decorator pattern.

    The decorator pattern hides the core components of the objects inside the decorator object. Trying to access the core object directly would be a problem.

    UML Diagram

    400px-Decorator_UML_class_diagram.svg


    Example

    One example is making a pizza ordering system. You can use the decorator pattern to implement a simple pizza ordering system by creating a pizza(component) and a plain pizza(Concrete Component) that is just the base or dough. Then the decoratorPizza(Decorator) which has the plain pizza and other functions. Lastly, the toppings(Concrete Decorators) for your pizza like: mozzarella, the sauce, pepperoni, etc.

    In this example, you have an interface pizza and a plain dough. The decorator then adds the desired toppings to the pizza.


    Conclusion

    I chose this particular topic since we are creating a simple web app for scheduling classes. I thought that it was helpful since we might be adding pop up windows to our web app.

    The Decorator Pattern is useful when you see yourself making something that is extensible and where you can interchangeably choose which components/functions you want on your object.  I think that with the decorator pattern, there is a lot of potential when using it. You could create something that has many functionality and is still easily changeable.

    source: decorator pattern

    From the blog cs-wsu – Computer Science by csrenz and used with permission of the author. All other rights reserved by the author.

    The Decorator Design Pattern

    What is the Decorator Design Pattern?

    The Decorator pattern applies when there is a need to dynamically add as well as remove responsibilities to a class, and when the sub-classing would be impossible due to the large number of sub-classes that could result. Also, use it when you want the capabilities of inheritance with sub-classes, but you need to add functionality at run time.

    Intent

    • Attach additional responsibilities to an object dynamically.
    • Decorators provide a flexible alternative rather than making many subclasses to extend functionality.
    • Client-specified embellishment of a core object by recursively wrapping it.
    • Wrapping a gift, putting it in a box, and wrapping the box.

    Discussion

    Say, you are working on a UI and you want to add borders and scroll bars to your windows. You could define the inheritance like… Window class interface, then you have concrete objects WindowWith_Scrollbar, WindowWith_Border etc..  This type of architecture creates a lot of subclasses and not much room for modularity.  It will be hard to change the concrete classes if you want to add some additional functions to them.

    The Decorator pattern suggests giving the client the ability to choose what features they want.  There might be a problem of chaining features together to produce custom objects as well. The solution to such problem is to encapsulate the original object inside an abstract wrapper interface. Both the decorator objects and the core object will inherit from the abstract interface. Then the interface uses recursive composition to allow an unlimited number of decorator to be added to each core object.  One thing to note is that the interface must remain constant when successive layers are specified using the decorator pattern.

    The decorator pattern hides the core components of the objects inside the decorator object. Trying to access the core object directly would be a problem.

    UML Diagram

    400px-Decorator_UML_class_diagram.svg


    Example

    One example is making a pizza ordering system. You can use the decorator pattern to implement a simple pizza ordering system by creating a pizza(component) and a plain pizza(Concrete Component) that is just the base or dough. Then the decoratorPizza(Decorator) which has the plain pizza and other functions. Lastly, the toppings(Concrete Decorators) for your pizza like: mozzarella, the sauce, pepperoni, etc.

    In this example, you have an interface pizza and a plain dough. The decorator then adds the desired toppings to the pizza.


    Conclusion

    I chose this particular topic since we are creating a simple web app for scheduling classes. I thought that it was helpful since we might be adding pop up windows to our web app.

    The Decorator Pattern is useful when you see yourself making something that is extensible and where you can interchangeably choose which components/functions you want on your object.  I think that with the decorator pattern, there is a lot of potential when using it. You could create something that has many functionality and is still easily changeable.

    source: decorator pattern

    From the blog cs-wsu – Computer Science by csrenz and used with permission of the author. All other rights reserved by the author.