

From the blog CS@Worcester – Computer Science Exploration by ioplay and used with permission of the author. All other rights reserved by the author.

From the blog CS@Worcester – Computer Science Exploration by ioplay and used with permission of the author. All other rights reserved by the author.
To begin exploring Factory design pattern, first of all, we need to know what factories are. Factories are simply functions that create objects and return them. In most cases you can use factories to design to code instead of classes, and they are much simpler and more readable than classes.
Even though classes have a lot of better performance, it is a good idea to use factories unless otherwise you are in a situation that requires you to instantiates many objects. For example, factories will take averagely 0.0004 milliseconds to create an object in most case while class will take 0.0002 milliseconds to create an object; classes will reduce the time to half way as compare to factories. This comes to matter when you are creating about thousands of classes but when your classes are not that much you will never notice the difference and hence, will not be necessary.
Why do we need factory design pattern? Now let think of it this way; in our codes, we uses a lot of objects. We have classes that instantiate object from class and we use them in many difference ways. In a strategy pattern, we use dependency injection where we imagine ahead of time what the objects will be doing. But at some point in our programming, that imagination has to be constructed. That is we need to instantiate our objects and the question is, where do we do that? This is what factory pattern try to address. In this regards, we say, when you are about to instantiate, let encapsulate them such that it span uniformly across all places so that you can use factory whenever you want to instantiate and the factory is responsible for instantiating appropriately.
Factory pattern gives you the ability to create objects without specifying the exact class of object that will be created; a class is chosen at run time using polymorphism.
For the matter, one will want to use factory pattern design when a method returns one of several possible classes that share a common super class. It is also a good idea to use factory design pattern to design your code when you do not know ahead of time what class object you will need. It is again useful when all of the potential classes are in the same subclass hierarchy and when you do not want the user to have to know every subclass in your code.
I chose to explore this topic as because I was unable to understand it on the go when we were treating it in class and I also got confused as to which pattern to use for my upcoming project and I decided to write this blog on factory pattern because I am impressed how you can use factories instead of classes to provide a clear code. I am actually redesigning my previous code using the factory pattern and I can figure out that everything looks simple at this point.
Reference: https://airbrake.io/blog/design-patterns/factory

From the blog CS@Worcester – Computer Science Exploration by ioplay and used with permission of the author. All other rights reserved by the author.
http://javapapers.com/design-patterns/decorator-pattern/
This short blog post discusses the uses, design, and implantation of the decorator design pattern. Specifically, in java. There are two reasons I chose to write about this topic. Firstly, I’m currently doing an assignment on the subject but, more importantly; Decorator pattern is one of the first ones covered in “Head First Design Pattern” (Freeman, Bates). I’m assuming that this means it is one of the more basic ones we should understand as developers. (Again, I’m still in school, I may be wrong) The reason I chose this blog in particular is because it’s example code is explained well and its example is more suited to what decorator pattern can do. I found the aforementioned text’s example a bit ill suited.
The blog’s example is to create a basic ‘IceCream’ object that has toppings applied at runtime. Decorators achieve their flexibility by creating wrappers to go around objects that communicate between the object and system. Decorators can also wrap wrappers that are already applied to an object. To do this, a decorator class is created that implements the same interface as the object we want to modify. From there, two concrete, decorator subclasses are created that can make the modifications the user or developers want. In this case, it’s adding nuts and honey.
From this blog I learned that the main advantage of decorators is “changing the behavior of an instance of our choice at runtime” which adds a great deal of flexibility to our project. This seems like a great alternative to what can be referred to as “sub-class explosions.” In other words, this is a good way to avoid having too many subclasses. This may not be necessary for the machine but, it’s a boon to the humans who have to work with the code.
The decorator pattern, from what I can tell, will most often be used when inheritance is either impossible or unreasonable for whatever reason. As I stated before, avoiding sub-class explosions is the most likely scenario for the later likely use of Decorator.
To me, this pattern seems fairly simple to understand and implement which excites me because that will make writing and practicing much less painstaking. My only gripe with this pattern is that, although it adds flexibility to our code and can reduce sub-class totals, that’s all it does. Of course, patterns are going to be one-dimensional because they are designed to tackle a single problem but, I’m not sure if there will be a lot of use of the decorator pattern in professional projects. That is, the problem it solves doesn’t seem too common or obnoxious. However, I enjoyed learning about it nonetheless because, for me it’s fun to solve issues of any kind.

From the blog CS@Worcester – W.I.P. (Something catchy) by aguillardcsblog and used with permission of the author. All other rights reserved by the author.
The blog that I chose this week was written by Trish Khoo. She was previously a manager on an engineering team for Google Maps until she decided to leave and return home to Australia. Her blog post (http://trishkhoo.com/2017/08/yes-all-testers-should-learn-how-to-code/) discusses the need for all testers to be able to effectively know how to code. I was going through some of her blog posts when this post caught my eye. I never realized that there was as big of a split as the poll showed that there is. The Twitter poll showed that 55% of the voters believed that all testers should be learning how to code. 45% felt that is was not necessary. This shocked me because up until now I was so rooted in the opinion that all testers should know how to code or be learning coding skills that I didn’t realize that it was even possible to be a software tester without having coding skills. I believe that testers should have coding skills because it will help when writing tests and analyzing code to find the bugs. If you don’t have coding skills then all you can really do is run pre-written tests and report back if it passed or failed. With coding skills you can rewrite codes that may improve your test results and productivity. Also if you are running white-box testing instead of just finding the bugs you can realize what the error is and what caused the failure. Then while you may not be authorized to change the code at that time it can help you learn more and help advance your career. Trish Khoo feels the same way and states her suprise that anyone would consider programming not essential in today’s software development workforce. She has done some research and found that programming is being entered into the school curriculum in Australia, the U.K. and the U.S. In some places even down to the elementary school level. In a world that is constantly becoming more computerized and connected I’m glad to see that here in the U.S. we are seeing a basic level of programming as a necessary tool for entering the workforce. At the end Trish Khoo also gives her reader two sites that are excellent starting points to start learning code. The resources are both free and easy to navigate with step by step instructions on a wide range of languages and instructions for users of all ages.

From the blog CS@Worcester – Tim's Blog by nbhc24 and used with permission of the author. All other rights reserved by the author.
Continuing with series of articles written by James Sugrue , taking each design pattern one by one, this week I read about the Adapter pattern.
I liked the real world analogy Sugrue gave for the easy understanding of the Pattern. The example he provided for the adapter pattern is based around AC power adapters. Say we’re visiting Europe from the US, with our laptop, which expects a US power supply. To get our laptop plugged in, we’re going to need to get a power adapter that accepts our US plug and allows it to plug in to the European power outlet. The AC adapter knows how to deal with both sides, acting as a middleman – this is the adapter pattern.
The Adapter is known as a structural pattern, as it’s used to identifying a simple way to realize relationships between entities. The definition of Adapter states: Convert the interface of a class into another interface clients expect. Adapter lets classes work together that couldn’t otherwise because of incompatible interfaces.
The classic diagram definition of the adapter pattern is given below:
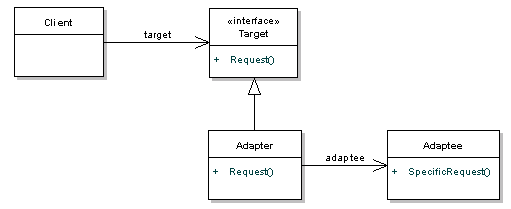
The Target interface defines the domain specific interface that the Client used, so the client collaborates with objects that implement the Target interface. On the other side of things, the Adaptee is the existing interface that needs adapting in order for our client to interact with it. The Adapter adapts the Adaptee to the Target interface – in other words, it translates the request from the client to the adaptee.
The main use of this pattern is when a new system wants to interact with legacy system using new interface which is not compatible with interface of legacy system. Moreover, when a class that we need to use doesn’t meet the requirements of an interface. For a particular object to contribute to the Properties view, adapters are used display the objects data. The view itself doesn’t need to know anything about the object the it is displaying properties for.
Some say that the Adapter pattern is just a fix for a badly designed system, which didn’t consider all possibilities. While this is a fair point, it is an important part of a pluggable architecture. It can also add a level of complexity to our code, making debugging more difficult.
After reading the article, I think in the integration aspects Adapter pattern is a time saver. I think that the adapter gives a great solution for legacy systems, and it doesn’t imply bad design. Even with a very good design, class which was once created would become a legacy class as more and more clients start using it. So, at one point of time, we might have to use adapters. With that being said, I think it’s true that adapter adds a level of complexity to our code. If there are no proper naming conventions and comments, the code is difficult to follow through. I believe we can minimize the complexity by modularizing the legacy class and adapter in separate files.
Source: https://dzone.com/articles/design-patterns-uncovered-0

From the blog CS@Worcester – Not just another CS blog by osworup007 and used with permission of the author. All other rights reserved by the author.
Today I will be discussing the adapter design pattern. According to a blog by journaldev.com, the adapter pattern is a design that is used to make two unrelated interfaces work together. The example used in the blog by journaldev.com refers to phone chargers and sockets. In this example, a phone battery needs 3V to charge, and the wall socket can either be 120V or 240V. So how do we take either 120V or 240V and convert it to 3V to charge the phone battery? The article suggests using an adapter, which would be the phone charger. In this example, the two interfaces are 120V and 240V, while the adapter interface is the phone charger. I feel it is important to note that according to the article, there are two approaches to the adapter pattern; object adapter and class adapter. The object adapter uses Java composition to adapt and the class adapter uses Java inheritance to adapt. However, the article points out that both approaches will result in the same conclusion. For this article, I want to focus on the class adapter approach.
The class adapter implements a public Class called SocketClassAdapterImp, and it extends the Socket interfaces and implements the SocketAdapter. This Class contains methods to override the different voltages using get() methods, and within the get methods it will convert the voltages supplied to the correct voltage, and return the converted voltage. The test class will check to see if the conversions were done correctly; that being if the test class calls for Volt v3 = getVolt(socketAdapter, 3);, it should return the correct voltage (3).
I chose this article because I wanted to expand on my knowledge of different design patterns, and this one seems to be rather important (especially since I didn’t know anything about it). I learned a lot from this article. I have never run into a situation where I have needed two different interfaces to communicate and work together. I think that this is a great approach, and it seems to be rather simple and straightforward. I learned that in order to “link” two different interfaces together, that all I need to do is create an adapter for them, which will provide some sort of conversion method to satisfy the subclass. I hope to implement this in my future works, should I run into a situation where this is applicable. I definitely think it will save a lot of space, time, and headache.
Here’s the link: https://www.journaldev.com/1487/adapter-design-pattern-java

From the blog CS@Worcester – The Average CS Student by Nathan Posterro and used with permission of the author. All other rights reserved by the author.
After being familiar with JUnit testing, I wanted to look more into Mocking. The idea of mock objects was confusing at first. In class our Prof. covered some examples how to use various mock object frameworks such as EasyMock and Jmockit. So, I thought to do some more readings on it. The article I read focusses on the concept of mocking in general. What is a mock object? What is it used for? Why can’t I mock object XYZ?
In the real world, software has dependencies. We have action classes that depend on services and services that depend on data access objects. The idea of unit testing is that we want to test our code without testing the dependencies. The code below would be an example of this:
import java.util.ArrayList;
public class Counter {
public Counter() {
}
public int count(ArrayList items) {
int results = 0;
for(Object curItem : items) {
results ++;
}
return results;
}
}
If we wanted to test the method count, we would write at test that addressed how the count method works. We aren’t trying to test that ArrayList works because you assume that it has been tested and works as designed. Our only goal is to test your use of ArrayList.
Let’s look at a slightly more realistic example:
public class Action extends ActionSupport {
private LookupService service;
private String key;
public void setKey(String curKey) {
key = curKey;
}
public String getKey() {
return key;
}
public void setService(LookupService curService) {
service = curService;
}
public String doLookup() {
if(StringUtils.isBlank(key)) {
return FAILURE;
}
List results = service.lookupByKey(key);
if(results.size() > 0) {
return SUCCESS;
}
return FAILURE;
}
}
We wanted to test the doLookup method in the above code, we would want to be able to test it without testing the lookupByKey method. For the sake of this test, we assume that the lookupByKey method is tested to work as designed. As long as we pass in the correct key, we will get back the correct results. In reality, we make sure that lookupByKey is also tested if it is code we wrote. How do we test doLookup without executing lookupByKey? The concept behind mock objects is that we want to create an object that will take the place of the real object. This mock object will expect a certain method to be called with certain parameters and when that happens, it will return an expected result. Using the above code as an example, let’s say that when we pass in 1234 for my key to the service.lookupByKey call, we should get back a List with 4 values in it. Our mock object should expect lookupByKey to be called with the parameter “1234” and when that occurs, it will return a List with four objects in it.
After reading the article, the key takeaways for me was to know that mock objects are a very valuable tool in testing. They provide us with the ability to test what we write without having to address dependency concerns. In my coming weeks I will learn about implementing a specific mocking framework.
Source: http://www.michaelminella.com/testing/the-concept-of-mocking.html

From the blog CS@Worcester – Not just another CS blog by osworup007 and used with permission of the author. All other rights reserved by the author.
In today’s blog, I will be discussing about a design pattern called the Command Design Pattern.
Command Design Pattern is a behavioral design pattern in which an object is used to represent and encapsulate all the information needed to perform an action or trigger and event at a later time.
The requests are wrapped as commands and passed to invoker object. The invoker object then looks for the appropriate object which can handle this command and gives the command to the corresponding object that will execute this command. The base class contains an execute() method that simply calls the action on the reciever.
A command class includes some of the following: an object, the method to be applied to the object, and the arguments to be passed when the method is applied.
Command Design Pattern allows you to store lists of code that is executed at a later time or many times. Client do not know what the encapsulated objects are, they just call the Command to run when execute is called. An object called the Invoker transfers this command to another object called the receiver to execute the right code.
First of, you have to create an interface that acts as a command. Command object knows about the receiver and invokes a method of the receiver.
Second, create your objects(client) that will serve as requests. The client decides which receiver objects it assigns to the command objects, and which commands it assigns to the invoker.
Third, create concrete command classes(also known as the receiver) that implements the command interface which will do the actual work when the execute() method in command is called.
Lastly, create an invoker object to identify which object will execute which command based on the type of command. The invoker object does not know anything about the concrete command, it only knows the command interface.

I selected this post because I wanted to learn more about different patterns that is not covered in class. This post shows you what the Command Pattern is and how it works. It also shows you the different steps and an example code on how to use the command design. The diagram above is from the post.
The Command Pattern seems to be very useful when you found yourself using code that looks like:
if (…..)
do();
else if(……)
do();
else if(……)
do();
else if
……..
I think Command pattern is very useful when you are creating an interface where objects are waiting to be executed, just like the menu interface.
https://www.tutorialspoint.com/design_pattern/command_pattern.htm

From the blog cs-wsu – Computer Science by csrenz and used with permission of the author. All other rights reserved by the author.
This post is password protected. You must visit the website and enter the password to continue reading.

From the blog CS@Worcester – by Ryan Marcelonis and used with permission of the author. All other rights reserved by the author.
http://www.kyleblaney.com/junit-best-practices/
This week we turn to the best testing practices in JUnit. This article lists out some of the most effective testing practices in JUnit that I hope to incorporate in my own testing practices. This is the main reason why I chose this blog post this week. Testing has two issues. First there are a lot of unit tests to conduct. So, testing needs to be lightning fast. Second, tests are used to indicate problems in the production code. Testing should fail if and only if the production code is broken. Therefore, testing needs to be extremely reliable.
This article discusses unit tests that needs to be ran completely in memory. This means that unit tests should not make HTTP requests, access a database, or read from a file system. These types of tests could take up too much time or are too unreliable to proceed with unit testing. Instead, they should be left to other types of tests such as functional tests. In addition, filesystems are too complicated to be considered for unit testing. The article lists the following complications:
Filesystems need to acknowledge the location of the current working directory. This can be difficult on developer machines and build machines. Many times, they require that the files to be read be stored in source control. However, it can be difficult to keep the items in the source control up to date.
My favorite recommendation above all in computer science is to not use static members in a test class. Static members creates dependencies in unit testing. For example, if a class depended on the DatabaseUtils.createConnection() method, then that method and whatever is dependent on it would almost be impossible to test. Instead, it would require having a database or a testing flag in the DatabaseUtils to be able to test the function. Another issue is that static methods creates behaviors that applies to all classes. In order to alter its behavior, a flag must be passed in as a parameter to the method, or the flag must be set as static. The main issue with passing flags in as parameters is that it changes the signature for every caller. This becomes cumbersome as more and more flags are added. The problem with the second approach is that the code can be everywhere.
The last recommendation discussed in the article is to not skip unit tests. A few ways to skip unit tests, but should be avoided, are to not use JUnit’s @Ignore annotation, to not use Mavel’s maven.test.skip property, to not use Maven Surefire Plugin’s skipTests property, and finally to not use Maven Surefire Plugin’s excludes property. Skipped unit tests provides no benefits and has to be checked out of source control and compiled. So, instead of skipping unit tests, they should be removed from source control.

From the blog CS@Worcester – Site Title by myxuanonline and used with permission of the author. All other rights reserved by the author.