Something that has haunted me since last semester is Gradle. Gradle is a flexible tool used in the automation process that can build nearly any software and allows for the testing of that software to happen automatically. I know how to use it, but it has been difficult for me to understand how Gradle actually works. So I wanted to do some research and attempt to rectify this.
Gradle’s own user manual, linked below in the ‘Sources’ section, provides a high-level summary of the tool’s inner workings that has been instrumental in developing my own understanding of it. According to the manual, Gradle “models its builds as Directed Acyclic Graphs (DAGs) of tasks (units of work).” When building a project, Gradle will set up a series of tasks to be linked together. This linkage, which considers the dependencies of each task, forms the DAG. This modeling is accessible to most build processes, which allows Gradle to be so flexible. The actual tasks consist of actions, inputs, and outputs.
Gradle’s build lifecycle is comprised of three phases: initialization, configuration, and execution. During the initialization phase, Gradle establishes the environment the build will utilize and determines which projects are involved in the build. The configuration phase builds the Directed Acyclic Graph discussed previously. It evaluates the project’s code, configures the tasks that need to be executed, and it determines the order in which those tasks must be executed. This evaluation happens every time the build is run. Those tasks are then executed during the execution phase.
When considering how to test a software, there are two major options: white box testing and black box testing. Both are uniquely useful depending on the purpose of your test.
White box testing is a technique that examines the code and internal structure of a software. This technique is often automated and used within CI / CD pipelines. It is intended to focus on the implementation and architecture of an application’s code. As such, this testing technique is useful in identifying security risks, finding flaws in the code’s logic, and testing the implementation of the code’s algorithms. Some examples of white box testing include unit testing, integration testing, and static code analysis.
Black box testing is a technique that tests a system and requires no knowledge of that system’s code. This technique involves a tester providing input to the system and monitoring for an expected output. It is meant to focus on user interaction with the system and can be used to identify issues with usability, reliability, and system responses to unexpected input. Unlike white box testing, black box testing is difficult to fully automate. In the event of a failed test, it can be difficult to determine the source of the failure. Some examples of black box testing include functional testing, non-functional testing, and regression testing.
Grey box testing exists in addition to these. It is a combination of white and black box testing which tests a system from the perspective of the user but also requires a limited understanding of the system’s inner structure. This allows the application to be tested for both internal and external security threats. Some examples of grey box testing include matrix testing, regression testing, and pattern testing.
This week I’ll be writing about test automation since the class has already covered this topic; specifically with section five and homework assignment two. According to the link above, test automation is the practice of running tests automatically, managing test data, and utilizing test results to improve software quality. In order for a test to be automated, it must fulfill three criteria. First, the test must be repeatable since there’s no real sense in automating something that can only be run once. Second, a test must be determinant meaning that the result should be consistently the same given the input is also the same every time. Third, the test must be unopinionated which means that aspects that are tested shouldn’t be matters of opinion. These criteria allow automated testing to save time, money, and resources which results in software to be improved efficiently.
Personally, I’ve experienced how efficient test automation is through simply working on assignments; for this class even. I don’t quite remember what assignment I was working on, but I recall using gitlab’s built in automated testing environment. I was nearly finished with the assignment but there was one function that wasn’t working correctly. Instead of having to go to the directory, run the tests, edit the code, and push the changes to gitlab, I had the option of simply running the tests and editing the faulty code on gitlab. The option was extremely convenient and freed up a decent chunk of time, and that was just a minor assignment. I’d imagine that applying automated testing onto larger projects would save even more time.
A transpiler is a program that converts code from one programming language to another programming language. This is comparable to a compiler, which is a transpiler that converts into machine code. It is also related to an interpreter, which behaves similarly, except rather than writing new code, it performs the code.
In my work on the Sea programming language I’m making, I took a long time writing a custom system for transpiling. However, while it succeeds at managing indentation pretty well, it makes actually transpiling statements much more challenging. So, recently I’ve gone back to the drawing board and have decided to pursue the classic model. If it ain’t broke, don’t fix it.
I’m working off of David Callanan’s Interpreter Tutorial. While it’s a very useful tutorial, the code is admittedly pretty poor, as it contains a few files with hundreds of lines. I’m also using Python exceptions to carry errors, since as far as I’m aware, Python has one of the safest exception systems (unlike C++). I can safely catch and handle exceptions to create useful messages for the user. The tutorial, on the other hand, is manually passing around errors from function to function. That said, the explanations are decent and it is a very useful tutorial. I’ll just have to make a lot of modifications and refactoring after each episode in the tutorial. That said, let’s go over how a transpiler works fundamentally:
The Process
The first step in transpilation is reading the source file. The lexer goes character by character and matches them to a set of predefined tokens. These tokens define a significant part of the syntax of a language. If it doesn’t recognize symbols, it can give an error that alerts the programmer. If there aren’t any errors, the lexer will go through the entire file (or files) and create a list of these matched tokens. The order of the list encodes the order that elements appeared in the file. Empty space and otherwise meaningless syntax symbols are not passed on.
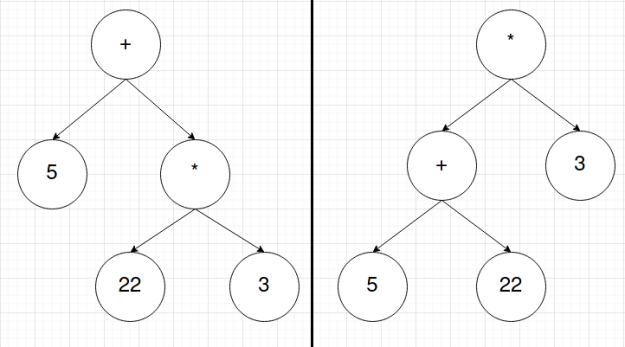
Next, the list of tokens is sent to the parser. The parser will then go through the list of tokens and create an Abstract Syntax Tree (AST). This is a tree of tokens whose structure encodes the order of operations of the language’s syntax. In this stage, the order of the list is lost; however, that order isn’t important. What matters is in what order tokens should be. For instance, the list of tokens for 5+22*3 might look something like [INT:5, PLUS, INT:22, MUL, INT:3] and the list of tokens for (5+22)*3 might look like [LPAREN, INT:5, PLUS, INT:22, RPAREN, MUL, INT:3]. The ASTs for these token lists will look something like this respectively:
Lastly, you then traverse the tree using depth-first-search (DFS), or more specifically, Preorder Traversal of the tree. This means we start at the root node and we the work our way down the left side and then down the right side. This is incredibly simple to implement using recursion. Each new node you check can be treated as the root to a new tree where you can then proceed to repeat the search. This occurs until the entire tree is traversed.
In this final stage, this is also where transpilers, compilers, and interpreters differ. Until now, the same code could be used for all three. At this point, if you want a transpiler, you use the AST to write new code. If you want a compiler, you use the AST to write machine code. If you want an interpreter, you use the AST to run the code. Notice this is why there is such a performance benefit to using a compiler over an interpreter. Every time you interpret code, assuming there is no caching system in place, the interpreter has to recreate the entire token list and AST. Once you compile code, it is ready to be run again and again. The problem then comes from compiled code potentially being more complicated for higher-level language features, and thus making it a pain to write a new compiler for every CPU architecture, due to different architectures using different machine instructions.
This week’s post is yet again about unit testing, but this time focuses on a much more broad question. After spending the past two posts trying to determine exactly what unit test and the variety of patterns available it is only natural that this next post focuses on how to write the tests well. As someone who personally has not written many, I can acknowledge that there may be some best practices I am not aware. Thus for this week’s post I am going to discuss another blog post, this one by Sergey Kolodiy, that goes into how to write a good unit test.
So how do you write a good unit test? Conveniently enough Sergey has compiled some principles, which are that the tests be easy to write, readable, reliable, fast, and truly unit, not integration. Easy to write and readable are pretty straightforward, and go hand in hand, as both just mean the tests should be easy to implement to cover lots of different cases and the output of the tests should easily identify problems. As for being reliable this means the tests must be giving the correct output, in addition to actually detecting bugs rather than just passing. Sergey also brings up a good reason for keeping the tests fast, being that lazy developers might skip the tests if they take too long. Finally there is the truly unit, not integration principle, which sounds more complex than it is. This simply means that the unit test and system should not access any external data or resources, such as a database or network, which will ensure that the code itself is working. Sergey chooses to focus on another very important part of writing good unit tests after this.
The rest of this blog revolves around discussing writing testable code as a good unit testing principle. He states a plethora of examples to show some bad practices, such as using non-deterministic factors. To clarify, this means some variable in a method that can have different values every time it is run; the example he uses helps put this into perspective more effectively. The original purpose of this post was simply to discuss writing the tests themselves, so I do not want to stray too much. I just wanted to mention this part, as it is interesting! If you want to learn more check out the link below.
Black and white box testing are the testing methods you usually hear about, but what is grey box testing? You probably have done a sort of grey box testing multiple times before learning other structured testing methods. While in black box testing the code structure is known and in white box testing the structure is unknown, in grey box testing, the structure is partially known. Grey box testing is sort of a combination of both black and white box testing. For example, when testing a drop down menu in a UI that your are creating, you can test the drop down on the application then change its internal code and try again. This allows you to test both sides of the application, its representation and its code structure. This is primarily used for integration testing.
The main advantages of using grey box testing include that it combines the pros of both black and white box testing while eliminating many of the negatives for each, you get the testing and feedback from both the developers and testers creating a more solid application, and makes the testing process quicker than just testing one at a time. The saved time from this also allows more time for developers to fix these issues. Lastly, it lets you test the application from both the developers and the users point of view. Some negatives of grey box testing are that there is usually only partial access to the code so you do not have full code coverage of what you are testing and also lacks in defect identification.
Grey box testing does not mean that the tester must have access to the source code, but that they have information on the algorithms, structure, and high level descriptions of the program. Techniques for grey box testing include matrix testing – states status report of project, regression testing – rerunning of the test cases once changes are made, orthogonal array testing, and pattern testing – verifying architecture and design. Grey box testing is highly suitable for GUI, functional testing, security assessment, and web services/applications. Grey box testing is especially good for web services with their distributed nature.
What this apprenticeship dives deep into is that along your journey of becoming a software craftsman, there will be many times you face trials and tribulations. There will be instances where you are burdened with working on a complex project and forced to solve problems you have no idea where to even start. I am sure most of us on our journeys have faced this pressure and this feeling of whether this is all worth doing or whether we are cut out for it. However, this pattern says that we need to have clear and strong motivations when these trials come to our front door. Many people have different motivations as well as altering goals and ambitions. We are all developing software and programming for various reasons as clearly defining these things help us moving forward. We wouldn’t have made it this far if it wasn’t for some motivation that kept us going.
I think this chapter is very relevant for all of us who are trying to become software engineers and architects, and to understand that this journey isn’t just some smooth sailing. There will be times where everything feels easy and you feel lucky to even be in these circumstances. However, there will be other times that bring either the best or worst out of us when we face hard problems related to programming which can mess with us mentally. As a result of this pressure, we need to keep our road and ambition clear on where we want to be heading. Our journey is unique but to keep the journey going we need some strong interior purpose and motivation to pick up our head and keep moving forward on those days when we feel like there is no purpose for doing this. It is at these times, our mind is fogged up with the current problem and not on the bigger picture as to why we are doing all this in the first place. To clear up that fog we need sustainable motivations to be our anchor and help us get through and keep the boat moving. Overall, software architects will need to develop the mindset of believing in themselves and know they are doing what is right for them if they have a clear vision.
There is more information available today than ever before, largely thanks to the advent of the internet and the ease with which that information can now be accessed as a result. Because of this increase in available information, the choices can often seem daunting when attempting to choose any source in particular. Especially when searching out books to look into regarding a specific topic, the sheer variety and number of options on even very niche topics makes it hard to make a decision on any one of them to study from.
Concerning the problem I just described, the pattern discussed in section 6 of of Apprenticeship Patterns, Reading List, outlines a useful technique for organizing the seemingly endless collection of books and reading which accumulates when studying a topic. The general idea is to keep a literal reading list, with all of the books (or other sources) you plan to read, reference, or look into recorded for the future. While the text seems to approach this from the context of physical books, I see no reason why this wouldn’t apply to any sort of reference, manual, or other self-educational materials in practice.
Additionally, the authors of Apprenticeship Patterns recommend maintaining the list as a priority queue, in that more important books or references will be studied first, before continuing down the list in order of importance. This seems like a good idea as it makes it easier to prioritize learning things in a more efficient order; subjects or topics which are less important would naturally proceed to rank lower and lower on the list and might eventually be removed if they stay towards the bottom for too long.
This process of removing dead-ends and passed topics of interest would keep the reading list relevant in the long term and help to maintain cohesion (it seems likely that irrelevant topics or sources would naturally begin to rank lower on the list, organically moving them out of the list over time).
Very probably in the near future, I will begin my own reading list, keeping track of prospective sources of information and reference which I feel will be interesting or useful to study. Considering the relative ease of implementing this pattern (keep a list), I would say that it is an easy way to optimize learning or research regarding any topic, but in the context of software development it seems even more relevant still. As there are oftentimes many disparate syntax manuals, tutorials, and textbooks to learn from which could benefit from the concrete organization afforded by a reading list.
Now that we have a good base understanding of unit tests we can dive a little deeper into the subject. When reading through the previous blog I saw mentions of different types of unit tests and my interest was piqued. From past examples I had seen, I assumed all of these tests followed the same format. Thus for this week’s post I wanted to discuss the different types of unit tests, as I only just learned that there were multiple. To aid in this I found a blog post from a programmer named Jonathan Turner who clarifies what each type is.
This blog post identifies three major types of unit tests, these being arrange-act-assert, one act, many assertions and finally test cases. The arrange-act-assert format is the more traditional method of unit testing and the one that most people are probably familiar with. This format involves setting up the conditions for the test, running the code with the test conditions, and subsequently examining the results of the test. As for the one act, many assertions pattern it uses the same basic setup as the previous pattern, but differs in having multiple assertions about the code at the end of the test. Finally there is the test cases patterns, which takes a different approach than the other two by using a collection of many inputs to check their respective outputs. Now that we understand what each of these patterns are we can discuss their advantages.
Each of these tests have their own use cases where they will be most efficient. The arrange-act-assert pattern is the traditional method and, thus, the most straightforward to implement. This pattern should mostly be used for testing specific conditions or situations of a certain system. The one act, many assertions pattern is best used when you have code that has different sections that each act independent of each other. To clarify, use this if testing a method that has multiple blocks of code that do not affect each other, but must each be validated. Finally, the test cases method is very advantageous if you have a program that has a wide span of input output values. This could be one implementing an algorithm that converts values; the blog post gives a very good example. I hope that this post gave you a glimpse into the variety of unit tests available and would recommend checking out the blog post by Jonathan Turner for further information.
Review Scrum :Reviewed the scrum guide and understand the process.
For the project, I am part of the reporting team. I mainly work on the event system software that sends and receives a message to other systems using the RabbitMQ messaging system interface. I also work with the database person and did make a docker example project and a cheat sheet of all the docker commands.
What worked well / did not work well
The thing that worked well for our group is that we were good at organizing everything and everyone was responsible for certain tasks, and I noticed that some of the tasks overlap between us. For example, the backend person must work more closely with the database person. The first few days we were a little confused, but as everything came together our workflow improved tremendously, which helped to complete all the issues for sprint 1. One thing that did not work well is that we had few problems with GitLab, our template was not loading properly at the start so we could not assign proper labels to issues. Also, during meetings, we should have done the group tasks together instead of a person just doing the task.
What changes could be made to improve as a team?
For a project, communication is the key to success. I think that as a team we should be communicating more rather than doing our tasks during the meetings. For instance, if someone is struggling to figure something out, the other team members can help the person and give insights to lead the individual in the right direction. Also, for the next sprint when we are making cards we should be more specific about the descriptions and properly think about the issue and how we can achieve it and it is clear to the person what needs to be done.
What changes could be made to improve as an Individual.
As an Individual, the change that I can make is to plan properly for the next sprint. The first sprint I started of slow because I was not sure how you do something or if I am doing it the right way. A properly planned sprint will help me to go with a flow and have a balance rather than getting overwhelmed by doing all the tasks towards the end of the sprint. My communication with the team should get better as we move on to the next phase.
Overall, this was a great learning experience. I think the first sprint was a success and a starting point for our team to move forward with a vision to complete the task that is assigned for us. I’m looking forward to working with the other teams to combine everything and see our progress.