REST – INSOMNIA(c)

This week let’s take another peek at the FoodKeeper API. We’ll review the endpoints and how to submit a request to retrieve data. Before we jump into this you need to download and install a REST client. I highly recommend Insomnia, the app not the sleep disorder, (download it here) I’ll wait… Now that you have Insomnia installed let’s talk about endpoints. Last week we covered the four primary HTTP verbs used with REST. Did you have a chance to visit https://www.restapitutorial.com despite the name of the website these aren’t tutorials on how to make REST calls but more like development guidelines for developers writing REST API’s.

So why did I recommend it? Because understanding how a good RESTful API is designed will make it easier to craft your REST calls. So the 4 basic HTTP verbs (POST, GET, PUT and DELETE) are CRUD (Create, Read, Update, Delete) operations. · POST = Create · GET = Read · PUT = Update · DELETE = Delete Kind of makes sense, right? These also make up the endpoints you access with your REST client. In JAVA we add an annotation to the class and the getter and setter methods to define the endpoint. For the FoodKeeper API we are using the Spring Framework (https://spring.io/) to help setup the Rest components. After all the imports are declared the class must be annotated with @RestController so that the compiler knows how to process it. Each endpoint must be annotated to reflect what it does. A POST endpoint would be annotated like this: @PostMapping(“/list/new”) The part in parenthesis indicates the URL path that you would pass as part of the REST Client call and is the actual endpoint. Let’s look at an online example. In a new tab on your browser go to: http://dummy.restapiexample.com/ The site lists 5 public endpoints you can practice against: · GET /employee · GET /employee/{id} · POST /create · PUT /update/{id} · DELETE /delete/{id} Note the curly braces with id in between them – this indicates that you will be passing a value.
Open your REST client, in Insomnia you would type in the URL in the White field in the top center of the screen and select the REST Method to the left of it: Click the Send button and watch the Right hand column you will see it populate with employees. This is the first entry in the list that was returned for me: Play around and get familiar with your REST Client and hit some of the other endpoints at

http://dummy.restapiexample.com/ TIP: For the endpoints above with {id} just append the url string with a number like this: http://dummy.restapiexample.com/api/v1/employees/6821 All right go play and learn something! #CS@Worcester #CS448

From the blog Michael Duquette by Michael Duquette and used with permission of the author. All other rights reserved by the author.
Behavior-Driven Development (BDD)

Once again, Martin Fowler has some comments on this week’s topic, but this post will mainly reference Dan Terhorst-North’s post, which better describes the reason and motivation for creating Behavior-Driven Development. BDD arose from TDD and it is better to think of it as an extension of TDD.

BDD tests follow the pattern “Given-When-Then” (notice the similarity to Arrange-Act-Assert). Mockito can define this pattern, but the BDDMockito aims to follow the same human-readable principles. The idea is simple: given a precondition, if some other condition occurs, then something else should have happened. Fowler’s example includes checking the state of an object, so clearly BDD is not simply testing the behavior of an object. However, it is a very important part.

Terhorst-North mentions that BDD picks up where TDD left off. I have seen some evidence that BDD has influenced TDD, such as describing tests as a sentence like “testFailsForDuplicateCustomers()”, which can be seen in many TDD test examples. Imitation is the highest form of flattery, so clearly this is a good approach. Or maybe, BDD is just more consistent in this naming because they put it in the specification.

Regardless, BDD developed out of Agile processes. It aimed to make writing tests part of the entire process and help future developers work well together in doing so. This is where many of Terhorst-North’s ideas stemmed from, and his main point, and the motivation behind the name BDD, is that “‘Behaviour’ is a more useful word than ‘Test’”. If you describe each test as a behavior, you know how to define the test, and you know when the specification has changed enough to warrant deletion of a test.

“What to call your test is easy – it’s a sentence describing the next behaviour in which you are interested. How much to test becomes moot – you can only describe so much behaviour in a single sentence. When a test fails. . . either you introduced a bug, the behaviour moved, or the test is no longer relevant.”

Daniel Terhorst-North, “Introducing BDD”

Real mastery of a subject is when it becomes simple. BDD is the next step to understanding testing on an intuitive, subconscious level. It wasn’t immediately obvious that tests don’t need to be difficult to write, but Terhorst-North managed to figure out a way to make it so. It is another part of the iterative process that is technology. Next time I encounter a difficult concept, I think asking three questions, in order, might help: Am I misunderstanding the concept? Do I just need more practice? Or is this method flawed?

Someone saw a flaw in TDD and developed BDD to improve it. This came only through thorough understanding, practicing, and identifying problems. This is applicable to any career, to provide real value.

From the blog CS@Worcester – Inquiries and Queries by ausausdauer and used with permission of the author. All other rights reserved by the author.

FPL&S 2: Uploading Files Through an API

I must say, this project has gotten much more complicated than I was expecting, even last week. Not difficult necessarily, but requiring much more knowledge of the framework that I expected. But after a steep hill over the course of the week, the good news is the features of Angular are much more powerful and exciting than I had thought. While the project specification requires communication with a REST API, which will be used for the database, I also require remote file storage. Since I will be using Google Firebase for both of these services, and file storage has a much simpler API which I’d prefer to use with mobile, I opted to not use the REST API for file storage.

Understanding the Firebase Storage API was the first step, but after reading through much of Google’s documentation for the web API, I still had difficulty translating everything to Angular and TypeScript. But luckily, Google is kind of a big deal these days, so David East from Angular posted a short tutorial that helped me bridge the gap.

The most mindblowing portion of completing this task was the concept of an async pipe, which I will explain shortly. You can’t get through a CS degree without learning and performing asynchronous tasks, but this syntax was completely alien to me. Take this HTML from David East’s post:

<label for="file">File:</label>
<input type="file" (change)="upload($event)" accept=".png,.jpg" />

This demonstrates Angular’s ability of event binding. The (change) syntax is binding a change in input to the upload() method in the Component, while also passing the event DOM, from which you can get the File using TypeScript. My needs were a bit different, but this same syntax can be used to simply store the file when the input is changed. Then, a separate upload button’s (click) event can trigger an upload within in the Component:

<button class="btn" (click)="submit()">Upload</button>

From there, my Component uses Typescript to communicate with the AngularFireStorage service, and even update a progress bar. This is where the async pipe comes in:

<progress max="100" [value]="(uploadProgress | async)"></progress>

More binding! This time, we’re using square brackets to bind the value property of the HTML progress tag to an Observable<number> object, which we can get within the Component from the AngularFireStorage service. This Observable will update the progress bar as the file uploads if we pipe it through an async task, as shown above. This subscribes to the Observable (or Promise) and automatically unsubscribes when the Component is destroyed.

I highly recommend reading over Angular’s template syntax documentation to get better acquainted with these concepts.

After completing this portion of the project, I’ve determined I’ve been thinking too much in terms of JavaScript, because I’ve found some of TypeScript’s rules to be a hindrance. Some of the examples noted above have shown me that if I get back to an object-oriented, strongly-typed mindset, I will be able to work quicker on future tasks. Essentially, this is just a matter of getting practice with a new language and framework.

From the blog CS@Worcester – Inquiries and Queries by ausausdauer and used with permission of the author. All other rights reserved by the author.

Displaying JUnit Test Reports on GitLab

In this blog post I wanted to look at something interesting that I found a while back this semester when we were learning about JUnit testing and combining this with GitLab. In class we learned how to use Gradle to build our Java programs and to run JUnit tests and get GitLab to run them when we pushed our code to GitLab using GitLab’s continuous integration feature. As GitLab’s documentation says, using Gradle and JUnit on Gitlab will show whether the tests fail on GitLab, but I wanted to take this a step further and looked into seeing if it was possible to display more information about JUnit test statuses on GitLab itself. This led me to finding this article in GitLab’s documentation about a feature in GitLab that can display JUnit test reports on merge requests. As this documentation shows this can easily be enabled on any GitLab project that already is a Java project with GitLab’s CI using Gradle to run JUnit tests. All you need to do is add the necessary lines in the GitLab CI/CD config file provided in this document to display the tests reports in a merge request.

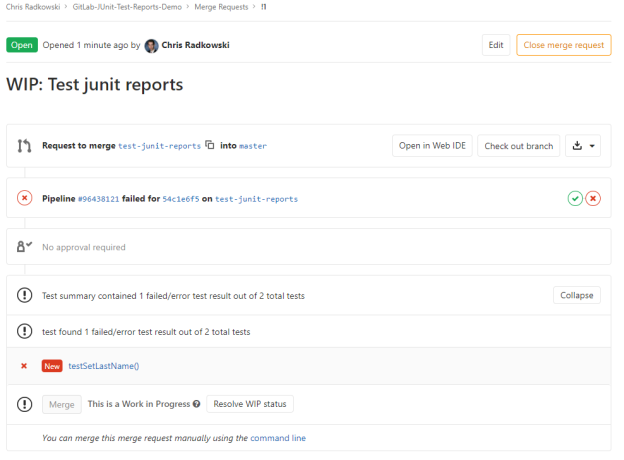
I already tried this before a couple of months ago when I first found it, but I wanted a nice demonstration of this feature, so I created a little Java test program that has a basic Student class with a JUnit test class. I then converted this to a Gradle project using some previous programs we have used as examples and instructions provided from this class and then pushed this to a new GitLab project. On the master branch of this project the tests pass as indicated by the previous GitLab CI job. After getting the initial code pushed and passing the tests, I then created a testing branch where I changed the code in the Student class so that one of the tests (testSetLastName) would deliberately fail. Creating a merge request on GitLab for this branch and pushing this “broken” code results in the test failing when it runs on GitLab with Gradle and therefore GitLab displays on the merge request which JUnit test(s) failed:

blog-post-1-screenshot.PNG

I found this little feature to be pretty awesome in combining software testing along with software management tools and can easily see how this would be very useful for checking if new or modified code in a project causes tests to fail. In addition to checking if the tests pass, this feature allows us to easily see which tests fail, and directly on the merge request itself, instead of the alternative that the documentation says of looking through reports possibly containing thousands of lines for the failed test. I will definitely be implementing this on any projects I’m working on that use JUnit tests and are hosted on GitLab.

Link to article: https://docs.gitlab.com/ee/ci/junit_test_reports.html

Link to demo program: https://gitlab.com/cradkowski/gitlab-junit-test-reports-demo

From the blog CS@Worcester – Chris&#039; Computer Science Blog by cradkowski and used with permission of the author. All other rights reserved by the author.

Path Testing Blog

Hello everyone! For this blog I wanted to share an article I found online written by Jeff Nyman ( https://testerstories.com/2014/06/path-testing-independent-paths/ ) which talks about Path Testing. I came across his article when I was trying to do some independent research about Path Testing and DD-Path Graphs for our 5th Homework Assignment in class. For our assignment, we are given 27 lines of code and need to come up with the DD-Path Graph for it. After starting to work on the assignment with Path Testing, I wanted to do some more research to make sure I completely understood the material, and that’s where Nyman’s article helped out a lot.

Path testing is a type of structural testing method that takes the source code of a program and finds all possible executable paths. The reason why this is used in computer science is because it can help find faults within a piece of code. DD-Path Graphs, or decision-to-decision path graphs, looks at the path of execution within two decisions for a piece of code. It is essentially a flow chart which follows the whole code.

Nyman’s article gives a lot of information on Path Testing, but the thing I like the most about his article is how he breaks down the way you can calculate the independent path for structures systems. He gives the following equations, which were created by Claude Berge, for calculating the independent paths:

  • Independent Paths = Edges – Nodes + 2
  • Independent Paths = Regions + 1
  • Independent Paths = Decisions + 1

He then goes into detail and gives a lot of examples of how to use these for specific coding problems, all of which helped me understand the material a little bit better. The reason why I found this so helpful was because our in-class assignment had us specifically looking for edge coverage and node coverage, and overall Nyman’s article helped me fill in the gaps to better comprehend the subject.

From the blog CS@Worcester – Nick’s Blog by nramsdell1 and used with permission of the author. All other rights reserved by the author.

The Great Pyramid of Software Testing

They all warned me that this was a horrible idea, yet here I am, guided only by the determination to find the uncovered truth lying behind the stone walls erected by our ancestors centuries ago. I walk across the endless sweltering sea of sand, my skin boiling and the contents of my canteen running dangerously low. I continue for what feels like an eternity in the direction I had estimated the pyramid to be in, although after days of walking I am starting to have my doubts. As the last drop of my strength gives way I find a small dune to rest on. Hours pass as I bake in the desert sun knowing that I may never find the truth I am searching for. I open my eyes to find Martin Fowler reaching his hand out to me silently expressing his infinite knowledge of the desert I find myself in. Fowler hands me his flask of water and I feel my energy and determination replenish and we walk through the desert speaking very little, yet I know now that we will find the Great Pyramid of Software Testing.

To anyone reading this, I am deeply sorry that you had to read that little prologue, but I mean, how could I not make a desert journey scene when talking about the software testing pyramid. Anyways, fluff aside, I decided to read a post that Martin Fowler made in 2012 that is still extremely relevant today. As I am taking a software testing class currently I thought it would be interesting to see where the type of testing we have been doing fits into the actual pipeline of software development.

In Fowler’s article he talks about the differences between low-level unit tests, high-level UI driven tests, and everything in-between. The pyramid has unit tests on the bottom, acting as the base and where the majority of tests should be. Then, just below the GUI driven testing, comes service layer tests. These are tests that are generally API driven that don’t suffer from many of the problems that UI driven testing has. Lastly, the tip is where the UI tests are, these tests can prove to be useful but have many drawbacks.

UI tests are the most brittle of the three types of tests as many times moving an element of the UI can result in having to refactor most of your tests. Fowler describes high-level tests as a second line of defense. This can prove to be useful because if a high level test fails it can expose underlying holes in your unit tests.

With test-driven development being so prevalent today with Agile frameworks, it makes sense that Fowler would recommend that unit tests are created whenever a high-level test exposes a bug as it makes it much easier to focus on squashing the specific bug that was found in the high-level test. Fowler also makes a case for always trying to use tests that lend themselves well to the type of application you are developing. If it is a javascript program it is best tested using a javascript testing framework like Jasmine.

Fowler’s article is filled to the brim with useful and topical information about testing. unit tests are the most flexible and powerful test type so it makes sense that anywhere a unit test could be used it should be. While the other two types of testing are less agile, they can provide benefits when usability is taken into account and only tests that make sense for UI level test are made.

From the blog CS@Worcester – Your Friendly Neighborhood Programming Blog by John Pacheco and used with permission of the author. All other rights reserved by the author.

Part 3: Setting up your first Angular 8 project

…and we’re back! Last week we created the get-all-employees component and the employee class. This week we’ll finish up by modifying: get-all-employees.component.html app.component.html app.modules.ts app.component.ts Before we move on open up the get-all-employees.component.ts and make sure you have an import statement for the Employee class up top. It should look like this: import {Employee} from ‘../employee’; If it’s not there please add it. Ok now moving right along… Once we touch up these four files you’ll have a working RestAPI Get call on your page. So let’s get to it and wrap this up! Open the get-all-employees.component.html – this defines how each employee is displayed. Modify using this code:

Get All Employee

  • Employee id:{{employee.id}}
    Employee Name:{{employee.employee_name}}
    Employee Salary: {{employee.employee_salary}}
    Employee Age: {{employee.employee_age}}
  • {{error.error}}

Let’s break down what we did here. We created a small form that has a button and two lists. The button, when clicked, calls our getAllEmployee() method which populates our employees Array. We handle populating the employee list on screen by using *ngFor, this is Angulars handly little for loop. *ngFor loops through the employees Array and returns each employee as a separate list item filling out the list. The *ngIf will only display IF an error is received. Now let’s look at the app.component.html now. Use this code to complete it:

Select an action

Here’s what we are doing in the app.component.html. Take a look at this line first: I’m defining the radio button as an add button and setting the appsection value to 1. When the radio button is selected the appsection==1 which we use further down to display the app-get-all-employees in this section:

This is a handy little trick because we can define multiple appsections and using *ngIf display only the desired app. For example let’s say we have another app component called app-get-employee that returns a single employee. We could setup a second radio button and have it assign “2” to appsection. Then we would setup a second *ngIf for appsection==2 just like we setup appsection==1 except passing in the component like this: In this manner we can build out an entire site as a single page app. It would be all action driven, reactive and fluid. It’s a great time to be playing on the web! O.k. moving right along now… open up the app.module.ts and modify it to include an import and a declaration for GetAllEmployeesComponent. The import statement will look like this: import { GetAllEmployeesComponent } from ‘./get-all-employees/get-all-employees.component’; and you want to append this to the list of declarations in @NgModule: GetAllEmployeesComponent, Save your work and let’s move on to the app.component.ts all we need to do here is an import statement for the Employee class: import {Employee} from ‘./employee’; Ok now save all your work and launch the angular site. Hit that radio button, now click the Get all Employees button. BOOM a screenful of employees! So in these last two posts I showed you how to setup a basic API call to an existing test API site. We also learned how to use appsection to load components on a page. Now go make it pretty and add more functionality. This article is just over a year old but it has great tips and tricks for working with TypeScript and Angular. #CS@Worcester #CS343

From the blog Michael Duquette by Michael Duquette and used with permission of the author. All other rights reserved by the author.

Part 3: Setting up your first Angular 8 project

…and we’re back! Last week we created the get-all-employees component and the employee class. This week we’ll finish up by modifying: get-all-employees.component.html app.component.html app.modules.ts app.component.ts Before we move on open up the get-all-employees.component.ts and make sure you have an import statement for the Employee class up top. It should look like this: import {Employee} from ‘../employee’; If it’s not there please add it. Ok now moving right along… Once we touch up these four files you’ll have a working RestAPI Get call on your page. So let’s get to it and wrap this up! Open the get-all-employees.component.html – this defines how each employee is displayed. Modify using this code:

Get All Employee

  • Employee id:{{employee.id}}
    Employee Name:{{employee.employee_name}}
    Employee Salary: {{employee.employee_salary}}
    Employee Age: {{employee.employee_age}}
  • {{error.error}}

Let’s break down what we did here. We created a small form that has a button and two lists. The button, when clicked, calls our getAllEmployee() method which populates our employees Array. We handle populating the employee list on screen by using *ngFor, this is Angulars handly little for loop. *ngFor loops through the employees Array and returns each employee as a separate list item filling out the list. The *ngIf will only display IF an error is received. Now let’s look at the app.component.html now. Use this code to complete it:

Select an action

Here’s what we are doing in the app.component.html. Take a look at this line first: I’m defining the radio button as an add button and setting the appsection value to 1. When the radio button is selected the appsection==1 which we use further down to display the app-get-all-employees in this section:

This is a handy little trick because we can define multiple appsections and using *ngIf display only the desired app. For example let’s say we have another app component called app-get-employee that returns a single employee. We could setup a second radio button and have it assign “2” to appsection. Then we would setup a second *ngIf for appsection==2 just like we setup appsection==1 except passing in the component like this: In this manner we can build out an entire site as a single page app. It would be all action driven, reactive and fluid. It’s a great time to be playing on the web! O.k. moving right along now… open up the app.module.ts and modify it to include an import and a declaration for GetAllEmployeesComponent. The import statement will look like this: import { GetAllEmployeesComponent } from ‘./get-all-employees/get-all-employees.component’; and you want to append this to the list of declarations in @NgModule: GetAllEmployeesComponent, Save your work and let’s move on to the app.component.ts all we need to do here is an import statement for the Employee class: import {Employee} from ‘./employee’; Ok now save all your work and launch the angular site. Hit that radio button, now click the Get all Employees button. BOOM a screenful of employees! So in these last two posts I showed you how to setup a basic API call to an existing test API site. We also learned how to use appsection to load components on a page. Now go make it pretty and add more functionality. This article is just over a year old but it has great tips and tricks for working with TypeScript and Angular. #CS@Worcester #CS343

From the blog Home | Michael Duquette by Michael Duquette and used with permission of the author. All other rights reserved by the author.

New Tricentis qTest Case Studies Highlight Testing’s Critical Role in Agile Transformation

Hello again everyone. For my second blog of the semester (Technically third because of intro post) I am using another article by Lanier Norville. Last week, I wrote about her article on testers becoming agents of change. This week, however, I am going to be writing about some Tricentis qTest Case Studies. I picked this article because it talks about Agile Transformation, and I am personally fond of agile frameworks.

Once again Norville leads off with a nice and small yet appropriate introduction on what she is discussing. In this case, she is talking about how companies are transforming agile and DevOps. She uses her case studies to show the “critical role” (Norville) of testers.

The first case study involves a payment processing technology provider. The VP of Test Engineering, Nick Jones attended an event on DevOps and he decided that his organization needed to transform as well. Norville then discusses how payment options have an effect on whether customers end up buying something or not. Jones developed a DevOps roadmap with his team and according to Norville they have reduced the time of delivery from “14 hours to 4 minute” (Norville) This is interesting because it is a huge drop in time which is huge for a company that is constantly making deliveries.

The next study isn’t as much of a success story as the last study, however it still seems like it is helpful. The University of the West of England switched to Tricentis qTest before using an agile framework. The head of testing, Heather Daniels that she “needed to implement a test management tool” (Norville) She needed to do this in order to maintain everything that the school used. (Library systems, eLearning systems, etc.) As of now, according to Norville, two of the organizations have switched to agile. It is a big change according to Daniels, and the University still isn’t used to making small functional deliveries, but it seems like they are getting the hang of it. I like that they switched because now they are “prioritizing the things that are most important to users first.” (Norville)

This article, in my opinion, was a little bit more difficult for me to follow, but it was still a very well written article overall. I did like how well she described each of the scenarios and what was done with qTest to transform into an agile framework. It is obvious that the article is supporting the websites own product, but that is what companies are supposed to do. Overall, this was a good read, but for my next blog, I will probably be visiting another website.

New Tricentis qTest Case Studies Highlight Testing’s Critical Role in Agile Transformation

From the blog CS@Worcester – My Life in Comp Sci by Tyler Rego and used with permission of the author. All other rights reserved by the author.

Decision table test design technique

Decision table also known as cause effect
table it is one of the black box test design techniques

what are that black box design techniques?

Black Box Testing is a software testing method in
which the internal structure/ design/ implementation of the item being tested
is NOT known to the tester. The black box is designed techniques are widely used as a best
practice in the industry. Black box techniques are used to pick the test cases
in a systematic manner by using these techniques we could save lots of testing
time and get the good coverage.

 Decision Table Test Case Design Technique:

This test technique is appropriate for functionalities where it has the logical relationships between the inputs (if-else logic). In Decision table technique, we are working with a combination of inputs. To identify the test cases with decision table, we have conditions and actions. We take conditions as inputs and actions as outputs.

As an example, for that lets practice on a small test case which is Login Screen

Let’s identify the conditions our inputs:

The user will type in the correct username and password, the user will be logged in successfully

If any of the input is wrong, an
error message will be displayed.

Now let’s divide our condition in to
true, false, error, and home screen

  • T for true – Correct username/password
  • F for false– Wrong username/password
  • E for error– Error message is displayed
  • H for home– Home screen is displayed

That leads us to the cases we are going to create:

  • Case 1 – Username and password both were wrong. The user is shown
    an error message.
  • Case 2 – Username was correct, but the password was wrong. The user
    is shown an error message.
  • Case 3 – Username was wrong, but the password was correct. The user
    is shown an error message.
  • Case 4 – Username and password both were correct, and the user
    navigated to homepage

Now let’s try to put all of this
into one decision table  

conditions Rule1 Rule2 Rule3 Rule4
Username F T F T
password F F T T
Output E E E H

And this is the way to create a decision table

Advantage of decision table technique:

  1. every complicated business can be converted easily into a
    test scenarios & test cases using this technique.
  2. The first iteration is used as input table for next
    tables.
  3. Once you get the idea of how the test works it become simple
    to understand and anyone can use this method.
  4. It gives a full coverage of test cases which help to
    reduce the rework.


Works Cited

From the blog CS@Worcester – Shams&#039;s Bits and Bytes by Shsms Al Farees and used with permission of the author. All other rights reserved by the author.