C4 Models

The c4 model is a tool used by programmers to articulate their software designs in a translatable manner. Using this model a programmer should be able to communicate their design easily to those outside the professions, say a stakeholder for example, and also to their programming team. The model should have levels and using “abstraction first” the levels should show different amounts of complexity that overall allow you and your team to implement the data. A great example of the overview of the c4 model is to think of google maps and their zoom feature. If you are looking at a country and are zoomed out so that you can see it in its entirety, then you may only see the name of the country and what is surrounding it. Then if you zoom in a bit you may see the states that make up the country. Zooming even more, you can see the cities, towns, and you may zoom all the way in to a specific location and see what is there. This allows the viewer to utilize the abstraction to avoid being overloaded with information and instead look at the data in layers of complexity. 

C4 models are implemented to represent the three levels of design. The three levels are known as:

“System design refers to the overall set of architectural patterns, how the overall system functions—such as which technical services you need—and how it relates to larger enterprise contexts. System design is shown in a Context diagram.

Application design refers to the combination of the services that are needed and how to implement them. Application design is shown in a Container diagram.

Service design refers to the patterns and considerations that are involved in implementing specific services. This type of design starts to emerge in a Component diagram”.

Relating these three levels of design to the google maps example starts to make things clear. The system design would be the view of a country in its entirety without too much detail, or in other words the big picture. Application design is a bit zoomed in and could show the states that makeup the country and helps to show the relationship between data inside the big picture. Service design would be the specifically zoomed areas where you can see in much more detail and see the function of data.

This c4 model stands out to me because it helps to bridge the gap between those involved in the field and those who are not. It provides a concise and organized way of communicating project ideas and patterns to your team  and to whom you are working with that may not understand the other diagrams programmers use. For example, UML diagrams are great for programmers but you don’t want to present that to someone who isn’t a programmer. They will have no clue what they are seeing, but with a c4 model you can capture the big picture and have the details on hand as well.

(n.d.). Retrieved from https://www.ibm.com/garage/method/practices/code/c4-model-for-software-architecture/.

From the blog cs@worcester – Zac's Blog by zloureiro and used with permission of the author. All other rights reserved by the author.
REST APIs

The latest in-class activity from CS-343 introduced me to Representational
State Transfer (REST), which is an architecture used by Client-Server APIs. The
activity was helpful in explaining standard HTTP methods which are used by REST,
specifically GET, PUT, POST, and DELETE, but it didn’t really focus on
explaining what REST actually is and how APIs that use it are structured. For
this reason, I decided to further look into the fundamentals of REST and how to
use it. While researching, I came across a blog post by Bivás Biswas titled “How
not to blow your REST interview.” The post can be found here:

While this blog does indeed give interview tips, it also helps
explain REST and the design principles it follows. Biswas focuses on five main
principles of REST that RESTful APIs follow, which include the contract first
approach, statelessness, the client-server model, caching, and layered
architecture. I chose to share this blog post because its organization of its
information on REST helped make it easy to follow and understand. For this reason,
I think the blog is an excellent resource for learning about REST, and I could
see myself coming back to it as a reference if I work with REST in the future.

I liked that Biswas opened the blog by acknowledging common
misconceptions about RESTful APIs that he has heard in interviews. One of these
misconceptions was that RESTful APIs simply follow the HTTP protocol, which is
a misconception I may have developed myself due to the aforementioned class
activity being focused on HTTP. The fact that this was immediately stated as
incorrect helped indicate to me that REST was more detailed and complex than I
understood from class.

I also thought that Biswas’ approach to explaining the five
principles of REST was particularly effective. He makes use of analogies and
examples to demonstrate each concept instead of relying on technical terms that
newcomers to the topic, such as myself, would likely not understand. For
example, he explains the contract first approach with a mailbox analogy by
suggesting that applications can get the same data without changing URIs in the
same way that people can get their mail without changing mailboxes. Similarly, layered
architecture is explained by comparing an API’s Gateway layer to a bed’s
mattress. Much like a bed frame can be changed without affecting how the
mattress feels, changing the fundamental layers of a RESTful API does not
change how applications interact with the API’s Gateway. Analogies and examples
always help make complex concepts easier to understand for me, and their use in
this blog greatly helped increase my understanding of REST and its 5 core
principles. I am by no means an expert on REST just because of this blog, but
it has certainly helped prepare me to learn more about it in the upcoming class
activities.

From the blog CS@Worcester – Computer Science with Kyle Q by kylequad and used with permission of the author. All other rights reserved by the author.

Docker and Automated Testing

Last week, in my post about CI/CD, I brought up Docker. Docker can be used to create an “image”, which is a series of layers that are built upon each other. For example, you can create an image of the Ubuntu operating system. From there, you can define your own image with Python pre-installed as a second layer. When you run this image, you create a “container”. This is isolated and has everything installed already so that you, or anyone else on your development team, can use the image and know reliably that it has all necessary dependencies and is consistent.

Of course, Docker will get much more complicated and images will tend to have many more layers. In projects that run on various platforms, you will also have images that are built differently for different versions.

So how does this apply to CI/CD? Docker images can be used to run your pipeline, build your software, and run your tests.

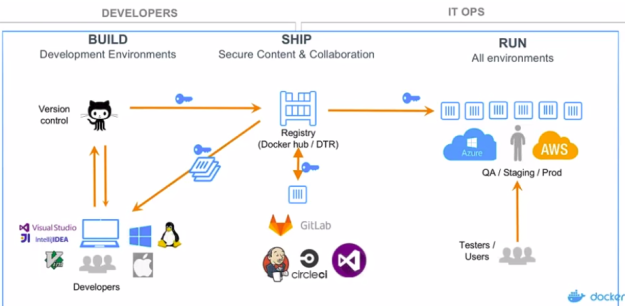
The company released a Webinar discussing how CI/CD can be integrated with Docker. They discuss the three-step process of developing with Docker and GitLab: Build, Ship, Run. These are the stages they use in the .gitlab-ci.yml file, but remember you can define other intermediate stages if needed. The power of CI/CD and Docker is apparent, because “from a developer’s perspective, all you have to do is a ‘git push’ — and that’s it”. The developer needs to write the code and upload to version control and the rest is automated, with the exception being human testers who give feedback on the deployed product. However, good test coverage should prevent most issues and these tests are more about overall experience.

Docker CI and Delivery Workflow
From Docker Demo Webinar, 4:49

Only five lines of added code in .gitlab-ci.yml are necessary to automate the entire process, although the Docker file contains much more detail about which containers to make. The Docker file defines the created images and the code that needs to be run. In the demo, their latest Ubuntu image is pulled from a server to create a container, on which the code will be run. Then variables are defined and Git is automated to pull source code from the GitLab repository within this container.

Then, a second container is created from an image with Python pre-installed. This container is automated to copy the code from a directory in the first container, explained above. Next, dependencies are automatically installed for Flask, and Flask is run to host the actual code that was copied from the first image.

This defines the blueprint for what to be done when changes are uploaded to GitLab. When the code is pushed, each stage in the pipeline from the .gitlab-ci.yml file is run, each stage passes, and the result is a simple web application already hosted from the Docker image. Everything is done.

In the demo, as should usually be done in practice, this was done on a development branch. Once the features are complete, they can be merged with the master branch and deployed to actual users. And again, from the developer’s perspective, this is done with a simple ‘git push’.

From the blog CS@Worcester – Inquiries and Queries by ausausdauer and used with permission of the author. All other rights reserved by the author.

REST not relaxing

Part of working with the LibreFoodPantry includes working with the FoodKeeper-API. So let’s talk about API’s, specifically REST API’s. REST is an acronym that means REpresentational State Transfer. REST is a resource based, not action based, architectural style that has six design constraints. REST architectural style, data and functionality are considered resources and are accessed using Uniform Resource Identifiers (URIs). The clients and servers exchange representations of resources by using a standardized interface and protocol – typically HTTP. BUT… REST is not HTTP! In order to be considered a RESTful API the design must meet the first 5 of these 6 design constraints: Client–server – The interface separates the client from the server. Cacheable – Clients can cache responses. Responses have to, implicitly or explicitly, define themselves as cacheable, or not. This prevents clients from reusing stale or inappropriate data in response to further requests. Uniform interface – REST is defined by four interface constraints: identification of resources; manipulation of resources through representations; self-descriptive messages; and hypermedia as the engine of application state. See this article on DZone for a better understanding of HATEOAS: https://dzone.com/articles/hypermedia-driven-rest-services-with-spring-hateoa Stateless – The necessary state to handle the request is contained within the request itself. Layered system – The layered system style allows an architecture to be composed of hierarchical layers by constraining component behavior such that each component cannot “see” beyond the immediate layer with which they are interacting. Code on demand (this is the only optional constraint) – REST allows client functionality to be extended by downloading and executing code in the form of applets or scripts. This simplifies clients by reducing the number of features required to be pre-implemented. Generally, the four primary HTTP verbs used are as follows: GET Read a specific resource (by an identifier) or a collection of resources. PUT Update a specific resource (by an identifier) or a collection of resources. Can also be used to create a specific resource if the resource identifier is known before-hand. DELETE Remove/delete a specific resource by an identifier. POST Create a new resource. Also a catch-all verb for operations that don’t fit into the other categories. A little digging on the web and you will find a lot if resources concerning REST. One very helpful sight I found for getting a better understanding is https://www.restapitutorial.com When you dig deeper into and need to use a client I recommend Insomnia (https://insomnia.rest/) #CS@Worcester #CS448

From the blog Home | Michael Duquette by Michael Duquette and used with permission of the author. All other rights reserved by the author.

REST not relaxing

Part of working with the LibreFoodPantry includes working with the FoodKeeper-API. So let’s talk about API’s, specifically REST API’s. REST is an acronym that means REpresentational State Transfer. REST is a resource based, not action based, architectural style that has six design constraints. REST architectural style, data and functionality are considered resources and are accessed using Uniform Resource Identifiers (URIs). The clients and servers exchange representations of resources by using a standardized interface and protocol – typically HTTP. BUT… REST is not HTTP! In order to be considered a RESTful API the design must meet the first 5 of these 6 design constraints: Client–server – The interface separates the client from the server. Cacheable – Clients can cache responses. Responses have to, implicitly or explicitly, define themselves as cacheable, or not. This prevents clients from reusing stale or inappropriate data in response to further requests. Uniform interface – REST is defined by four interface constraints: identification of resources; manipulation of resources through representations; self-descriptive messages; and hypermedia as the engine of application state. See this article on DZone for a better understanding of HATEOAS: https://dzone.com/articles/hypermedia-driven-rest-services-with-spring-hateoa Stateless – The necessary state to handle the request is contained within the request itself. Layered system – The layered system style allows an architecture to be composed of hierarchical layers by constraining component behavior such that each component cannot “see” beyond the immediate layer with which they are interacting. Code on demand (this is the only optional constraint) – REST allows client functionality to be extended by downloading and executing code in the form of applets or scripts. This simplifies clients by reducing the number of features required to be pre-implemented. Generally, the four primary HTTP verbs used are as follows: GET Read a specific resource (by an identifier) or a collection of resources. PUT Update a specific resource (by an identifier) or a collection of resources. Can also be used to create a specific resource if the resource identifier is known before-hand. DELETE Remove/delete a specific resource by an identifier. POST Create a new resource. Also a catch-all verb for operations that don’t fit into the other categories. A little digging on the web and you will find a lot if resources concerning REST. One very helpful sight I found for getting a better understanding is https://www.restapitutorial.com When you dig deeper into and need to use a client I recommend Insomnia (https://insomnia.rest/) #CS@Worcester #CS448

From the blog Michael Duquette by Michael Duquette and used with permission of the author. All other rights reserved by the author.

Refactoring

Once again I was looking through the course topics for my CS-343 Class on Software Construction, Design, and Architecture where I came across refactoring. refactoring is the process of “editing and cleaning up previously written software code without changing the function of the code at all” by Sydney Stone in an article called “Code Refactoring Best Practices: When (and When Not) to Do It“. The technique of Red-Green-Refactor seems to be the most used type of refactoring process and focuses on the three steps of Red or consider what needs to be changed, Green or write enough code to pass the test written, and Refactor/clean up the code. Refactoring is clearly an important part of the software development process, but it is not something that I have used in my own coding experience so far. The continuous cleaning, optimizing of code, and adding of new functionality helps to ensure that the user receives the best experience using that code or program or tool. At the same time refactoring may not be the best solution due to time constraints and if the design or code is not worth refactoring because in some cases it’s much easier to just start from scratch.I have found myself in the hole of attempts to change and fix thing and I’m sure almost all people that code have fallen into this hole because its much more enticing to try to use or change something you already coded instead of starting over. I personally really like the style of Refactoring code and it seems to be more commonly used in things like games, applications, and other user based software.
I can certainly see myself using this technique in the future when working on code or being instructed to do a part of the refactoring process because it looks to be common practice in the field of Computer Science and especially software engineering. I knew that there was a process to updating and refining/adding new functionality to software but was unsure of the name or the actual process that takes place in order to yield the best results. I also had no idea that eclipse had a built-in automated refactoring support which makes me want to learn more about how to achieve this so I can apply it to my own software in the future. Testing also is an important part of refactoring so I can apply this method as I learn more about Software Testing and Quality Assurance which encourages me to learn more about good practices in both fields of Software engineering.

Link to Article referenced: https://www.altexsoft.com/blog/engineering/code-refactoring-best-practices-when-and-when-not-to-do-it/

From the blog CS@Worcester – Tyler Quist’s CS Blog by Tyler Quist and used with permission of the author. All other rights reserved by the author.

Out of Bounds

While searching for more information about Boundary Value testing I stumbled across “Boundary Value Analysis & Equivalence Partitioning with Examples” by the website guru99 which gave a great explanation of what each is and gave an interactive part that you could type in values to see where they would fall on the specific examples. Boundary testing is checking the extreme values and the in-between vales and allows the tester to focus on the important values to be tested rather than go through and try to test every possible input. The great thing about this source is that it provides not only a textual explanation but also a visual and interactive one as well.
while Boundary testing focuses on the minimum and maximum and values between them, Equivalence partition checks even the values that are invalid and do not meet the requirements set by the program. For Example, An Equivalence partition would check for exceptions like if a person gave a negative value for money to be withdrawn from a bank account. I found this website extremely helpful because I was having trouble distinguishing between the two types since they are similar in some ways. personally I believe that Equivalence testing is the more sensible approach because it covers the values that would not and should not work for a system/program and makes sure that they are dealt with appropriately.

Link to Website Referenced: https://www.guru99.com/equivalence-partitioning-boundary-value-analysis.html

From the blog CS@Worcester – Tyler Quist’s CS Blog by Tyler Quist and used with permission of the author. All other rights reserved by the author.

REST and RESTful

The article, “REST vs. RESTful: The Difference and Why the Difference Doesn’t Matter,” examines the Representational State Transfer pattern, or REST, and its implementations, RESTful services. The author, Eric Goebelbecker, mentions REST pattern’s creator Roy Fielding, and provides a link to Fielding’s dissertation.

 The article then
defines REST’s architectural constraints. Client-server architectural style,
separating responsibilities between client-side and server-side. Client-side
will handle user interaction while server-side will handle data and state. This
allows for the two sides to evolve independently of each other. Stateless, the
server is not responsible for a client’s session state and instead, the client
keeps the session state. Cacheable, the server must classify their responses as
cacheable or not. This improves performance by allowing the client to store
cacheable responses for later, equal requests. Uniform Interface, possibly the
most important constraint, requires the use of a uniform interface for
components. This simplifies the architecture by taking advantage of the
software principle of generality. The final constraint mentioned in the article
is a layered system. A layered system is a hierarchical system that
encapsulates components to layers that can be independent of each other. This
can be used for security and performance such as load-balancing. These five architecture
constraints are what defines the REST pattern.

The article then gives an example between remote procedures
calls (RPC) and REST. The difference being that RPC manipulate data by remote
calling the server functions and REST, instead, shares the data between
client-server. Put simply, in REST the URIs work with data and not remote
methods.

The article then mentions the Richardson Maturity Model.
Richardson’s model classifies RESTful services into four levels of compliance. Level
0, the use of RPCs. Level 1, sharing resources between server and client. Level
2, the proper use of HTTP verbs. And level 3, exporting hypertext with objects
to aid with API discoverability. The author of the article brings up that Fielding
would only consider level 3 to be true REST.

Before I read through this article, I had only a rudimentary
understanding of the REST pattern (I had missed the class that introduced it).
I now understand REST and RESTful, the architectural pattern and its
implementations. REST focuses on data sharing and a uniform interface to make its
data the emphasis of the pattern and not its specific implementations. This
allows for easier understanding with generality and assists with scalability.

 I read some of
Fielding’s dissertation and highly recommend it to anybody who is learning REST.
The descriptions of the architectural constraints are clear and provide simple
examples.

LINKS:
Article: https://blog.ndepend.com/rest-vs-restful/
Fielding’s Dissertation: https://www.ics.uci.edu/~fielding/pubs/dissertation/rest_arch_style.htm

From the blog CS@Worcester – D’s Comp Sci Blog by dlivengood and used with permission of the author. All other rights reserved by the author.

Path of Most Resistance


In my last blog, I sought
to cover Integration Testing and in doing so we covered the two distinct types
outlined by Mr. Fowler. Of these, Broad Integration Testing (BIT to save time)
is most relevant to the next subject I wish to cover: Path Testing. BIT covers
the interactions between all ‘services’ within a program – meaning a program’s
completed modules are tested to ensure that their interactions match
expectations and do not fail some tests created for them. In this way, Path
Testing is very similar but with a focus on how paths through various aspects/modules
of a program, hopefully, work or do not.

           As
opposed to BIT, Path Testing (PT) seeks to identify not just the interactions
between modules, but instead any and all possible paths through an application
– and discover those parts of the application that have no path. The ultimate
goal is to find and test all “linearly independent paths”, which is defined as
a path that covers a partition that has yet to be covered. PT is made up of,
and can integrate, other testing techniques as well, including what we’ve
covered most recently: equivalence testing. Using this technique, paths can be
grouped by their shared functionality into classes, in order to eliminate
repetition in testing.

           When
determining which paths to take, one could be mistaken for wanting to avoid the
same module more than once; as stated previously, we are seeking paths we have
yet to take. However, it is very often that the same path must be taken, at
least initially, which leads to several modules. In fact, a path might be near
or actually identical to one that has come before it, but if it is required
that several values be tested along this path then it as well is considered
distinct as well. An excellent example of this made by the article I chose
states that loops or recursive calls are very often dictated by data, and
necessarily will require multiple test values.

           However, after this point the author begins to move away from the purely conceptual to actual graphs representing these paths, specifically directed graphs. While it was painful to see these again after thinking I had long escaped discrete math, they provide a perfect illustration for the individual modules you expect a path to trace through, as well as possible breaking points. Directed graphs represent tightly coupled conditions, and in this way they express how a program’s run in order and the cause and effect of certain commands upon execution. In this way, it offers a much more concise visual presentation of the testing process as opposed to something like equivalence testing. As well, these graphs are quite self-explanatory but I look forward to applying these concepts in class to actual code.

Sources

Path Testing: The Theory

From the blog CS@Worcester – Press Here for Worms by wurmpress and used with permission of the author. All other rights reserved by the author.

Quackers about Patterns

So far we’ve dealt with design smells and played with the Duck factory. Which is a great segue into our next topic, Design Patterns, one of which is the Factory Pattern. Design patterns allow us to look at our code, usually as the need for changes arise and utlize the benefits of a design pattern. With our Duck Factory exercises this is where we began. We created duck objects and added them to a pond. As the number of types of ducks changed so did their behaviors. Does a rubber duck quack? Can a cement duck float? Does decoy duck fly? Our initial Factory design pattern worked fine until we our duck types changed and it became evident that the design pattern needed to evolve. Out first iteration took the factory design pattern and migrated to an Abstract Factory pattern. Now our ducks could inherit behaviors from interfaces. But should a decoy duck be inheriting quack behaviors? The Abstract Factory design pattern is really just a transitional pattern to the Strategy Pattern. As we moved our code around it became clear that we were making things a little more complicated than they needed to be. We were starting to introduce some needless design smells. The advantage of the Strategy Pattern is it favors encapsulation. The “Strategy” is to define a set of algorithms, encapsulate each one and make them interchangeable. This allows the algorithms to vary independently from the clients that use them. In the case of our Duck Factory and the ducks (and duck sub-classes) use the encapsulated behaviors (and sub-behaviors) to fly, quack, squeak, and in the case of cement duck sink. We covered 3 other design patterns and next week I’ll touch on those. Until then happy coding! #CS@Worcester #CS343

From the blog Home | Michael Duquette by Michael Duquette and used with permission of the author. All other rights reserved by the author.