Category Archives: Bot

Lab 3: Obstacle avoidance and Multi-process systems

Before I would like to start, I would like to speak openly here for the intelligent Dr. Wurst, my professor, to ask him something really quick.
Would this blog post count as acceptable for a lab notebook entry? It would be a pleasure and a great convenience if you will accept this!

I will answer all of your questions in the following paragraphs and write about me, Urooj, and Braxtons time working on Lab 3 for Robotics.

Let us begin.
Today, I am working on finishing up our multi-process c program that will have the robot adjust its direction and speed at the same time, thus two processes working in a multi-process system can be observed.

If we had approximately four or so hours straight to spend on this lab, we would have completed it all in one day in my opinion.

But that is fine, now I am back and now I am more than ready to solve some problems!

There begs a question: What will I do first? Well, right here and right now is a start. Keeping steady lab notes and tracking everything I do will be most beneficial for us all in the long run, as we all can learn easily about anything — we must simply have a passion for whatever it may be!

I apologize. I am writing much like a Philosopher. One could say I am a philosopher of technology. With this out of the way however, I would like to actually get down to business. I will now begin [:chuckling:]

I am going to produce a program to read the Sonar Sensor attached to the 0th analog position in the Botball device. After I do this I will begin to track the sensor readings for the following materials and light levels.
If my hypothesis is correct then light levels will not affect the Sonar sensor, as it uses echolocation to sense its surroundings. What a smart device truly!

However if I were to attach light sensors and IR sensors, I could create even more functionality to the robot.  Heck, imagine if I put a camera on the front of the robot to stream to my phone! And a bluetooth keyboard to have the user gain full control of the robot itself.
Goodness, technology endlessly brings me so much interesting new stuff to work with! Okay, I am going to stop writing here now so that I can accomplish the programming for the Botball.


Attempt Number 1: Robot keeps moving forward, stops to check IR readings (sensing left value vs right value.) but fails to adjust course in second function. Layout of functions: First function is the IR reading function, then comes the DRIVE function. The IR reading (and, well, writing as well) function keeps track of the devices input readings and adjusts variables so that the drive function performs as we want it to — to avoid obstacles or turn around if there is no way forward.

Changed motorValue from changing using is equals ( == sign) with = sign. Maybe program will work now. Attempt number 2 will be detailed in the paragraph/s below.

Attempt Number 2:
Attempt 2 was a success!! The robot followed the instructions perfectly this time after setting each analog state (0 and 1 as floating points) and used multiple functions in rapid succession. Time to implement C multi-process capabilities and if this works the robot is all set. Its behavior is to like stimuli and approach it (when it senses more from one IR to the other, it goes towards the stimuli closest.)

Attempt Number 3:

Pre-program test: Using multi-process function in KIPR C programming environment means I might not be able to use the defer method. Initially I would have used this in between processes to defer the need of one process to the need of the other process. Let us try to see how it works.

Post-program test:

Robot functionality lost while using start_process and kill_process. Maybe I should use kill_process in while loop? Next attempt will be below.

Attempt Number 4:
Put the start processes and kill processes before and after with while loop. Did not work. Now attempting to change kill_process(0 and 1) to kill_process(1 and 2). Maybe this will finally work?

Attempt Number 5:
Everything is balls [:tears forever:]

From the blog CS@Worcester – Sean Raleigh's CS Blog by sraleigh62 and used with permission of the author. All other rights reserved by the author.

Robotics: Post 2

Hello, reader.

So today is a day after I was in class, but now that I’ve got some rest and have taken care of the other chores around the house, it’s about time I get to writing again about how my Robotics class has gone.

Yesterday afternoon, me, Urooj and Braxton attended our Robotics class after having had a reading assignment along with written summaries of the various vehicles described in our class book. If I haven’t talked about the book in my first post, I’ll take time to edit it in so you can check it out if you want.

Anyways, similarly to how our first class went, we had another lab to complete. This time around, we were tasked with manually attaching light sensors to a robot through any input between 0-8 on the component that downloads and stores the C code from the computer we write it on. I will edit this blog post within a week to take some photos of the device and show and explain in better detail as to how we hook everything up.

So, we get the light sensors plugged in, and our Professor states that we need to surround the light sensors with a straw, black tape surrounding the straw to keep light from the sides of the sensors from throwing them off too much, and then to attach the light sensors using double sided tape about 45 degrees away from the middlemost point of the circular iRobot-create. So, imagine a circle with a line going from the center of the circle to the topmost portion of the circle, then two lines slightly apart from it going off in either direction.

The light sensors, positioned in such a way, would be able to more accurately track light levels along with the minor modifications we made to it. The straw and tape combo made for a useful casing around the sensors themselves.


So, now we have the iRobot-create set up with light sensors attached through the device that contains the code and is simultaneously connected to the iRobot itself. This provides the iRobot with the ability to intelligently sense varying light levels. Now, we begin to write the code.

I’m afraid I cannot go into super in-depth detail about it now – however, I will just go over the overall experience of programming the robot in C. It was up to us to set up the core components of the code including any variables we needed to use to keep track of things and whileif statements to cause the robot to move. We did this rather quickly.

Initially we kind of screwed up and it just kept going forward. This was because we had it constantly run a command to make the iRobot-create move forward instead of running the other nested if loops. So, we removed this command and made an if loop for it.

You may be wondering, “If loops, while loops, schmile loops. I’m not understanding what you are talking about.” If so, that is completely fine. I will try and explain the outline of our code here onward.


The General Design
:

So, the code begins to run. It has the variables for detecting the light levels accounted for and it knows which ports the light sensors are plugged into. Therefore, we can gain a sense of how bright it is in front of the robot and a little to its sides. After we got this done, we started setting up the iRobot to move forward on its own. We fumbled with this at first, but then realized why it would only constantly move forward – slightly flawed coding.

After we fixed this small issue, we moved on to creating the while loop, which contained all the if loops; it also had the ability to cancel out of the while loop once certain criteria were fulfilled. The criteria we chose was for the iRobot to stop moving once the lightbulb placed in front of it got too bright for its liking. We enabled it to do this by measuring how bright the light was on each light sensor – if it detected light too far to the right, the left motor would speed up and correct its trajectory; this was the same except vice versa regarding the right-side motor and left side sensor.

Once we figured out how to get it to work, it ran like a beaut’. It ran fast at first trying to find the light source. Then, once the light source was in range, it made sure to correct for its direction and face the light while approaching it. This finally culminated in it stopping within about a foot or so of the bulb. Had we left out the line of code to stop the iRobot, it would have simply kept on going forward, even possibly damaging the light bulb or itself.


Many seemingly trivial things in programming can cause big issues, so it’s all about caring about what you do and taking it easy so you don’t get frustrated and give up. You never want to do a rush job when it comes to coding as every day programming becomes increasingly ingrained into our lives. Anyways, I do hope you enjoyed reading about our day working with the robot. While we haven’t completed the last bits of programming needed for the other variations of what the bot should do, we will be completely capable of tackling it come next week. Have a nice rest of your day, and I will see you around for next time!

From the blog CS@Worcester – Sean Raleigh's CS Blog by sraleigh62 and used with permission of the author. All other rights reserved by the author.

Robotics, Day One


Hello again, my dear reader.

Today is the day me and my friends and fellow peers Urooj Haider and Emmanuel Braxton tackle our first small Robotics assignment. It is a Lab which will get us acquainted with the basics of programming a Robot through KISS (KIPR’s Instructional Software System) and running a simulation through it as well.

Currently, Urooj is writing for her own blog while Emmanuel goes and grabs a circular Robot made compatible with the programming application. I am downloading the application on my Ubuntu operating system (dual loaded with Windows 10 which was the original system on the computer.) while also getting Wine (a program used to help Ubuntu run Windows programs) set up as well.


Braxton got back now, so we are putting the bot together. Once it is together we will then begin to program some basic instructions for the bot to follow, and we hope that it will work smoothly and quickly. Oh! And I forgot to mention; Braxton ran the sim of the robot in the program and it had crossed a white line (I’m assuming representing a wall) and showed that its bumpers could tell when it had hit something.


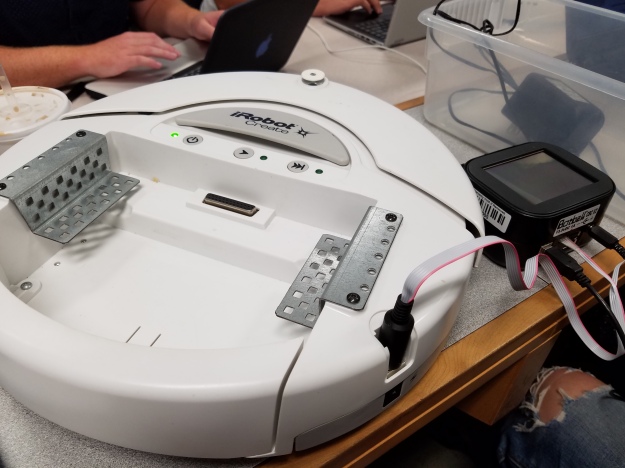
So, we just now completed setting up the robot. Here is an image that I took using my Galaxy S7 Edge phone:

20170907_152756.jpg

The device connects via a circular cable, which goes into the Botball device. Both the bot and the device itself can be charged via a much smaller in diameter circular power cord. Along with the ability to connect to each other and to connect to a power source for charging, it also has a usb cable that, from the Botball device, connects the bot all the way to Braxtons laptop.


So, we just ran the program through the Botball connected to the bot itself. The Botball store the program for immediate use simply by clicking a run button to begin running the code. Connected to the bot, it feeds it the instructions we gave it: Move forward for approx. ten seconds and then wait ten seconds, after which it would shut down (the program.) It was incredibly fascinating to see it come to life in the push of a button!


Right now, I’m watching on as Urooj and Braxton talk between each other as Braxton begins programming for use with the bot. There are methods we can use for the robot which can do the following things (and more): Move forward or backward, rotate on the spot clockwise or counter-clockwise, pause to wait, pause awaiting user input, etc.

With complex enough coding, one could make up games to play with the bot! One game I imagine is in which the robot rotates constantly and you have to try and guess where it will land. It randomly calculates how long it will rotate for and whoever gets the closest guess, wins!

What is Braxton programming, you may ask? Well, he’s attempting to program in a way for the robot to check and give the distance it traveled over the time it was used. There is a specific method for getting and setting travel time.


We are working through some of the kinks of working with C programming. It for sure is not completely straightforward nor easy to diagnose when issues occur, but it is completely doable. We are attempting to get it to move a distance, tell when its moved a certain amount,  and then stop it from moving past that amount of distance.


I have completed my version of the programming which worked out flawlessly in the simulation, and now we are also trying out Braxtons code too. His code worked and only went over by 35mm.


Now both of our code is nearly perfected, but I gotta run out due to out of school plans.
hope you enjoyed my post!

Sending good vibes,

Sean M. Raleigh; CS Major at WSU

From the blog CS@Worcester – Sean Raleigh's CS Blog by sraleigh62 and used with permission of the author. All other rights reserved by the author.