Category Archives: #git

Semantics Antics

Recently, I came across an interesting blog post titled “A Beginner’s Guide to Semantic Versioning” by Victor Pierre. It caught my attention because I’ve been learning about software development best practices, and versioning is a fundamental yet often overlooked topic. The blog simplifies a concept that is vital for managing software releases and ensuring compatibility across systems. I selected this post because, in my current coursework, semantic versioning keeps appearing in discussions about software maintenance and deployment. I’ve encountered terms like “major,” “minor,” and “patch” versions while working on team projects, but I didn’t fully understand their significance or how to apply them effectively. This guide promised to break down the topic in a beginner-friendly way, and it delivered.

The blog explains semantic versioning as a standardized system for labeling software updates. Versions follow a MAJOR.MINOR.PATCH format, where:

  • MAJOR: Introduces changes that break backward compatibility.
  • MINOR: Adds new features in a backward-compatible way.
  • PATCH: Fixes bugs without changing existing functionality.

The post emphasizes how semantic versioning helps both developers and users by setting clear expectations. For example, a “2.1.0” update means the software gained new features while remaining compatible with “2.0.0,” whereas “3.0.0” signals significant changes requiring adjustments. The author also highlights best practices, such as adhering to this structure for open-source projects and communicating changes through release notes.

Reading this blog clarified a lot for me. One key takeaway is how semantic versioning minimizes confusion during development. I realized that in my past group projects, we sometimes struggled to track changes because we didn’t use a structured versioning approach. If a teammate updated a module, we often didn’t know if it introduced breaking changes or just fixed minor issues. Incorporating semantic versioning could have streamlined our collaboration.

I also appreciated the blog’s simplicity. By breaking down each component of a version number and providing examples, the post made a somewhat abstract topic relatable. It reminded me that software development isn’t just about writing code but also about maintaining and communicating it effectively.

Moving forward, I plan to adopt semantic versioning in my personal projects and advocate for it in team settings. Using clear version numbers will make my code more maintainable and professional, especially as I contribute to open-source projects. If you’re looking to deepen your understanding of software versioning or improve your development workflow, I highly recommend checking out Victor Pierre’s blog. It’s a quick, insightful read that makes a technical topic approachable.

Resource:

https://victorpierre.dev/blog/beginners-guide-semantic-versioning/

From the blog Computer Science From a Basketball Fan by Brandon Njuguna and used with permission of the author. All other rights reserved by the author.

Code Review

Source: https://about.gitlab.com/topics/version-control/what-is-code-review/

This article is titled “What is a code review?” As clearly stated by the title, the article explains the processes of code reviewing. “A code review is a peer review of code that helps developers ensure or improve the code quality before they merge and ship it.” Code reviews help in the identification of bugs, increase the overall quality of code, and enhance understanding of the source code. Code review, as suggested in the name, happens after a software developer has finished coding. Code needs to be checked before it is merged into an upstream branch for bugs or conflicts. A code reviewer “can be from any team or group as long as they’re a domain expert. If the lines of code cover more than one domain, two experts should review the code.” Adhering to a solid code review process allows for continuous improvement of code and aims to ensure that faulty code isn’t being implemented for customers/users to see and use. This process isn’t just important for the code itself, but also for all of the team members of a software development project. Whilst reviewing the code, meaningful knowledge of the source code is shared between team members to ensure that it is being implemented properly. The main benefits of the code review process are: the sharing of knowledge, discovering bugs earlier, maintaining compliance, enhancing security, increasing collaboration, and improving code quality. Code reviews allow for maintaining compliance because different developers have different backgrounds and thus different personal processes when they are developing. Code reviews allow these people to get together and maintain a standard coding style. Security is enhanced because “security team members can review code for vulnerabilities and alert developers to the threat. Code reviews are a great complement to automated scans and tests that detect security vulnerabilities.” There are many benefits to code review, but there are some disadvantages, including: longer time to ship, focuses being pulled from other tasks, and large reviews mean longer review times. These can be described as necessary evils due to the sheer amount of positives that code reviews offer in software development.

I chose this article because it was published by GitLab, a software that we are heavily using in class for version control, and I thought that it would be interesting to read this specific topic from the syllabus. Version control softwares such as GitLab allow code reviews to happen, so diving deeper into the topic in an article published by this popular software company was tempting. Before reading this article I understood that code reviews were important to pinpoint any bugs or difficulties before merging code into the upstream, but I never really thought about the implications of security or different development styles. I’ll definitely keep this information in mind during future code reviews on the job to remind myself that bugs aren’t the only important thing during a code review.

From the blog CS@Worcester – Shawn In Tech by Shawn Budzinski and used with permission of the author. All other rights reserved by the author.

Why Git

Why is it always git

Photo by RealToughCandy.com on Pexels.com

The version control system that every programmer uses. Even in my computer science class, we had lectures dedicated to Git, the commands in Git, how Git is used, what Git is used for, and just so much Git. The funny thing, is there are other version control systems such as Mercurial, but they aren’t ever brought up they are there but feel overshadowed by git. So the question I am asking now is why Git. So I did some investigating.

The question: what does Git do that is so special compared to other version control systems? Now version control systems can do all sorts of things such as allowing developers to see what has been changed, enable collaborative work, and branch and merge changes to a repo. If multiple can do this, then what does git do differently? An article from Geeks For Geeks lists several. Git can be worked on offline and is resilient because multiple developers can have copies of the repo, and any local repo can be used to restore a project. It also comes with conflict resolution that’s allows one to handle merge conflicts by providing tools to solve those problems. So what about the other systems. Well, GFG got that covered. Here are some comparisons.

Subversion

Compared to Git, the architecture is centralized, one single central repo

Fewer branching and merging options

Better performance

Mercurial

Smaller community compared to Git

Not as much flexibility as Git

Perforce

Can handle very large code base

Not as flexible as Git in terms of merging

Git is Open Source and Free, while Perforce isn’t

That is a decent amount of reasons to use Git over other VCS. I think the community part is important for such a popular system, because if you aren’t too familiar with the commands that come with Git, then you have a lot of people that can help. There are a lot of forums and articles about Git tools out there if you ever need it.

I also feel that the collaborative aspect of Git is, very helpful. A lot of projects have a lot of people working on them, so having something like Git that can handle it and make the task easier is great. Also, the fact that it is accessible helps with that too.

Git being so popular makes a lot of sense now, accessibility, community, and collaboration are what a lot of developers require, and I have to say Git provides that well.

GeeksforGeeks. (2024, September 19). Git vs. other version control systems: Why Git stands out? https://www.geeksforgeeks.org/git-vs-other-version-control-systems-why-git-stands-out/

From the blog Debug Duck by debugducker and used with permission of the author. All other rights reserved by the author.
Version Control

Source: https://www.spiceworks.com/tech/devops/articles/what-is-version-control/

This article is titled “What Is Version Control? Meaning, Tools, and Advantages.” The main purpose of version control is to “track the progress of code across development and iterations and also aids in managing changes during the life cycle.” Records are kept of all changes with names, timestamps, and other important information. So, the process by which software code is monitored and the way in which changes are made is called version control. A huge benefit of version control is being able to look at the revision history and determine where problems originated from, and who caused them to happen. This allows for increased efficiency regarding workflow considering that the time required to locate problems is greatly reduced. Another benefit of version control is branching. “Branching is a distinct approach to version control where development programs are duplicated for parallel versions of development while keeping the original and working on the branch or making separate modifications to each.” This allows for enhanced collaboration where development is increased, issues are resolved, and code remains organized. A couple very popular version control tools are Git and GitHub. The creator of Linux, Linus Torvalds, created Git. The memory footprint of Git isn’t vast and is able to follow changes in any files. It is a very simple version control system and as a result is used by top companies such as Google. GitHub is a service that enables development teams to collaborate and keep track of all their code changes in a cloud environment. GitHub is secure and reliable, and as a result is also widely used. Through the use of a version control system the following can be achieved: “streamline merging and branching, examination/experimentation with code, the ability to operate offline, creation of regular/automated backups, communication through open channels.” Overall version control aids in the maintenance of reliable code bases and enforces accountability for effective collaborative development. 

I selected this article because we are actively learning about version control in class right now so I figured it’d be the perfect time to read up on it more. Reading the GitKit chapters has exposed me to different git commands and GitHub usage. It was interesting to read in this article about all of the in-depth benefits that version control offers and clearly showcases why even top companies such as Google use it to optimize their workflow. In future practice, whether it be at a job or while working on an individual project, I will use version control to improve collaboration and the ease of maintenance of my code.

From the blog CS@Worcester – Shawn In Tech by Shawn Budzinski and used with permission of the author. All other rights reserved by the author.

Tackling Merge Conflicts with GitKit: A Student’s Guide to Smoother Collaboration

Working on team projects in class has really brought out how tricky merge conflicts can be. Nothing quite like seeing “conflict” pop up after a pull request to slow things down! For this blog entry, I looked into a post called “Mastering Merge Conflicts with GitKit” , which breaks down why merge conflicts happen and shows how to tackle them using GitKit’s built-in tools. Since our course covers version control and team-based coding, I figured learning to manage these conflicts more effectively would make a big difference, not just now but for any future projects.

Summary of the Selected Resource

The post explains why merge conflicts occur in collaborative projects, like when multiple team members edit the same file or branch in different ways. The author points out that conflicts are actually pretty normal in team coding—it’s just part of working with a shared codebase. GitKit’s approach to handling conflicts was the real game-changer for me here. It uses interactive conflict markers, visual diffs, and a guided merge workflow to help developers see exactly where conflicts happen and resolve them without a lot of guesswork. It’s clear from the blog that these features simplify what’s often a frustrating process, making it more manageable and, honestly, less intimidating.

Why I Chose This Resource

I picked this post because merge conflicts have been a big obstacle for me and my project teammates. They always seem to come up at the worst times—right when you think you’re wrapping up! Learning more about practical strategies to handle them seemed like a solid move. Plus, I hadn’t really explored GitKit’s full range of features before, so this gave me a chance to see how it can streamline conflict resolution. With team coding becoming more common in projects, internships, and industry work, knowing about these tools feels pretty essential.

My Takeaways and Reflection

Before reading this, I mostly just knew the basics of handling conflicts through the command line. But after seeing what GitKit offers, I realized how helpful visual tools and conflict markers can be. They make it so much easier to understand what’s causing the conflict and to feel more confident about fixing it. Having a clearer view of what’s happening in the code feels like it will help me avoid mistakes and keep our project moving forward without so much stress.

Looking ahead, I’m definitely going to use these GitKit techniques in my future work. I plan to keep practicing conflict resolution so it becomes second nature and doesn’t disrupt my flow as much. I can see how this will really come in handy, especially when I start working on larger projects or in a professional setting where team collaboration is essential.

Link to the Resource

https://dev.to/htsagara/handling-merge-conflicts-in-git-how-to-fix-and-prevent-them-1m62

From the blog Computer Science From a Basketball Fan by Brandon Njuguna and used with permission of the author. All other rights reserved by the author.

CS448 Sprint 1 – Retrospective

This past Tuesday 2/27/2024 marked the conclusion of Sprint 1 for CS448 – Capstone. My team worked generally well together and we managed to complete all of our assigned tasks as well as some extra we added during the Sprint.

During this Sprint, I was involved in addressing a few different tasks and issues:

Issue spent most time on – “Create General and Pipeline” https://gitlab.com/LibreFoodPantry/client-solutions/theas-pantry/gitlab-profile/-/issues/10. This issue was in the “General” (#gitlab-profile) repository and consisted of three separate parts: 

  1. Moving settings from configuration files set up for integration with Dev Containers to .gitpod.yml extensions for GitPod integration.
  2. Refactoring the ‘commands’ folder to ‘bin’ to keep up with industry standard file naming. This includes updating script paths and .gitlab-ci.yaml environment variables to refer to bin.
  3. Adding the AlexJS linter to pipelines as well as the bin/lint.sh test script file.

Also, as a part of this issue I also implemented some minor typo and similar fixes so that all linters pass for a successful integration pipeline. Originally, these were three separate issues that were combined during the Sprint.

Issue #2 – “Familiarize ourselves with GuestInfoFrontend to Understand What Goes into CheckoutGuestFrontend”

https://gitlab.com/LibreFoodPantry/client-solutions/theas-pantry/inventorysystem/checkoutguestfrontend/-/issues/37. This issue included all team members and was intended to prepare each of us for Sprint 2, during which we intend on tackling some front-end Epics/issues in CheckoutGuestFrontend. So, I reviewed the GuestInfoFrontend repository structure and began to strategize a possible plan of action for building out CheckoutGuestFrontend.

As mentioned, my Team added additional tasks to our Sprint Backlog during the sprint as we found we would have extra time leftover after completing our original tasks. We chose to take on “Verifying that all Thea’s Pantry projects have the correct extensions, linters, and pipeline stages” for the Documentation and General repositories as we had already set up the settings and thereby familiarity with these repos. https://gitlab.com/LibreFoodPantry/client-solutions/theas-pantry/documentation/-/issues/10

https://gitlab.com/LibreFoodPantry/client-solutions/theas-pantry/gitlab-profile/-/issues/12

I created our new issues; we were able to complete the task for the Documentation repo as it was relatively simple in terms of not needing to make many changes/add linters, and make some progress in the General repo but pushed the issue into Sprint 2.

Reflecting back on the sprint, there were a few things that come to mind which worked really well – as a team we scheduled out our tasks well between standups and managed to have full attendance at each. Also, when we needed to add tasks we elected to stay within the repositories we had already been working in and were somewhat familiar with, which was a good choice as switching would have likely wasted time getting familiar with the new repo, as well as wasted time for another team who would have needed to become familiar with ours. 

However, we struggled somewhat with getting used to navigating the GitLab issue board, merges, child issues etc. and sometimes it felt like some team members were in different places where a solution may not have been fully communicated to all teammates. As a team, I feel we can improve on some of our internal communication and do a better job planning out our sprints and creating something of a road map, especially as we prepare for Sprint 2 which is considerably longer than the first. Personally, I think I can improve my time management and also be a bit more involved in the process of planning out our next Sprint and creating issues with relevant descriptions and linking to organize our tasks and get a better feel of how to use GitLab to its maximum potential.

From the blog CS@Worcester – Tech. Worth Talking About by jelbirt and used with permission of the author. All other rights reserved by the author.
Week 14 – Blog for both CS-343 AND CS-348

So for this blog, I wanted to find a topic that is applicable to both classes, so I wanted to look more into GitHub and the ways it functions compared to GitLab.

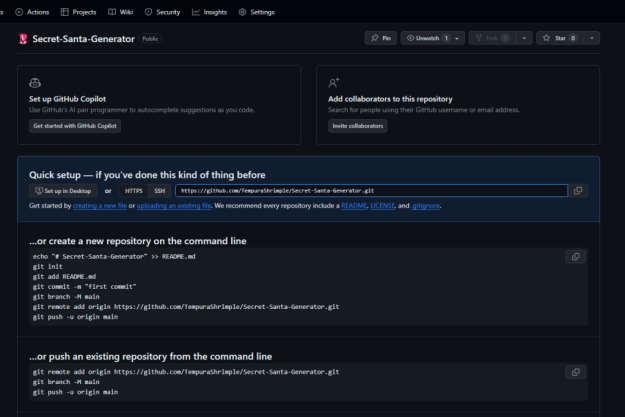
I duplicated by Secret Santa Generator repository from GitLab: https://gitlab.com/worcester/cs/cs-348-01-02-fall-2023/students/bpoole/secret-santa-generator and duplicated it in GitHub here: https://github.com/TempuraShrimple/Secret-Santa-Generator

To do this, I had to open up the local repo on my PC, create a new blank repository on GitHub, and run the following commands:

Once this was done, my repository was transferred over to GitHub successfully, without harming my GitLab repository in any way shape or form. Everything, including the history of the repository, was included with this transfer, which I think is really cool.

One difference I immediately noticed between GitHub and GitLab is that GitHub allows you to add a short description on the right-hand side of the repository, allowing a quick way to figure out what the program intends to do without having to look at the README.md. Obviously if you want more information, the README.md is very important in that case.

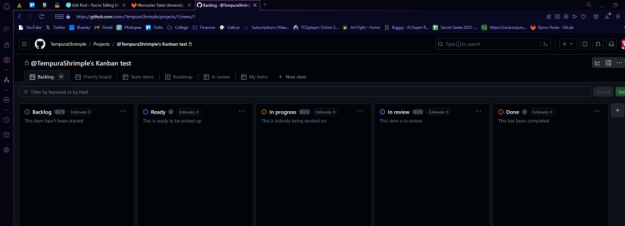
Both sites have a really good planning structure, with GitLabs’ issue boards, and GitHub’s project tab, which is structured very similar, but I think GitHub’s might be better as it allows you to choose from a lot of different templates like Kanban, Team retrospectives, and bug tracking, which I think is really cool. You’re also able to customize it as you please, so you’re able to set up a scrum structure like we did in GitLab for many of our projects. However, after looking into it, if you want to utilize Scrum, it seems GitLab is definitely structured better with preset pillars that are made with Scrum in mind. However, it’s a toss up on which would be better to utilize in this case for project management, in my own humble opinion.

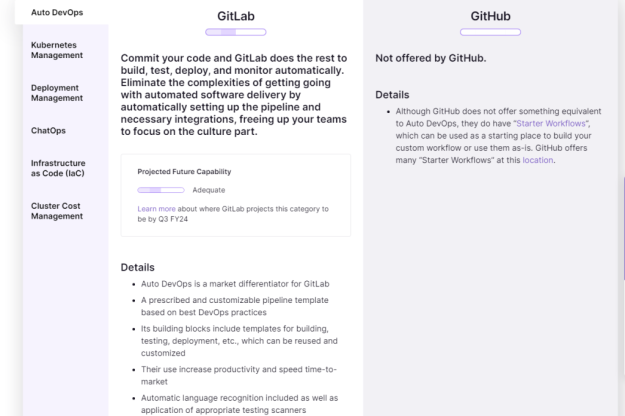
GitLab also has some advantages in the construction and development aspects of this comparison, as after looking into it, GitLab is able to automate releases and builds of code once they are ready to be done so, and GitHub doesn’t have this capability at all.

https://about.gitlab.com/competition/github/?stage=Configure

This seems extremely useful for a program that has set deadlines and not enough time to do these things during, say, a Sprint. It allows a lot more flexibility with the work being done in a repo and can allow a lot more efficiency and productivity. I will definitely look into this more later on when I start using this repo I cloned myself.

All in all, after looking things over, it seems like GitLab has a lot of additions that make it better over GitHub in all sorts of ways, and I’m surprised GitHub is used more than it. I should probably introduce my friend I’m working with on GitHub for his game engine for this if he ever develops a much bigger team, as many of the planning-oriented inclusions GitLab has would be extremely beneficial!

From the blog CS@Worcester – You're Telling Me A Shrimp Wrote This Code?! by tempurashrimple and used with permission of the author. All other rights reserved by the author.
Sabbatical Restart

Summer is over, and it’s time to really get to work on my Sabbatical project.

I did do some work this summer – I’ve read 3 of the books on my Sabbatical Reading List (and added a few more to the list) and I’ve finally de-lurked on the OpenMRS developer mailing list and in some of the online meetings, and I’ve made a decision to convert all of my course materials to Markdown (the better to track changes on GitHub – see a future post). But, it’s all been pretty passive.

So, the Friday before the Labor Day Weekend, I decided it was time to get back to the “develop code in OpenMRS” part of the project.

Since it had been a couple of months since I had set up  my development environment and tried to build the OpenMRS code, I decided that starting over from scratch (mostly) would not be a bad idea. Here is what I did:

  1. Read OpenMRS’s Getting Started as a Developer wiki page. I had already set up my OpenMRS ID, and signed up for the developer mailing list. I already had a GitHub account, as well.
  2. Read Development ProcessfromOpenMRS Developers’ Guide, and got the code:
    1. Fork openmrs-core repository.
    2. Clone my fork onto my computer.
    3. Set the OpenMRS repository as my upstream remote so that I can pull changes from the main project into my local working copy.
  3. Set up development environment based on Get Set Up from the OpenMRS Developers’ Guide. I chose the section on Manual Installation because Iwantto be able to develop code fortheOpenMRS core application. I followed the general outline of this section, but went about some of the software installations differently.
    1. Install MySQL. Because I am setting up my development environment on a Mac, I installed MySQL using Homebrew
    2. Install Maven using Homebrew
    3. Install Git using Homebrew (actually, I already had Git installed, but I made sure it was up-to-date)
    4. BuildtheOpenMRS code:
      cd openmrs-core
      maven clean install
    5. RuntheOpenMRS web app through the jetty server:
      cd webapp
      mvn jetty:run
    6. The first time you run the web app, it will take you through the Setup wizard
  4. Set up Eclipse. I already had Eclipse installed, but I made sure that my version was up-to-date. Eclipse had been updated to a new major version (Luna) since the last version I installed (Kepler). 1
  5. Git IDE Integration: Since EGit is already installed in current versions of Eclipse, and I’ve already forked and cloned the repository, I really only needed to do the To import as a Maven project section, to get the the projected into Eclipse.
  6. Build the OpenMRS code under Eclipse. I followed the steps in the following section:
    1. How to run the build
    2. How to run Junit
    3. How to Run Web Application

Now that I have a working environment that builds and runs, the next step is to choose a ticket to work on.

  1. In the past, I had just downloaded the newest version, and replaced what I already had installed. I figured that there must be a way to do the update without having to reinstall and reconfigure all of my plugins. It turns out that you can add the release’s repository to the Available Software Sites: http://wiki.eclipse.org/FAQ_How_do_I_upgrade_Eclipse%3F

From the blog On becoming an Eccentric Professor... » CS@Worcester by Karl R. Wurst and used with permission of the author. All other rights reserved by the author.

All Aboard the Coding Train!

cue Ozzy Osbourne laughter…

This blog is coming to you direct from Amtrak Northeast Regional Train 95, where Stoney Jackson and I are on our way to POSSE 2014 at Drexel University in Philadelphia, PA. This is becoming an annual tradition for us.

So, why is it called the Coding Train? Because we are spending the 5 hour train ride writing code!

When we did this for the first time last year, we worked on the code for the grading scripts that I had started writing in bash (https://github.com/kwurst/grading-scripts/tree/bash-version). Stoney started adding error checking, and then a Python version – neither of which he finished, but we learned a lot about how GitHub works for collaborative development.

This year we discussed a number of options for what project we would sprint on (after we spent a lot of time on professor-talk about curricula, and courses, and learning outcomes, and assessment) but we ended up back on the same project. This time our starting point was the Python conversion of the original scripts that I had started in December, and which I had just begun to refactor this month (https://github.com/kwurst/grading-scripts/tree/master).

Stoney has been doing some serious refactoring on the code, adding one major new feature: a JSON configuration file so that I don’t need 15 different scripts – just different configuration files to pass to a single, more general script. He’s also undertaken a major cleanup of the code, and added the project’s first unit test!

I, on the other hand, have been installing tools that Stoney suggested – git flow and git bash prompt, and in the process having to debug my Mac’s installation of Homebrew and cleaning up my .bashrc file (being completely ignored by my shell) and my .bash_profile file (full of lots of cruft from previous installs.)

Stoney has just pushed his branch, so now it’s time for me to pull it, and test it on some data on my computer. And we’re almost to Philadelphia, so just in time…

From the blog On becoming an Eccentric Professor... » CS@Worcester by Karl R. Wurst and used with permission of the author. All other rights reserved by the author.

Code Break: GitLab API Part 1 – Creating student accounts

Now that we have the CS Department’s GitLab server set up, and CS-140 Lab 1 is rewritten and tested using the new server, I’ve started to think about how to automate my interactions with the server. I had already  written some Bash scripts to interact with the Bitbucket server to get student code, convert it to PDF files, and put it back on the server after grading. Those scripts should still work fine with GitLab, since it’s just git on a different server.

One thing that I had not been able to automate previously is the step of issuing a pull request for students to merge my grading branch into their repository. This was not too much of an issue when there were only 6 students in the summer class (so only 3 repositories per lab assignment), but it was going to take more time with ~48 students in the spring class. While reading RSS feeds, I came across a post mentioning the GitLab API. This could be the solution to my problems! And there’s a Python module for the API! I had already been writing Python scripts to make my grading easier, and had been starting to rewrite my Bash scripts in Python.

I started playing with the GitLab API in Python, and had managed to create a merge request (GitLab’s term for pull request.) I had also noticed that you could create GitLab accounts through the API. This seemed like something I should pursue – creating ~48 accounts per semester seemed like something that should be automated.

Since I intended to post my code on Github, one of the first issues I had to address is how to avoid publishing my private token for GitLab. I could have put in a dummy token before pushing my code, but I would have to remember to do that before every time I committed my code. The solution to this issue was solved through the use of the .gitignore file. If I put my token into a file, then I could add a line to my .gitignore file so that it would not be committed.

# Private GitLab Token - not to be stored in repository #
########################################################
gitlabtoken.txt

Then I could just read the token out of the file, and use that string.

# Get my private GitLab token
# stored in a file so that I can .gitignore the file
token = open('gitlabtoken.txt').readline().strip()

After importing the pyapi-gitlab module, I could use that token, along with the server’s URL to create a GitLab object. Notice, that I had to turn ssl verification off, since we only have a self-signed certificate.

# Create a GitLab object
# For our server, verify_ssl has to be False, since we have a self-signed certificate
git = gitlab.Gitlab(GITLAB_URL, token, verify_ssl=False)

Creating a user account is pretty simple using the API:

# Create the account  
success = git.createuser(name, username, password, email)

The returned success value is a boolean — either it worked, or it failed (but you can’t tell why…).

One thing that’s a bit odd about the createuser call, is that you have set a password for the user, but the notification email to the doesn’t include the password. (If you create a user account from the web interface, it generates a random password, includes it in the notification email to the user, and requires the user to change their password when first logging in.) And, the password you set doesn’t seem to work either!

So, I’m just telling the students that they should use the “Forgot Password” link to have a password reset email sent to them, and then proceed from there. (If this is ever fixed, I’ll have to generated a random password.)

Getting the class list as a CSV file from the Blackboard Grade Center is pretty easy, and the first three rows contain the student’s last name, first name, and username. I can use those three strings to generate the name, username, and email needed for the createuser API call.

The only challenge with processing the CSV file is that Blackboard puts some strange character at the beginning of the file, so the file has to be opened with utf-8 encoding. (And the header line needs to be thrown away.)

The last thing I wanted to add is a way to have optional verbose output, so that I could see if the user creation was working. (I decided that it should always notify the user if the account creation failed.)  To do this I had to learn two new things about Python: how to parse arguments1, and how to send output to stderr.

I used the argparse module:

import argparse
# Set up to parse arguments
parser = argparse.ArgumentParser()
parser.add_argument('filename', help='Blackboard CSV filename with user information')
parser.add_argument('-v', '--verbose', help='increase output verbosity', action='store_true')
args = parser.parse_args()

and used the verbose argument to determine what to print:

if not success:
    sys.stderr.write('Failed to create acccount for: '+name+ ', '+username+', '+email+'\n') 
elif args.verbose:
    sys.stderr.write('Created account for: '+name+', '+username+', '+email+'\n')

Full code is on Github here.

  1. I already knew how to do simple argument parsing, but I wanted to learn how to deal with optional arguments.

From the blog On becoming an Eccentric Professor... » CS@Worcester by Karl R. Wurst and used with permission of the author. All other rights reserved by the author.