
Christian Shadis, 02/28/2021
I find teaching topics you are currently learning to be an extremely valuable way to supplement that learning. So, in this blog post, I will walk the reader through an in-class activity from my CS-443 Software Quality Assurance and Testing class, while providing further context and explanation to demonstrate understanding of the material.
If there’s anything I’ve learned in my three years as a Computer Science major, it’s that my code is definitely going to have bugs. Lots and lots of bugs. I remember spending hours trying to debug a program for one of my courses, only to realize that I had tried to compare two strings in Java with ‘==’ instead of the ‘equals()’ method. In those hours, I ran the JUnit test suite provided to us dozens of times. While test automation wouldn’t have solved my problem that day, it does solve a very real problem developers face: running tests manually and repeatedly. In this post, I will use my limited experience and outside reading to provide some top-level understanding of what testing automation is, and how to implement it in your projects.
It may be practical for a student to click the ‘Run’ button over and over again to troubleshoot their code, but in a professional environment with large projects (even multi-project builds), this quickly becomes cumbersome and costly. We can automate testing by forcing unit test suites to run any time a repository is updated – in this example I will be using Gradle and GitLab.
To begin, we must understand the basics of the concept of a build. According to https://www.techopedia.com/definition/3759/build, a software build is the process by which source code is converted into standalone executable scripts. Gradle is a well-known build tool that allows the developer to use test automation. Visit https://gradle.org/install/ to install Gradle on your computer.
Open a basic project. For this post, I will be using some very simple Java code from an in-class activity that models a Rectangle object:
public class Rectangle {

    private int height;
    private int width;

	public Rectangle(int height, int width) {
		this.height = height;
		this.width = width;
	}

        public int getArea() {
                return height * width;
        }

        public boolean isSquare() {
                return height == width;
        }
}
Now that we have our main code, we need to write some JUnit 5 test classes:
// We need to import some testing modules
import org.junit.jupiter.api.Test;
import static org.junit.jupiter.api.Assertions.*;

public class RectangleTest {

    @Test
    void testRectangleArea() {
        Rectangle r1 = new Rectangle(2, 3);
        int area = r1.getArea();
        assertEquals(6, area);
    }

    @Test
    void testRectangleNotSquare() {
        Rectangle r1 = new Rectangle(2, 3);
        boolean isSquare = r1.isSquare();
        assertFalse(isSquare);
    }
}
Now that we have a class and a test class, we are capable of manually running tests in our IDE. All tests, of course, will pass. But as we work on our project, expanding our code and our test classes, we want tests to run every time we push our changes to the remote repository – this way we know if any new changes have broken any old features. So, let’s configure this project to do exactly this.
The first step to automating our testing is to create a build with Gradle. Open a terminal, and navigate to the top-level folder of your project:

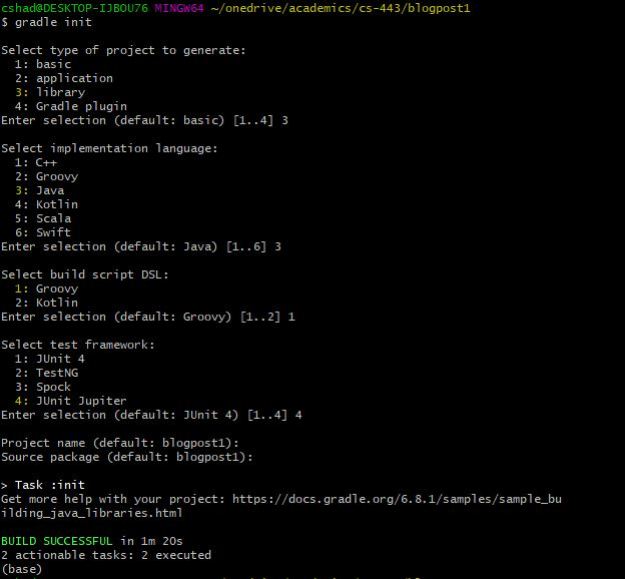
Run the command gradle -v to ensure Gradle is installed on your machine. If the version number of Gradle appears in your terminal, it means your installation is complete. Now run the command gradle init to establish the folder as a gradle project. Now go through the options, selecting all applicable choices. For example, I chose the following:
If you now examine your project folder, you will see an entirely different structure. In the folder lib/src, you will see two other folders: main and test. These folders are where our code for our classes and tests will be moved to. Move Rectangle.java (or your equivalent file) to lib\src\main\java\[package_name]. You will see another file, Library.java, in the desired location. Similarly, move RectangleTest.java (or your equivalent) to
lib\src\test\java\[package_name]. You will see another file, LibraryTest.java, in the desired location.
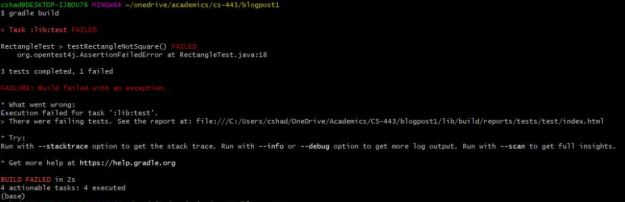
From the top-level directory, you are now able to run gradle build and gradle test commands. These commands will return no errors if all your unit tests pass. If one is faulty, however, you might see something like this:
Now we can also integrate this Gradle project with a Git repository. Create a new project on GitLab, and follow the instructions given for importing an existing folder to a new project. You will need to run git init command and set a remote origin URL.
Note: If this is your first time using GitLab, you will also need to create an SSH key pair – you can do that by clicking on SSH keys in the left-hand panel of User Settings and following the directions there.
Now that we have a git repository, try running the following commands to update it. First, navigate to the correct directory in your terminal. Now, run these commands:
git add .
git commit -m "Add comment here"
git push origin master
See my output below:

If you did this correctly, your remote repository should now have all of your files in it! If we want to integrate Gradle with Git, we can trigger gradle build and gradle test to run every time we push a new commit to GitLab. This removes the need to run tests manually, and is useful in informing developers if all code is still working at the time of the push.
To accomplish this, we need to use GitLab’s Continuous Integration (CI) tool. Read more about this tool at https://docs.gitlab.com/ee/ci/. The idea behind the tool is to build and test the code before merging changes with the existing repository, adding an extra layer of protection for your code. GitLab uses a specific file, .gitlab-ci.yml , to format the execution of its continuous integration. There are templates available online, such as at https://gitlab.com/gitlab-org/gitlab-ce/blob/master/lib/gitlab/ci/templates/Gradle.gitlab-ci.yml. For simplicity, I copied and pasted the code below:
# This is the Gradle build system for JVM applications
# https://gradle.org/
# https://github.com/gradle/gradle
image: gradle:alpine

# Disable the Gradle daemon for Continuous Integration servers as correctness
# is usually a priority over speed in CI environments. Using a fresh
# runtime for each build is more reliable since the runtime is completely
# isolated from any previous builds.
variables:
  GRADLE_OPTS: "-Dorg.gradle.daemon=false"

before_script:
  - export GRADLE_USER_HOME=`pwd`/.gradle

build:
  stage: build
  script: gradle --build-cache assemble
  cache:
    key: "$CI_COMMIT_REF_NAME"
    policy: push
    paths:
      - build
      - .gradle

test:
  stage: test
  script: gradle check
  cache:
    key: "$CI_COMMIT_REF_NAME"
    policy: pull
    paths:
      - build
      - .gradle
Again, make sure this code is saved in a file called .gitlab-ci.yml (don’t forget that leading period!).
Before using CI, we need to check one more thing. Open the build.gradle file, located in the lib folder of your top-level project directory. Make sure to add version numbers of the Jupiter API and Engine if they are not already there:

We should now be ready to use GitLab’s CI tool to automatically run all unit tests every time the code is pushed – if any tests fail, the developer will even be notified by email.
Let’s give it a shot. Open your java class and add a comment at the bottom of the file. Then run git add ., git commit -m “Second commit”, and git push origin master.
If you navigate to the CI/CD tab on the left-hand side of GitLab and look at the pipeline, you will see the build and test commands running. If you have no errors, the status should change to passed. See the images below for a running pipeline versus a completed pipeline:


Congratulations! Now every time you push changes to GitLab, all of your unit tests will be run. You have now implemented a simplistic version of automated unit testing on your own machine. I hope this has been a valuable insight to those getting started with testing automation.
Outside articles used:
https://www.testim.io/blog/what-is-test-automation/
https://medium.com/@jonashavers/how-to-use-junit-5-with-gradle-fb7c5c3286cc
https://www.qaautomation.co.in/2019/07/introduction-to-gradle-beginners-guide.html
From the blog CS@Worcester – Christian Shadis' Blog by ctshadis and used with permission of the author. All other rights reserved by the author.