According to this blog what I study for the Junit 4 and Junit5:
JUnit 5 is a powerful and flexible update to the JUnit framework, providing various improvements and new capabilities to organize and describe test cases and to help understand test results. Upgrade to JUnit 5 is quick and easy: Just update your project dependencies and start using the new functionality.
JUnit 4 bundles everything into a single JAR file.
JUnit 5 consists of three sub-projects, namely JUnit Platform, JUnit Jupiter, and JUnit Vintage.
1. JUnit platform
It defines TestEngine’s API for developing new testing frameworks that run on the platform.
2.JUnit Jupiter
It has all the new JUnit annotations and TestEngine implementations to run tests written with those annotations.
3.JUnit Vintage
Support for running tests written by JUnit 3 and JUnit 4 on the JUnit 5 platform.
But here are four strong reasons to start writing new test cases with JUnit 5:
JUnit 5 takes advantage of features from Java 8 or later, such as lambda functions, to make tests more powerful and easier to maintain.
JUnit 5 adds some very useful new capabilities for describing, organizing, and executing tests. For example, tests get better display names and can be organized hierarchically.
JUnit 5 is organized into multiple libraries, so import only the functionality you need into your project. With build systems like Maven and Gradle, it’s easy to include the right libraries.
JUnit 5 can use multiple extensions at the same time, something that JUnit 4 cannot do (you can only use one runner at a time). This means that you can easily combine Spring extensions with other extensions, such as your own custom extensions.
The JUnit 5 tests look pretty much the same as the JUnit 4 tests, but there are a few differences you should be aware of.
The import. JUnit 5 uses the new org.junit.jupiter package. . For example, org. Junit. Junit Test into org. Junit. Jupiter. API. Test.
Annotation. The @Test annotation no longer has arguments; each argument is moved to a function.
Assertions. JUnit Assertions 5 now in org. JUnit. Jupiter. API. Assertions. Most common assertions, such as assertEquals() and assertNotNull(), look the same as before, but with a few differences.
The hypothesis. Assumption has been moved to org. Junit. Jupiter. API. Assumptions.
In summary, JUnit 5’s tests are more powerful and easier to maintain. In addition, JUnit 5 offers many useful new features. Only the features you use will be imported, you can use multiple extensions, and you can even create your own custom extensions. Together with the new features, these changes provide a powerful and flexible update to the JUnit framework.
The basic idea of unit testing is that you are testing individual units of source code that you have written to see if there are any bugs. Usually the code is deterministic so there are set outputs. The idea of integration testing is to test how a group of modules in your application are working together including how external dependencies are working with the code. This usually involves testing something that is non-deterministic in the application.
Integration testing usually comes after unit testing and is the more expensive to maintain. While the developers will run the unit tests, integration tests are usually required to be ran by a test team. This is partly due to the difficulty in finding errors in integration tests as well as the time it takes.
Integration testing is black box testing which means you are testing the inputs and outputs of the interface. An example of an integration test would be checking the interface to see if you are brought to your profile home page when you enter your username and password. Unit testing is white box testing so you are writing test cases for certain functions to see if they perform correctly. An example of a unit test would be writing a JUnit test case to test the deposit() method and assert that when you make a deposit of $50 to your bank account object (with initial balance of $0) that your balance is now at $50.
The main takeaway is that integration testing tests the interface and how multiple modules work together while unit testing is testing the source code of one function. Unit tests are done in early development while integration tests are done after you have some sort of product complete.
The software development life cycle consists of many parts and one of the essential factors included is software quality assurance. QA for software has the role of establishing and maintaining a standard set of requirements for developing code and making sure the product is properly tested before being available to users. Quality assurance is essential because mistakes are inevitable to happen because the people who develop code are humans not machines. There is always something that can happen that escapes the developer’s eye and so there is another stage of the life cycle to catch this mistake. Now there are many reasons why quality assurance plays a huge role and can really help prevent major problems down the road.
By far the most important reason for quality assurance is money which makes sense because the goal of a business is to make money by selling their products. If code is developed but not tested through QA, then it will be released to the users and they will face problems. This will bring many additional problems to the company since their product failed because the right precautions were not taken. It is essential to test for as many unexpected problems that come to mind, and this is why a quality assurance process is needed to clear up these issues. Another big reason for quality assurance is safety for both the user and the company. A person who buys the software is investing in the product knowing that it is safe and their personal data won’t be a threat. If companies don’t ensure their products through quality assurance testing, then they are liable for damages to the user’s life and further safety issues. Adding on to this, once a company is known to not properly test their products and code, then they will be tarnished with a reputation that they are unreliable. First impressions are always important and this also applies to software because the technological world is changing exponentially which leads to a smaller margin of error for software companies to protect their reputation. The essential goal of a business is to create a product they can sell to a client and receive compensation for it. The user wants to spend money so he can be able to use that product for his own good. Therefore, the company has an obligation to make sure they do their best to meet client’s needs and make the best product based on their capabilities. Overall, software quality assurance is an essential process in the development life cycle and can break or make the software.
Breakable Toys is a very interesting pattern. It talks about doing and undoing something. You must learn how to break it in order to unbreak it again and really learn its inner parts and how does it work. As the author clearly states, “failure is merely an incentive to try a different approach next time.” Breakable Toys is more about deliberately creating opportunities to learn by stepping beyond your boundaries and single-handedly building complete software projects.
I´ve applied that pattern repeatedly, sometimes breaking it too much that I would take hours to unbreak it, but at the end, taking with me a greater knowledge. This way I learned computer languages. I have a project with requirements, and I must translate it into code. Nothing works with the first try so you have to break your classes over and over again until you get it right. At the end what you gain is experience in that language and knowledge that you can share and use it in the future.
This pattern made me understand that is ok to break and fail. In the apprenticeship pattern book, in the chapter about the breakable toys, the author writes that Only by attempting to do bold things, failing, learning from that failure, and trying again do we grow into the kind of people who can succeed when faced with difficult problems. I am one of those persons who is afraid to break it because it might damage the whole thing even though it might need that.
Breakable toys is one of those patterns that need to be in your mind all the time. You need to remind yourself that the road to learn something new is not easy and has a lot of failures, but what is important is that you do it with passion. It really doesn’t matter what you decide to do, as long as you experiment and learn.
You can’t do anything well unless you love it, and if you love to hack, you’ll inevitably be working on projects of your own.
In class, we have been learning about testing with Junit 5 and doing assignments related to it. After watching the video for the advanced part of the assignment, I decided that I wanted to research further into the topic for my first blog post. So, what is Junit? In a short answer, JUnit is a Java open sources unit testing framework that is used to write and run repeatable automated tests. JUnit 5 Is the updated version of the highly popular testing library that is Junit 4 which I’m sure you all have heard of it. Junit 5 was released in 2017 that adds good use for Java 8 features. In fact, JUnit 5 requires Java 8 JDK or higher to work.
While researching a few of the key differences between the two versions are Junit 5 is composed of 3 sub-projects JUnit Platform, JUnit Jupiter, and JUnit Vintage. The Assertions and Annotations have been changed, and most importantly Junit 5 adds the support of the lambda expression in which we went over in class. One of the blogs I read recommends doing this example, which I found quite helpful and easy to understand. The code below is just a conversion between Fahrenheit to Celsius and Junit to test it. The author breaks each part down into subsections which made It easier to follow along. I was also, curious about how Junit 5 worked in the Gradle so I followed tutorials to see how the build systems provide supports to the new feature. I highly recommend watching the video that I have provided; it explains everything you need to know about Junit 5 and the architecture behind It.
The article linked above talks about test driven development, also referred to as TDD, and how it effects software development. I specifically chose this article since it centers around a topic that we’re supposed to cover in this class. The author explains three key reasons why this type of development is used. The first reason is that test driven development is an iterative cycle comprising of the three steps of failing tests, passing tests, and refactoring code. The “failing tests” phase establishes a baseline to work with, the “passing tests” phase develops that baseline into code that meets minimum requirements, and the “refactoring code” phase further develops that code. The second reason is that TDD forces a developer to question their code on multiple levels. For example, a developer would be pushed to question how a specific component works or what they expect from their code. The last reason is that test driven development allows for faster feedback on software design as poor design is often the reason why testing features fail. The article goes on further to explain how to apply TDD on code that is impossible to test.
Reading this article, I found myself agreeing with a lot of what the author had to say. What stuck out to me in particular was how TDD forces a developer to question their code. It got me thinking about the habit I developed writing code where I began to write down and plan the general structure of a whatever project I worked on. The way that test driven development pushes someone to understand their code in what component does what reminds me of my habit but on a smaller scale since a developer would usually test a single feature at a time. And this type of development is really a new concept for me since I’ve used that iterative cycle that the author mentioned without even realizing it. The only major difference is that is that I typically didn’t use a test class which is what I’d assume is a given in the context of the article. I usually manually tested my projects which obviously hurt my productivity and deprived me of the benefit of faster feedback in TDD.
Recently as part of a homework assignment, I learned that in JUnit 4, you were only allowed to use one test runner. This aspect of Junit 4 intrigued me so I decided to do a little more research into the architecture of the JUnit 4 Runner Class.
In this blog by Michael Scharhag, he explains generally what are Runners, how they work and the class hierarchy. Throughout the post, he walks us through the class hierarchy by using a series of tree diagrams and code snippets. He also explains some of the more easily missed details such as what happens when we don’t pass a Runner to the @Runwith annotation. He also talks a little bit about possible pitfalls such extending the wrong class and some neat tricks you can do with the JUnit 4 Runner such as creating custom runners. Overall, I feel like this post was more on the technical side and I used the following video to look at more of the application side.
In this video, it talks more specifically about what each of the classes in the hierarchy do and what annotations to include and when.
This week we had our first assignment. This assignment was about practicing writing JUnit 5 test cases. I am familiar with Junit 5 test cases from another computer class in last semester. Because I haven’t used Junit or coding in java for a while it took me a while to remember what I knew and how to code the test cases. JUnit 5 is most widely used testing framework for java applications. For very long time, JUnit has been doing its job perfectly. In between, JDK 8 brought very exciting features in java and most notably lambda expressions. JUnit 5 aims to adapt java 8 style of coding and several other features as well, that’s why java 8 is required to create and execute tests in JUnit 5.
In this homework, we had a BankAccount class and create at least one test class for the Bank Account System using Junit 5. In the base assignment we had to write the test for the methods that were in the BankAccount class and at the same time create a private method. In the intermediate we had to the write tests for which may include Custom Exceptions. In JUnit 5, to test methods which throws exceptions, we should use .assertThrows() method from org.junit.jupiter.api.Assertions class. The assertThrows() method asserts that execution of the supplied executable block or lambda expression which throws an exception of the expectedType.
In the advance I had to watch a podcast from Sam Brannen, Deep Dive into Junit5. The podcast was very interesting. From here I learned the fun fact that Junit5 is called Jupiter, the reason is Jupiter happens to be the fifth planet from the Sun. He explained some advantages and differences that Junit 5 has over 4 like; JUnit 5 has new features for describing, organizing, and executing tests, especially the display names and can be organized hierarchically, Junit 5 can use more than one extension at a time, you can easily combine the spring extensions with other extensions etc.
Overall, I really enjoyed working in this assignment even though I had to refresh my skills in java and writing test cases has always been a challenge for me but that doesn’t mean that I will give up.
I find teaching topics you are currently learning to be an extremely valuable way to supplement that learning.So,in this blog post, I will walk the reader through an in-class activity from my CS-443 Software Quality Assurance and Testing class, while providing further context and explanation to demonstrate understanding of the material.
If there’s anything I’ve learned in my three years as a Computer Science major, it’s that my code is definitely going to have bugs. Lots and lots of bugs. I remember spending hours trying to debug a program for one of my courses, only to realize that I had tried to compare two strings in Java with ‘==’ instead of the ‘equals()’ method. In those hours, I ran the JUnit test suite provided to us dozens of times. While test automation wouldn’t have solved my problem that day, it does solve a very real problem developers face: running tests manually and repeatedly. In this post, I will use my limited experience and outside reading to provide some top-level understanding of what testing automation is, and how to implement it in your projects.
It may be practical for a student to click the ‘Run’ button over and over again to troubleshoot their code, but in a professional environment with large projects (even multi-project builds), this quickly becomes cumbersome and costly. We can automate testing by forcing unit test suites to run any time a repository is updated – in this example I will be using Gradle and GitLab.
To begin, we must understand the basics of the concept of a build. According to https://www.techopedia.com/definition/3759/build, a software build is the process by which source code is converted into standalone executable scripts. Gradle is a well-known build tool that allows the developer to use test automation. Visit https://gradle.org/install/ to install Gradle on your computer.
Open a basic project. For this post, I will be using some very simple Java code from an in-class activity that models a Rectangle object:
public class Rectangle {

    private int height;
    private int width;

	public Rectangle(int height, int width) {
		this.height = height;
		this.width = width;
	}

        public int getArea() {
                return height * width;
        }

        public boolean isSquare() {
                return height == width;
        }
}
Now that we have our main code, we need to write some JUnit 5 test classes:
// We need to import some testing modules
import org.junit.jupiter.api.Test;
import static org.junit.jupiter.api.Assertions.*;

public class RectangleTest {

    @Test
    void testRectangleArea() {
        Rectangle r1 = new Rectangle(2, 3);
        int area = r1.getArea();
        assertEquals(6, area);
    }

    @Test
    void testRectangleNotSquare() {
        Rectangle r1 = new Rectangle(2, 3);
        boolean isSquare = r1.isSquare();
        assertFalse(isSquare);
    }
}
Now that we have a class and a test class, we are capable of manually running tests in our IDE. All tests, of course, will pass. But as we work on our project, expanding our code and our test classes, we want tests to run every time we push our changes to the remote repository – this way we know if any new changes have broken any old features. So, let’s configure this project to do exactly this.
The first step to automating our testing is to create a build with Gradle. Open a terminal, and navigate to the top-level folder of your project:
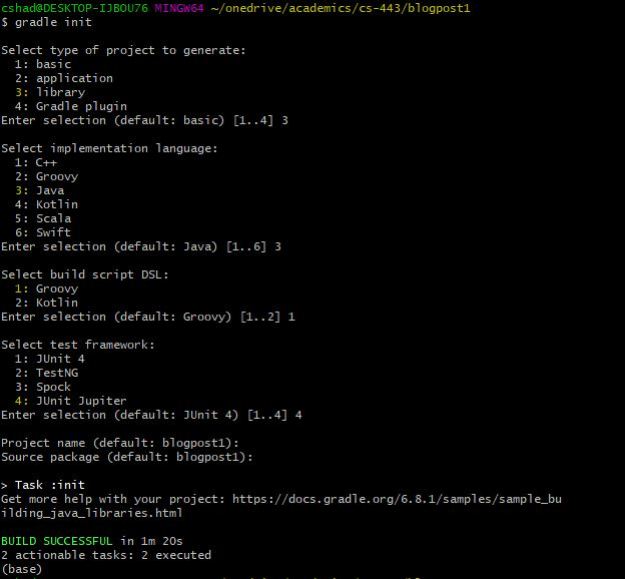
Run the command gradle -v to ensure Gradle is installed on your machine. If the version number of Gradle appears in your terminal, it means your installation is complete. Now run the command gradle init to establish the folder as a gradle project. Now go through the options, selecting all applicable choices. For example, I chose the following:
If you now examine your project folder, you will see an entirely different structure. In the folder lib/src, you will see two other folders: main and test. These folders are where our code for our classes and tests will be moved to. Move Rectangle.java (or your equivalent file) to lib\src\main\java\[package_name]. You will see another file, Library.java, in the desired location. Similarly, move RectangleTest.java (or your equivalent) to lib\src\test\java\[package_name]. You will see another file, LibraryTest.java, in the desired location.
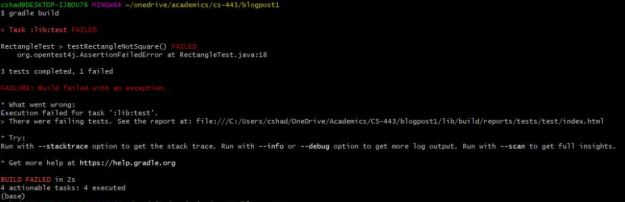
From the top-level directory, you are now able to run gradle build and gradle test commands. These commands will return no errors if all your unit tests pass. If one is faulty, however, you might see something like this:
Now we can also integrate this Gradle project with a Git repository. Create a new project on GitLab, and follow the instructions given for importing an existing folder to a new project. You will need to run git init command and set a remote origin URL.
Note: If this is your first time using GitLab, you will also need to create an SSH key pair – you can do that by clicking on SSH keys in the left-hand panel of User Settings and following the directions there.
Now that we have a git repository, try running the following commands to update it. First, navigate to the correct directory in your terminal. Now, run these commands:
If you did this correctly, your remote repository should now have all of your files in it! If we want to integrate Gradle with Git, we can trigger gradle build and gradle test to run every time we push a new commit to GitLab. This removes the need to run tests manually, and is useful in informing developers if all code is still working at the time of the push.
To accomplish this, we need to use GitLab’s Continuous Integration (CI) tool. Read more about this tool at https://docs.gitlab.com/ee/ci/. The idea behind the tool is to build and test the code before merging changes with the existing repository, adding an extra layer of protection for your code. GitLab uses a specific file, .gitlab-ci.yml , to format the execution of its continuous integration. There are templates available online, such as at https://gitlab.com/gitlab-org/gitlab-ce/blob/master/lib/gitlab/ci/templates/Gradle.gitlab-ci.yml. For simplicity, I copied and pasted the code below:
# This is the Gradle build system for JVM applications
# https://gradle.org/
# https://github.com/gradle/gradle
image: gradle:alpine

# Disable the Gradle daemon for Continuous Integration servers as correctness
# is usually a priority over speed in CI environments. Using a fresh
# runtime for each build is more reliable since the runtime is completely
# isolated from any previous builds.
variables:
  GRADLE_OPTS: "-Dorg.gradle.daemon=false"

before_script:
  - export GRADLE_USER_HOME=`pwd`/.gradle

build:
  stage: build
  script: gradle --build-cache assemble
  cache:
    key: "$CI_COMMIT_REF_NAME"
    policy: push
    paths:
      - build
      - .gradle

test:
  stage: test
  script: gradle check
  cache:
    key: "$CI_COMMIT_REF_NAME"
    policy: pull
    paths:
      - build
      - .gradle
Again, make sure this code is saved in a file called .gitlab-ci.yml (don’t forget that leading period!).
Before using CI, we need to check one more thing. Open the build.gradle file, located in the lib folder of your top-level project directory. Make sure to add version numbers of the Jupiter API and Engine if they are not already there:
We should now be ready to use GitLab’s CI tool to automatically run all unit tests every time the code is pushed – if any tests fail, the developer will even be notified by email.
Let’s give it a shot. Open your java class and add a comment at the bottom of the file. Then run git add ., git commit -m “Second commit”, and git push origin master.
If you navigate to the CI/CD tab on the left-hand side of GitLab and look at the pipeline, you will see the build and test commands running. If you have no errors, the status should change to passed. See the images below for a running pipeline versus a completed pipeline:
Running pipelinesPassed pipeline
Congratulations! Now every time you push changes to GitLab, all of your unit tests will be run. You have now implemented a simplistic version of automated unit testing on your own machine. I hope this has been a valuable insight to those getting started with testing automation.
Software development isn’t all about writing code. A vital aspect of software development is quality assurance. Some may think that quality assurance is just all about testing the code to make sure it works. However, while that is a big part of quality assurance, there is more to it than that. As the name itself suggests, a quality assurance team ensures that the development of a product goes smoothly and without flaws. Testing occurs during each phase of development. They confirm that the end product is properly working before it releases.
Now of course sometimes you can’t have a whole team to certify that your code is perfect. Learning how to do QA on your own code is helpful as a programmer. This could include writing tests for your code, as well as making sure the code does not have anything unnecessary. Although this type of testing may not be an extensive as real Quality Assurance testing, it is still a good way to make sure that the program can run smoothly. There are many different forms of testing, some of which may be automated. Some developers feel that writing up tests for their code may take up more time than it is worth, so automation is an optimal solution.
Having quality assurance in software development increases the quality of the code and results in a more finished end product. It is an essential aspect of creating up to par software, and so being able to provide quality assurance to their code is something that every programmer should strive for.
Articles that provided useful information about quality assurance: