Author Archives: ausausdauer

FPL&S 5: Putting Things Together and Making it Pretty

By now, I’ve become rather accustomed to Typescript, Angular, and even CSS. Once the basic functionality of this project was working, motivation and momentum made it easy to continue adding more features. As evidence 14 out of 21 commits have been made in the past week, and although some are small it shows how easy adding features becomes when you have a good base built.

The database building and making sure it was in sync with file uploads was the most challenging part of this project so far. Two new services were created: one to handle all interactions with the database and another to provide information about the user that is currently logged in. Having Components communicate through a service decouples them from each other and the parent. The Components can simply subscribe to the data they need. This blog post was most helpful in determining the best approach for my needs, but Angular’s documentation filled in the blanks as needed.

An interesting bug I encountered was that uploading a new file overwrote all previous files. This was occurring because I was using the same reference to storage, but a new one is required for each upload. This was a simple solution, but puzzling at first. This was only noticed when I tried deleting a file: other files were still in the database and storage, but the link to all files returned a 404 error.

Then my least favorite part came: improving the UI. I love making things work, but making them flashy and fancy frankly seems like a waste of time, as long as it doesn’t detract from the user experience. Still, I quite enjoyed making it look nicer, despite some frustrations with CSS. The biggest issue I’ve had is CSS styles from outside components affecting the inner ones. I also wish browsers were more standardized. It has been difficult creating a consistent user experience across browsers, save for creating new elements from scratch. In the case of file uploads, for example, it is much simpler to hide the actual element and forward user clicks from a custom text input and browse button.

My last task will be to add some graphs to process information and display it to the user. This is of little use for the project as it stands, but will be incredibly useful for my Independent Study project next semester when I re-brand it. I have to give some credit to the Angular framework for making it easier, but using software engineering principles has allowed for an iterative project. I have a working project at every step with a much bigger end goal in mind.

There is still some polishing I’d like to do, and of course there could always be more features. This project was a great chance to dive into Angular and web development.

From the blog CS@Worcester – Inquiries and Queries by ausausdauer and used with permission of the author. All other rights reserved by the author.

FPL&S 4: User Login, Email Verification, and a Hard Lesson in “this.”

Before creating a database, I needed a way to associate files with a user. This requires user authentication, which is thankfully provided by Google Firebase. In my experience, 3rd Normal Form (3NF) is the best compromise in database normalization, so I strive to achieve this when creating one. Therefore, instead of blindly implementing file storage for a single user, I put some thought in ahead of time of how I would store the data. Currently there are not many data to store, but 3NF is helpful in allowing for additions to a database in the future.

Google’s authentication provides a familiar, smooth interface for users to login or create a new account. In properly-designed, object-oriented software, it is a quick and secure way to implement authentication to quickly launch a product and still easily replace it with your own authentication implementation in the future. The API took a little getting used to (and again, their documentation is not easily converted to Typescript), but it only took a few hiccups to get everything working reliably.

The biggest of the hiccups was “this.”, (pronounced “this-dot”) when referring to member variables. I’ve heard legends of the horror of “this.” in JavaScript. I’ve seen Twitter posts lamenting the language for its strange behavior. But I never expected this.

In typical Java fashion, I was using callbacks for the authentication service. The module would need to update member variables, which are bound to elements through the *ng-if directive. Coming from Java, I naturally assumed calling “this.variable” within the callback would change the value, and the console was printing the correct value, but only within the callback function. As soon as it finished, “this.variable” was the old value. As it turned out, I was referring to two different “this’s”.

The problem is that “this” refers to the context in which a variable is called, not the class in which it is defined. This Stack Overflow post has some good answers describing why and the proper way to use it. My solution was to use arrow functions to pass the correct context to the callback function when I subscribed to it, like so:

ngOnInit() {
    this.angularFireAuth.authState.subscribe((user) => {
        this.firebaseAuthChangeListener(user, this);
    });
}

Subscribing to the authState gives us a user object, which needs to be passed to the custom callback function. ngOnInit() is called to initialize the Component, so the context is the Component itself. Therefore, we can refer to it using “this”, which we do to refer to other services and methods. Modifying the callback function to also take the context means we can modify the member variables of the Component using this argument.

I tried a few other solutions, but this was the simplest and the only one that reliably worked. If there are better TypeScript solutions, I’d love to hear them. For now, I can reliably register users and use their unique IDs to associate them with their file uploads in the database.

From the blog CS@Worcester – Inquiries and Queries by ausausdauer and used with permission of the author. All other rights reserved by the author.

FPL&S 3: Component Interaction, Custom Services, and Fear of Commit

After completing the file upload portion of the project last week, I found myself in fear of committing my changes. I have always had this problem: I want each commit to be concise, change as little as possible, and even have perfect whitespace. This minimizes changes and makes it easier to track down commits where bugs are introduced, but moving forward like this will slow me down, as it has in the past.

But once I made that first commit, things starting progressing quicker. It was time to start adding more Components. Once I could interact with the files I was uploading, it was time to be able to delete files. With more functionality and interaction with the cloud storage, it was best to remove this behavior from the Components and move them to a Service. This custom service class handles all interaction with the cloud storage service, so there aren’t some components adding files and others deleting files. Everything is nicely encapsulated, and user interaction only needs to forward actions to the Service.

I do wonder if there are downsides to this design, and whether Angular might have features I’m missing that may be better suited. However, I definitely believe that UI Components in any framework should delegate user interaction to another class that contains the logic. Even so, is importing a Service class the proper avenue? I have also considered passing commands in each Component up to the main app Component, which would have a single reference to the custom Service I created. This would quickly complicate the application architecture, however, because changes in the cloud storage will require updates in the children Components. For example, the list of Files will have to update, and a file shouldn’t be removed from the UI unless the delete action is successful, requiring a callback to be passed down to children.

The software engineering practices I’ve studied and written about this past semester are at the front of my mind. My current solution is rather simple, and although I am anticipating possible problems, I am not over-engineering and adding unnecessary complexity. I am following Clean Code principles from Robert C. Martin; making code easy it read, making it work, and refactoring when necessary.

The overall design of my final project is beginning to solidify. I naively thought I would download all file metadata from the cloud storage when loading the web page and then maintain them from there, but I’ve realized that all of this data is going to have to be stored in another database, which I will access using a REST API. This will store all the file data and URLs to the files themselves and will be a good chance to practice with data synchronization between databases.

Through the next week I will implement the database. Once I have this synced client-side, I can add Components to search/filter the files and load the files that are selected by the user.

From the blog CS@Worcester – Inquiries and Queries by ausausdauer and used with permission of the author. All other rights reserved by the author.
Behavior-Driven Development (BDD)

Once again, Martin Fowler has some comments on this week’s topic, but this post will mainly reference Dan Terhorst-North’s post, which better describes the reason and motivation for creating Behavior-Driven Development. BDD arose from TDD and it is better to think of it as an extension of TDD.

BDD tests follow the pattern “Given-When-Then” (notice the similarity to Arrange-Act-Assert). Mockito can define this pattern, but the BDDMockito aims to follow the same human-readable principles. The idea is simple: given a precondition, if some other condition occurs, then something else should have happened. Fowler’s example includes checking the state of an object, so clearly BDD is not simply testing the behavior of an object. However, it is a very important part.

Terhorst-North mentions that BDD picks up where TDD left off. I have seen some evidence that BDD has influenced TDD, such as describing tests as a sentence like “testFailsForDuplicateCustomers()”, which can be seen in many TDD test examples. Imitation is the highest form of flattery, so clearly this is a good approach. Or maybe, BDD is just more consistent in this naming because they put it in the specification.

Regardless, BDD developed out of Agile processes. It aimed to make writing tests part of the entire process and help future developers work well together in doing so. This is where many of Terhorst-North’s ideas stemmed from, and his main point, and the motivation behind the name BDD, is that “‘Behaviour’ is a more useful word than ‘Test’”. If you describe each test as a behavior, you know how to define the test, and you know when the specification has changed enough to warrant deletion of a test.

“What to call your test is easy – it’s a sentence describing the next behaviour in which you are interested. How much to test becomes moot – you can only describe so much behaviour in a single sentence. When a test fails. . . either you introduced a bug, the behaviour moved, or the test is no longer relevant.”

Daniel Terhorst-North, “Introducing BDD”

Real mastery of a subject is when it becomes simple. BDD is the next step to understanding testing on an intuitive, subconscious level. It wasn’t immediately obvious that tests don’t need to be difficult to write, but Terhorst-North managed to figure out a way to make it so. It is another part of the iterative process that is technology. Next time I encounter a difficult concept, I think asking three questions, in order, might help: Am I misunderstanding the concept? Do I just need more practice? Or is this method flawed?

Someone saw a flaw in TDD and developed BDD to improve it. This came only through thorough understanding, practicing, and identifying problems. This is applicable to any career, to provide real value.

From the blog CS@Worcester – Inquiries and Queries by ausausdauer and used with permission of the author. All other rights reserved by the author.

FPL&S 2: Uploading Files Through an API

I must say, this project has gotten much more complicated than I was expecting, even last week. Not difficult necessarily, but requiring much more knowledge of the framework that I expected. But after a steep hill over the course of the week, the good news is the features of Angular are much more powerful and exciting than I had thought. While the project specification requires communication with a REST API, which will be used for the database, I also require remote file storage. Since I will be using Google Firebase for both of these services, and file storage has a much simpler API which I’d prefer to use with mobile, I opted to not use the REST API for file storage.

Understanding the Firebase Storage API was the first step, but after reading through much of Google’s documentation for the web API, I still had difficulty translating everything to Angular and TypeScript. But luckily, Google is kind of a big deal these days, so David East from Angular posted a short tutorial that helped me bridge the gap.

The most mindblowing portion of completing this task was the concept of an async pipe, which I will explain shortly. You can’t get through a CS degree without learning and performing asynchronous tasks, but this syntax was completely alien to me. Take this HTML from David East’s post:

<label for="file">File:</label>
<input type="file" (change)="upload($event)" accept=".png,.jpg" />

This demonstrates Angular’s ability of event binding. The (change) syntax is binding a change in input to the upload() method in the Component, while also passing the event DOM, from which you can get the File using TypeScript. My needs were a bit different, but this same syntax can be used to simply store the file when the input is changed. Then, a separate upload button’s (click) event can trigger an upload within in the Component:

<button class="btn" (click)="submit()">Upload</button>

From there, my Component uses Typescript to communicate with the AngularFireStorage service, and even update a progress bar. This is where the async pipe comes in:

<progress max="100" [value]="(uploadProgress | async)"></progress>

More binding! This time, we’re using square brackets to bind the value property of the HTML progress tag to an Observable<number> object, which we can get within the Component from the AngularFireStorage service. This Observable will update the progress bar as the file uploads if we pipe it through an async task, as shown above. This subscribes to the Observable (or Promise) and automatically unsubscribes when the Component is destroyed.

I highly recommend reading over Angular’s template syntax documentation to get better acquainted with these concepts.

After completing this portion of the project, I’ve determined I’ve been thinking too much in terms of JavaScript, because I’ve found some of TypeScript’s rules to be a hindrance. Some of the examples noted above have shown me that if I get back to an object-oriented, strongly-typed mindset, I will be able to work quicker on future tasks. Essentially, this is just a matter of getting practice with a new language and framework.

From the blog CS@Worcester – Inquiries and Queries by ausausdauer and used with permission of the author. All other rights reserved by the author.

FPL&S 1: Getting to Know Angular

For my final project in my software construction and architecture class, I will be writing a 5-post series for Final Project Learning and Status (FPL&S). This project will be using Angular, Typescript, and Node Package Manager (npm). I am not familiar with these tools, but I have learned my lesson before that one should fully understand the technologies they’re using before they start a project. I have spent about 10 hours this week tinkering with Angular, reading blogs, watching tutorials, and of course referencing Angular documentation, with the goal of understanding the architecture as a whole.

My first question: why did I have to download Node.js? The answer boils down to requiring npm, which is packaged with Node.js. Npm allows users to share packages, and Angular requires quite a few packages to run. Npm takes care of this. Of course, it also installed Angular itself.

I was also confused about which files were doing what in a pre-configured project, but after playing with the code and making modifications, this started becoming second-nature, so I won’t go into detail on that. However, learning the concepts behind each file was much more important.

Traversy Media released an Angular Crash Course video which I found to be quite comprehensive and helpful in understanding the framework as a whole. Many of these concepts were learned in practice, but it is nice to be explicitly told some things to remove doubt. The video described how UI “Components” are used and built. Particularly useful were the descriptions of using a constructor to import services that will be used, and that selector was defining the tag to be used in HTML.

Modules, called NgModules, are another important concept, central to Angular. In a single-page web app you might only have a single NgModule, but in larger systems they help improve the modularity of an application, just as modules in Java or other languages. A single NgModule, however, can have many Components. Components can also be reused and nested, but should be considered a view, the goal of which is to create a user experience.

My final project will tie in with my independent study Android app next semester. My first idea was to implement audio recording that will also be necessary for my mobile app, but this turned into a much bigger challenge than expected. Due to the nature of my mobile app, I feel it will be better to start with a web front-end that can pull from data already stored in a cloud database, in order to display metrics, charts and a summary of results. Learning about Angular Observables will likely help to perform asynchronous uploading.

I’ve learned much more than what I’ve written up here, but this blog post addresses what I feel was most relevant to my project and learning Angular. Since this blog is documenting learning experiences, I welcome comments, corrections, and suggestions if anyone thinks it will help.

From the blog CS@Worcester – Inquiries and Queries by ausausdauer and used with permission of the author. All other rights reserved by the author.

Mockito: Complicated at First Glance, Simple in Concept

Mockito is a mocking framework. In his article Mocks aren’t Stubs, Martin Fowler mentions that Mocks allow for behavior verification, rather than state verification, which verifies values after method calls to confirm the proper behavior occurred. Behavior verification instead makes sure the proper behavior happened, by confirming the proper methods themselves were called.

So mocking is a means of setting expectations of method calls on a mock object, and then verifying that those method calls actually happen. But how does this apply to Mockito?

Mockito is a bit more comprehensive. It has mocks, stubs and spies. It has a lot of methods, and a few different philosophies on how it should be used. Should everything be mocked except the system under test? Should you mock types that you didn’t create? When is partial mocking ok? These are questions that are not simply answered and will likely have answers that evolve over time. But the takeaway is that there is a lot to Mockito.

The best way to learn how Mockito can be used is to look at examples. Mockito’s documentation is a good resource and describes many of the concepts. However, the examples are a bit simple and isolated. A Vogella tutorial on Mockito has many better examples that shows how you can use Mockito in actual production code.

Complicated behavior is where mocking comes in handy. Stubs are great for making sure simple methods are called within objects. But in complicated systems, there is a lot more going on that may affect the behavior of the object under test. A mock object can trick external classes into believing that the Mock object is doing real work, by providing expected return values when a method is called. Furthermore, you cannot always check the state of an object without modifying the class itself, making behavior verification the only means of testing.

Mockito is commonly used in Android mobile app testing, especially when Android was officially using Java. In a mobile environment, you are building an app on top of a complicated framework, and as such you may encounter problems, or at least complications, when trying to test. A common example is the Context object in Android. It provides necessary information about the environment in which code is being run. Android Fragments and Activities might need this context internally, but the behavior of the Fragments and Activities should not depend on the actual Context object. Another issue arises: how do you set up application context in a test environment? With Mockito, these complications are resolved by simply creating a Mock Context object in the test cases. If you rely on return values within a mock object, you can even tell Mockito what it needs to return when methods are called.

Mockito can be used in combination with other test methods, using as many or as few of its features as desired. Mocking is quite possibly a necessity when testing complicated systems, and at the very least powerful and convenient.

From the blog CS@Worcester – Inquiries and Queries by ausausdauer and used with permission of the author. All other rights reserved by the author.

Docker and Automated Testing

Last week, in my post about CI/CD, I brought up Docker. Docker can be used to create an “image”, which is a series of layers that are built upon each other. For example, you can create an image of the Ubuntu operating system. From there, you can define your own image with Python pre-installed as a second layer. When you run this image, you create a “container”. This is isolated and has everything installed already so that you, or anyone else on your development team, can use the image and know reliably that it has all necessary dependencies and is consistent.

Of course, Docker will get much more complicated and images will tend to have many more layers. In projects that run on various platforms, you will also have images that are built differently for different versions.

So how does this apply to CI/CD? Docker images can be used to run your pipeline, build your software, and run your tests.

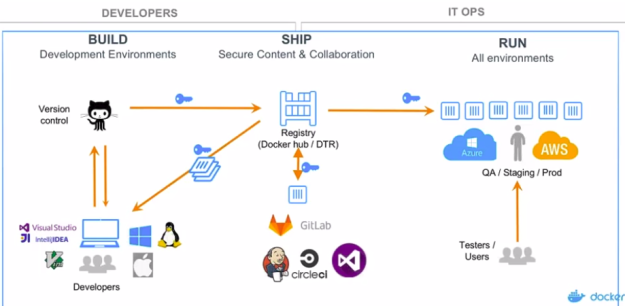
The company released a Webinar discussing how CI/CD can be integrated with Docker. They discuss the three-step process of developing with Docker and GitLab: Build, Ship, Run. These are the stages they use in the .gitlab-ci.yml file, but remember you can define other intermediate stages if needed. The power of CI/CD and Docker is apparent, because “from a developer’s perspective, all you have to do is a ‘git push’ — and that’s it”. The developer needs to write the code and upload to version control and the rest is automated, with the exception being human testers who give feedback on the deployed product. However, good test coverage should prevent most issues and these tests are more about overall experience.

Docker CI and Delivery Workflow
From Docker Demo Webinar, 4:49

Only five lines of added code in .gitlab-ci.yml are necessary to automate the entire process, although the Docker file contains much more detail about which containers to make. The Docker file defines the created images and the code that needs to be run. In the demo, their latest Ubuntu image is pulled from a server to create a container, on which the code will be run. Then variables are defined and Git is automated to pull source code from the GitLab repository within this container.

Then, a second container is created from an image with Python pre-installed. This container is automated to copy the code from a directory in the first container, explained above. Next, dependencies are automatically installed for Flask, and Flask is run to host the actual code that was copied from the first image.

This defines the blueprint for what to be done when changes are uploaded to GitLab. When the code is pushed, each stage in the pipeline from the .gitlab-ci.yml file is run, each stage passes, and the result is a simple web application already hosted from the Docker image. Everything is done.

In the demo, as should usually be done in practice, this was done on a development branch. Once the features are complete, they can be merged with the master branch and deployed to actual users. And again, from the developer’s perspective, this is done with a simple ‘git push’.

From the blog CS@Worcester – Inquiries and Queries by ausausdauer and used with permission of the author. All other rights reserved by the author.

Inversion of Control and Dependency Injections

When I started programming, one subject I felt I never fully understood was the Inversion of Control design principle, in the context of using dependency injection when testing. These were commonly mentioned in tutorials, blogs, and documentation. My main takeaway was “make it another class’s problem”, so I think it’s time for a refresher on this topic to see if that holds true. Inversion of Control extends the Dependency Inversion principle, the D in SOLID.

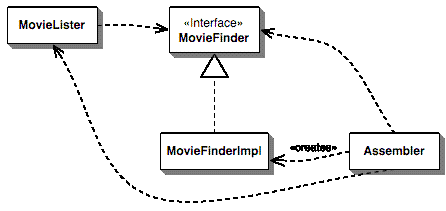
Once again Martin Fowler has a great article on the subject, this time with code examples. Before I summarize his description, what is the problem that IoC solves? A picture says approximately 2¹⁰ words, so:

A MovieLister depends on both the Abstraction and Concrete Class
From https://martinfowler.com/articles/injection.html

Fowler describes a MovieLister class that can act on the MovieFinder interface. This is great for the methods in MovieLister and makes it easy to modify, but MovieLister is also creating the implementation. It would be nice to change the implementation without modifying MovieLister, especially if we want to package MovieLister for use by others, who might need a different implementation of MovieFinder.

“We would prefer it if it were only dependent on the interface, but then how do we make an instance to work with?”

Martin Fowler, Inversion of Control Containers and the Dependency Injection pattern

The basic idea is simple: create the implementation of MovieFinder in another class and “inject” it into the MovieLister. This can be done in a separate Container class, or an Assembler class.

A class acts to assemble the MovieLister by creating the concrete implementation and injecting it to MovieLister
From https://martinfowler.com/articles/injection.html

Dependency Containers allow you to keep track of the classes that you must create and their dependencies. This container will construct the dependencies, create the object you need, and return said object. This isolates all changes to dependencies into a single class. Note that this is encapsulating what varies. The user only needs to decide on concrete implementations in their own custom Container. They can implement MovieFinder in a custom class and use in in their Container.

There are three types of dependency injections: constructor, setter, and interface. The difference is straightforward: either inject the dependency with a constructor at instantiation, a public setter method, or an interface method. Fowler prefers constructors and I’m inclined to agree. If possible, it is better to have a completely constructed object immediately.

I do think this really boils down to “make it another class’s problem”, but this phrase was misleading to me a few years ago. The problem I had with it was figuring out where to end the abstraction and create a concrete class, thinking it should be yet another class’s problem. It was tempting to misuse the design pattern, which left me feeling confused when I didn’t have a good answer. At some point, you need a concrete class to actually do the work. With this design pattern that concrete class is the Dependency Container.

From the blog CS@Worcester – Inquiries and Queries by ausausdauer and used with permission of the author. All other rights reserved by the author.

The KISS and RoP Trade-off

I’ve discussed trade-offs in software before. The more you delve into the world of design and engineering, the more evident it becomes that trade-offs are an underlying principle to rule all principles. There is no perfect software; there is no perfect solution. My aim to strive for the best software, however, led to me choose this topic to discuss.

I intended to keep it simple and focus on KISS (Keep it Simple, Stupid), which claims that a simple, straightforward solution is the better solution. But after listening to a podcast about design principles by SoftwareArchitekTOUR*, I was forced to make a trade-off between a simple blog post and a more powerful, generic one. Specifically, they mentioned the RoP (Rule of Power) principle or GP (generalization principle), which states “that a more generic solution is better than a specific one”.

You will never produce a perfect design… but you can’t typically have both [KISS and RoP]. Either it is simple and specific, or it’s very generic and flexible and therefore no longer simple but rather has a certain degree of complexity. You can typically only strive for a Pareto-Optimal Solution.”

Christian Rehn (translated from German), SoftwareArchitekTOUR Episode 60, 14:30 – 15:45

Rehn says it’s a balancing act, and neither principle is either right nor wrong. The concept of a Pareto-optimal solution is rather simple: find a solution that is better in at least one aspect, but at least as good in every other aspect. As Rehn says, you have to ask yourself what works best in your situation. What is the best compromise?

So what does this mean when choosing between KISS and RoP? Like any new concept or principle, both should be practiced in isolation, with small projects. It is only with this basic experience that you can learn how to make these decisions in more complicated systems.

In learning design principles, I have refactored code in order to make it adhere to a design pattern or principle. When new situations arise, the old solution may no longer hold water. But each time, the code was kept as simple as possible given the requirements. The Pareto-optimal solution is the simplest solution that provides the required functionality. This leads me to conclude that KISS trumps RoP, especially considering other principles such as YAGNI, which strives to prevent the code smell of unneeded complexity. But on the other hand, the simplest solution in which every class does a single, specific thing, would itself become extremely verbose, violating DRY in particular.

Determining how to make these trade-offs is an art and comes with experience. In the mean time, I plan to keep my code as simple as possible and add complexity and generalizations as needed.

* This podcast is only available in German, but the English show notes explain the topics of the podcast in detail.

From the blog CS@Worcester – Inquiries and Queries by ausausdauer and used with permission of the author. All other rights reserved by the author.