Author Archives: stonecsblog

Typescript Classes Vs Interfaces

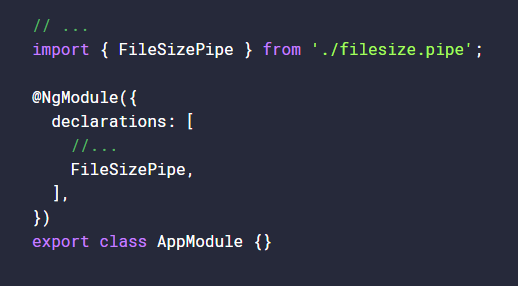
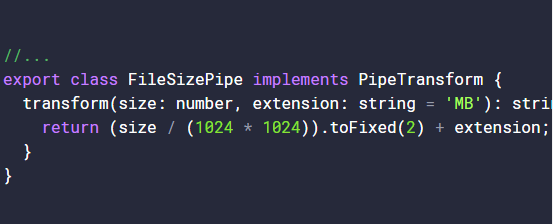
For this blog I will be taking a look at Angular Classes vs Angular Interfaces in Typescript. Angular Classes and Interfaces facilitate not just object-oriented programming but is also used for type-checking in Typescript. As we all should know, a class is generally a blueprint that can be used to create objects that share the same properties or methods. While an interface is a group of related properties or methods that help to describe an object, an interface however does not provide implementation or initialize an object.

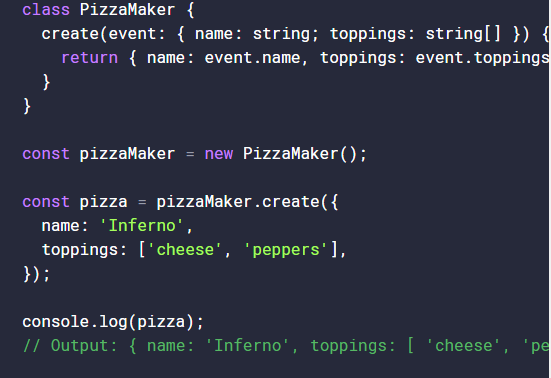
Using a class with Typescript boosts the Javascript classes with the power of typechecking and static properties. Whenever the code is transpiled to a target Javascript code, the transpiler keeps the class code present throughout all phases of the code. Classes are looked at as object factories and help to define the blueprint for what an object will look like and should act like. When you create an instance of this class, the object has defined functions and properties. In the example, we create a PizzaMaker class that has a static method called create which defines the name of the Pizza object as well as the toppings. If the PizzaMaker class did not define create as a static method, we must then create an instance of PizzaMaker in order to use the method. Being able to use Typescript with and without an existing instance of a class make them versatile and flexible. Adding a static properties and methods to a class makes them act like a Singleton, while defining non-static properties and method makes them act like a factory.

Screenshot (27)

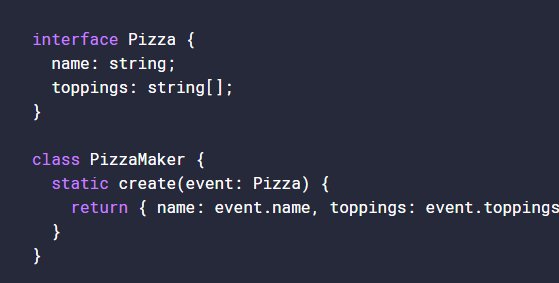
Typescript interfaces are a virtual structure that only exists within the context of Typescript. The compiler uses interfaces only for type-checking purposes. An interface is a structural contract that defines what the properties of an object should have as a name and as a type. In the code below, you will see how the Pizza Interface lists the name and toppings properties and gives them a type. It does not however, create the event or return any objects.

Screenshot (28)

Both interfaces and classes define the structure of an object and can be used interchangeably depending on the situation.


https://toddmotto.com/classes-vs-interfaces-in-typescript

From the blog CS@Worcester – Jarrett's Computer Science Blog by stonecsblog and used with permission of the author. All other rights reserved by the author.

Angular Pipes

In this weeks blog post I will be taking another look at Angular and more specifically Custom Pipes in Angular. While Angular has many built in Pipes ready for use, we would like to extend our applications by creating custom pipes for our applications. Custom pipes allow the developer to create a pure function that can accept an input and return a different output. This is done through a transformation within the pipe.

In order to use Pipes in general they must be imported from the Angular core library. In this example, we are looking to convert a file size of 2120109 into a more readable format of something such as 2.5MB. After importing the Pipe library, we must create a class for the pipe and give it a name as seen in the code below. In order to name the pipe (in example seen as “filesize”) we must use the Typescript decorator @Pipe and provide a name that matches the template code name. The pipe must also be registered in your @NGModule under declarations.

Screenshot (24)

After the class is setup, it is time to implement the PipeTransform interface. The interface creates a required contract that the FileSizePipe adheres to. Since the Pipe is being used via interpolation, the file.size variable is passed through the transform method as the first argument. This is used to convert the numeric value into a readable form. The FileSizePipe method transformed the digits into a string and appends ‘MB’ at the end to make it more readable.

Screenshot (25)

In order to make this a custom pipe, the example  adds the capability for an extension to the code. Using a default parameter instead of appending the ‘MB’ to the end of the string which allows us to use the default ‘MB’ or override it when necessary. This must be passed as an argument into the pipe as seen below.

Screenshot (26)


https://toddmotto.com/angular-pipes-custom-pipes

From the blog CS@Worcester – Jarrett's Computer Science Blog by stonecsblog and used with permission of the author. All other rights reserved by the author.

ngIf, Else, Then

In this weeks blog I will be taking a look at Agular’s NgIf, Else, and Then directives and the different syntaxes that can be used to better deal with conditionals and asynchronous objects. The ngIf directive when placed on a component will hide or show the details of that component or element based on the expression that you pass it to be evaluated. If the expression is evaluated to true, Angular will add  your DOM nodes and mount or remount your components. Another reason to use ngIf is the availability to invoke relevant lifecycle hooks such as ngOnInit and ngOnDestroy. The most standard use of ngIf is to provide a “true or false” type expression based on an evaluation. A common example of the standard use of ngIf would include:

@Component( {

Selector: ‘app’

Template:

Welcome back!

This basic use of ngIf check to see if the user is logged in and if so, Welcome back is displayed.

The next form that can be used is *ngIf and Else. The else statement makes it easy to provide a strategy that Angular can follow if the first *ngIf expression fails or is invalid.

<div *ngIf = “isLoggedIn; else loggedOut”

Welcome back!

</div>

<ng-template #loggedOut>

Please Login

</ng-template>

Here *ngIf is used to see if the user is logged in else it used the local reference of #loggedOut to tell the user to login.


One of the final variations of the ngIf directed is *ngIf, Then and Else. Using then alongside ngIf moves out ignition *ngIf template outside the element we’re binding it to. This allows use to dynamically change the template reference to then, swapping ng template as we go.


<ng-container>

*ngIf= “isLoggedIn; then loggedIn; else loggedOut”>

</ng-container>


In conclusion, ngIf is a versatile directive that can have many use cases apart from the code above and is a great way of providing If, Else, Then statements to your Angular application.


https://toddmotto.com/angular-ngif-else-then

From the blog CS@Worcester – Jarrett&#039;s Computer Science Blog by stonecsblog and used with permission of the author. All other rights reserved by the author.

Useful Wireframes


In this weeks blog I’m going to step back and go to the basics of design and take a look at effective wireframe design and implementation. Wireframes are the backbone of a project and help the team of developers show their ideas on layouts, visual hierarchies, content, and information architecture. Wireframes use placeholders to represent the content that will come later in the development process. Building wireframes has a variety of benefits such as knowing where everything will go before implementing the exact details, the ability to create foundations early on in the process, and the wireframes simplicity allows for creativity and experimentation.

One of the best things about wireframes is the availability and ease of making one.  While they do have specialized wireframing tools and image editors a wireframe can be simply made with a piece of paper and a pen.

1

The first step in making a wireframe the article suggests is to create a content inventory. The content inventory allows the developer to get all their materials in one place before building. Inventories are usually spreadsheets that list all the separate content that will be including on the page, this can include things such as a list of URLs with descriptions. The content should be organized by topic and should be allocated to the correct page. Next, it is recommended to create a visual hierarchy by marking each item by importance as primary or secondary.

2

We can then begin to make the wireframe itself. We start by making a content wireframe which will allow us to place all our content and prioritize the essential elements. It is recommended to start with a mobile-first approach when making an application for this reason, as you can always scale upwards if needed. Once all the content is generally in place, it is time to “sculpt” the wireframe by designating where individual links and icons will go and setting space and sizes for images. It is then recommended to turn the wireframe into a lo-fi prototype so that testing can begin. Certain platforms allow drag and drop interactivity which helps designate usability issues early on.

3

This method allows for rapid prototyping which involves creating prototypes quickly, testing them, and then incorporating the feedback into the next build. The design refines as you go instead of testing everything at once. This leads to much more efficient wireframes and overall applications.

From the blog CS@Worcester – Jarrett&#039;s Computer Science Blog by stonecsblog and used with permission of the author. All other rights reserved by the author.

Python vs R

For this week’s blog I will be taking a look at more of the data analysis side of the computer science world with a comparison of R vs Python. When looking to get into data science, business intelligence, or predictive analytics, we often hear of the two programming languages, but we don’t necessarily know which one to learn or use in different situations.

The R language is a statistical and visualization language that was developed in 1992. R has a rich library that makes it perfect for statistical analysis and analytical work. Python, on the other hand, is a software development language that is based on C. Python can be used to deploy and implement machine learning at a large-scale and can do similar tasks as R. The usability for the two languages is clear that Python is better for data manipulation and repeated tasks while R is better for ad-hoc analysis and general exploration of data sets. Python, being more of a general programming language, is the go to form Machine Learning while R is better at answering statistical problems.

R comes with many different abilities in terms of data visualization, which can be both static or interactive. R packages such as Plotly, Highcharter, and Dygraphs allow the user to interact with the data. Python has libraries such as SciKit-Learn, scipy, numpy, and matplotlib. Matplotlib is the standar Python library that is used to create 2D plots and graphs while numpy is used for scientific computing.

Although R has always been the favorite for data scientists and analysts recently Python has gained major popularity. Over the last few years, Python has risen in popularity by over 10 percent total while the use of R has fallen about 5 percent. Since R is more difficult to learn than Python, the general consensus is that the seasoned data scientist uses R, while the entry-level new generation of data analysts prefer Python extensively.

In the end, Python is a clear better choice for machine learning due to is flexibility, especially if the data analysis tasks need to be integrated with web applications. If you have the need for rapid prototyping and working with datasets to build machine learning models or require statistical analysis of a dataset, R can be used much easier.

https://www.datasciencecentral.com/profiles/blogs/r-vs-python-meta-review-on-usability-popularity-pros-amp-cons

From the blog CS@Worcester – Jarrett&#039;s Computer Science Blog by stonecsblog and used with permission of the author. All other rights reserved by the author.

The Builder Design

For this week’s blog post I will be taking a look at the Builder Design Pattern and how it is effectively implemented and used within a Java program. The Builder Design Pattern is designed to provide a flexible solution to various object creation problems that may arise within object-oriented programming. The pattern is used to separate the construction of a complex object from its representation. The Builder pattern is a creational pattern.

For this pattern we will use a common class, the Employee class. Suppose you have an Employee class with multiple instance variables some of which are required and others that are not. What type of constructor is required for this type of class?  One could follow the telescoping constructor pattern, which would require multiple constructors all with different forms of required attributes as parameters, but this is tedious and inefficient.  Having multiple constructors with varying parameters can lead to confusion of which constructor to invoke when, the default values of the parameters, and what could happen if you pass the wrong value to a constructor.

This leads us to the Builder Pattern. In order to implement the Builder pattern for this example, you would need to create a public static nested class which contains all the instance attributes from the outer class. The outer Employee class will have a private constructor that takes the EmployeeBuilder object as an argument. The builder class will have a public constructor that has all the required attributes as parameters defined as “final”. The builder class will also have setter methods to set the optional parameters. The final step is to provide a build() method in the builder class tat will return the other class object to the client. The method will call the private constructor in the other class, passing the Builder object as the parameter to this private constructor. The Employee class will only have getter methods and no public constructor. This means that the only way to get an Employee object is through the nested EmployeeBuilder Class.

The Builder pattern is useful in situations where a class has multiple attributes that may be the same type or optional. Instead of creating multiple constructors, we can build a separate class that will build the object and provide setter methods to set the optional attributes.


Article: https://dzone.com/articles/the-builder-pattern-for-class-with-many-constructo

From the blog CS@Worcester – Jarrett&#039;s Computer Science Blog by stonecsblog and used with permission of the author. All other rights reserved by the author.

Implementing Laziness

http://matt.might.net/articles/implementing-laziness/

For this week’s blog I will be taking a look at an article on matt.might.net called ‘Understand and Implement Laziness with examples in Scala, JavaScript, Swift and Racket’. Within this article, Professor Might explains the concept of ‘laziness’ in programming. Laziness (other than the laziness we all initially think of) means delaying the computation of a value until the value is necessary. There are two interpretations of laziness, by-name and by-need. Using the by-name interpretation, the computation of the value is delayed until necessary and the computation is repeated each time it is used. Compared to by-need interpretation in which the computation of the value is delayed until necessary, and then the result is cached for subsequent users. The article explains how most languages we use today are strict languages, meaning they compute the value of an expression immediately. While other languages such as Haskell and Scala are lazy or can be called lazy if explicitly specified for a given situation of variables or parameters.

Scala, which is strict by default, can use the lazy keyword if explicitly specified. Therefore, it makes it easy to use as an example.

val x = { print (“foo”) ; 10 }

print (“bar”)

print (x)

As the article explains, this will print foo, then bar, then 10. But if we use the lazy keyword, we see that the output changes.

lazy val x = { print (“foo”) ; 10 }

print (“bar”)

print (x)

This will produce the result bar, then foo, then 10. The use of the lazy keyword delays the computation of x until it is actually needed.

Parameters can also be lazy. Some languages allow the definition of explicitly lazy parameters to functions. The parameters are not evaluated until they are used. In lazy languages like Haskell, the parameters are all implicitly by-need.

The use of lazy parameters and variables allow the programmer to save on computing space and loading time by holding off on the creation of complex objects and variables until needed.

From the blog CS@Worcester – Jarrett&#039;s Computer Science Blog by stonecsblog and used with permission of the author. All other rights reserved by the author.

Service Locator Pattern

For this week’s blog article, I will be looking at the Service Locator Pattern. The article explains how the Service Locator Pattern is a relatively old pattern that was originally used to improve the modularity of an application by removing the dependency between the client and the implementation of an interface. There are many principles that enable you to implement maintainable applications: the Open/Closed Principle, the Liskov Substitution Principle, the Interface Segregation Principle, and the Dependency Inversion Principle. Although these principles are all helpful, they all share the same issue. You need to provide an implementation of the interface, and if that’s done by the same class that uses the interface, you have a dependency between the client and the implementation.

The Service Locator Pattern avoids this dependency altogether. The service locator pattern acts as a central singleton registry that provides implementations of different interfaces. The component that uses the interface no longer needs to know the class that implements the interface, and instead of instantiating the class, it gets an implementation from the service locator. You can implement the service locator as a static service locator that uses a field for each service to store an object reference. Or you can create a dynamic service locator that keeps a java.util.Map with all service references.

Although the Service Locator Pattern can be helpful there are concerns against it and it is also largely outdated by the Dependency Injection pattern. The three most common concerns against the Service Locator Pattern are that all components need to have a reference to the service locator, which is a singleton, the service locator makes the application hard to test, and a service locator makes it easier to introduce changes in interface implementations.

The service locator pattern is just one of the many different patterns that you can use to decouple a client from the implementation of an interface. The pattern uses a singleton registry that provides an instance of a service interface. This helps to move the dependency to the interface implementations from the client of the interface to the service locator class. Although the pattern has some downfalls and is slightly outdated, it can still be used in certain situations.

From the blog CS@Worcester – Jarrett&#039;s Computer Science Blog by stonecsblog and used with permission of the author. All other rights reserved by the author.

Introductory Blog

Hello!

My name is Jarrett Stone and this is my computer science blog. Throughout the semester, I will be staying informed in the ever changing computer science field through various media such as news outlets, podcasts, and other blogs. On the subjects I find interesting or important to the field, I will write my own opinions on in this blog.

Currently, I am a Senior at Worcester State University with a major in Computer Science and a concentration in Big Data Analytics. I have also worked an internship at Infineon Technologies for the past 9 months in Leominster, Massachusetts. As a Big Data Analytics concentration, I hope to find current news on this specific area and how it changes our world today and how it will change the world in the future.


Good company in a journey makes the way seem shorter. — Izaak Walton


From the blog CS@Worcester – Jarrett&#039;s Computer Science Blog by stonecsblog and used with permission of the author. All other rights reserved by the author.