Category Archives: GitHub

Week 14 – Blog for both CS-343 AND CS-348

So for this blog, I wanted to find a topic that is applicable to both classes, so I wanted to look more into GitHub and the ways it functions compared to GitLab.

I duplicated by Secret Santa Generator repository from GitLab: https://gitlab.com/worcester/cs/cs-348-01-02-fall-2023/students/bpoole/secret-santa-generator and duplicated it in GitHub here: https://github.com/TempuraShrimple/Secret-Santa-Generator

To do this, I had to open up the local repo on my PC, create a new blank repository on GitHub, and run the following commands:

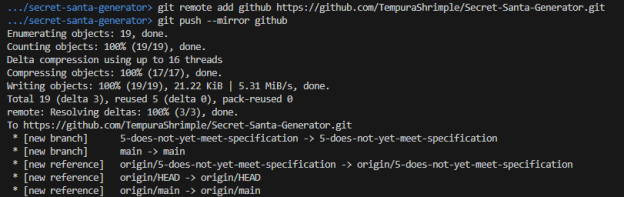
Once this was done, my repository was transferred over to GitHub successfully, without harming my GitLab repository in any way shape or form. Everything, including the history of the repository, was included with this transfer, which I think is really cool.

One difference I immediately noticed between GitHub and GitLab is that GitHub allows you to add a short description on the right-hand side of the repository, allowing a quick way to figure out what the program intends to do without having to look at the README.md. Obviously if you want more information, the README.md is very important in that case.

Both sites have a really good planning structure, with GitLabs’ issue boards, and GitHub’s project tab, which is structured very similar, but I think GitHub’s might be better as it allows you to choose from a lot of different templates like Kanban, Team retrospectives, and bug tracking, which I think is really cool. You’re also able to customize it as you please, so you’re able to set up a scrum structure like we did in GitLab for many of our projects. However, after looking into it, if you want to utilize Scrum, it seems GitLab is definitely structured better with preset pillars that are made with Scrum in mind. However, it’s a toss up on which would be better to utilize in this case for project management, in my own humble opinion.

GitLab also has some advantages in the construction and development aspects of this comparison, as after looking into it, GitLab is able to automate releases and builds of code once they are ready to be done so, and GitHub doesn’t have this capability at all.

https://about.gitlab.com/competition/github/?stage=Configure

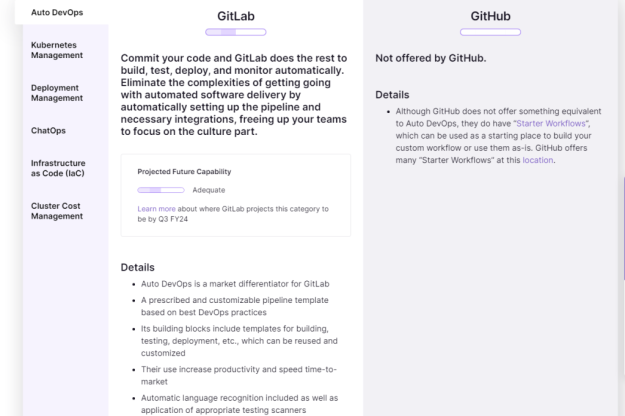
This seems extremely useful for a program that has set deadlines and not enough time to do these things during, say, a Sprint. It allows a lot more flexibility with the work being done in a repo and can allow a lot more efficiency and productivity. I will definitely look into this more later on when I start using this repo I cloned myself.

All in all, after looking things over, it seems like GitLab has a lot of additions that make it better over GitHub in all sorts of ways, and I’m surprised GitHub is used more than it. I should probably introduce my friend I’m working with on GitHub for his game engine for this if he ever develops a much bigger team, as many of the planning-oriented inclusions GitLab has would be extremely beneficial!

From the blog CS@Worcester – You're Telling Me A Shrimp Wrote This Code?! by tempurashrimple and used with permission of the author. All other rights reserved by the author.

Setting up your development environment

This is a guide for creating a new Android Eclipse project from source code on GitHub. It is tailored to my independent study project for the benefit of my partners, but it could be easily adapted to any Android project.

Note: This guide was created for Windows 7 64-bit. Other versions of Windows should be similar.

1. Download and install Java SE Development Kit for Windows x86

Note: I highly recommend NOT installing to the default C:\Program Files (x86)\Java\ folder. The Program Files folder has very restrictive permissions which may cause file writing/copying errors in the future. I chose to install to C:\Java\.

2. Download and install Android SDK for Windows

Note: Again I recommend NOT installing to the default folder. I chose to install to C:\Android\.

3. Run the Android SDK Manager and install the groups: Tools, Android 4.1 (API 16), and Android 2.2 (API 8).

4. Download either Eclipse Classic for Windows 32-bit or Eclipse for Java Developers for Windows 32-bit

5. Extract the downloaded eclipse\ folder into your Java\jdk*\ folder

6. Download and install GitHub for Windows

7. Run Eclipse, and choose your GitHub folder as your workspace

8. Install Eclipse ADT Plugin

Note: If you get an error after restarting Eclipse about not being able to find the Android SDK, just click the Preferences button and point to your Android\android-sdk\ folder.

9. Create a new Android project, and then close Eclipse afterwards

Name the project Task Butler, and name the package edu.worcester.cs499summer2012. The target SDK should be API 16 and the minimum required SDK should be API 8.

10. Clone the CS499Summer2012 repo to your local GitHub folder

11. Move the local repo files into your Task Butler folder

  • In your GitHub\Task Butler\ folder, delete everything EXCEPT .settings\, .project, and .classpath
  • Move everything from GitHub\CS499Summer2012\ into GitHub\Task Butler\
  • Note: Make sure “Show hidden files, folders, and drives” is enabled in Windows Explorer’s Folder options so you can see the hidden .git folder
  • Delete the now-empty \GitHub\CS499Summer2012\ folder

12. Reopen Eclipse, and the project should now have all of its files (and lots of errors!)

13. Download ActionBarSherlock and extract it somewhere

I chose C:\Android\

14. In Eclipse, import the library\ folder inside the ActionBarSherlock folder as a new project

15. Modify the library’s Android properties and Java Compiler properties to get rid of errors

Make sure the build target is set to 4.1 and the “Is library” checkbox is checked.

Make sure the Compiler compliance level is set to 1.6.

16. Modify Task Butler’s Android properties to include the new library

Make sure the build target is 4.1 and add ActionBarSherlock to Library (if there is one listed already with a question mark, remove it).

17. If necessary, clean the project and it should rebuild itself with no errors.

The project is now ready to be worked on!

From the blog Code Your Enthusiasm » WSU CS by Jon and used with permission of the author. All other rights reserved by the author.

Code is live on Github

Now that the app is in development, our work is live on Github. Check it out by clicking the Github link at the top of my blog.

From the blog Code Your Enthusiasm » WSU CS by Jon and used with permission of the author. All other rights reserved by the author.

The trickiness of using Git in an Eclipse project workspace

I know there is a Git plugin for Eclipse, but I prefer to do things the old school way with terminal commands. So when it came time to make sure my Eclipse project folder was being tracked by our remote repository on Github, I thought I could just clone our repository and then create a new Eclipse project in that same directory. Except Eclipse does not let you create a new project in a directory that already exists. And I wasn’t going to try to clone into a directory after it had already been populated by local Eclipse files; who knows what kind of problems that would have created.

If there is an elegant solution to this problem, I didn’t find it. I changed the name of the cloned directory, then created my Eclipse project using the original directory name now that it was unused and available. Then I moved all the Git files into the new directory, and deleted the now-empty one with the changed name. And everything works great.

From the blog Code Your Enthusiasm » WSU CS by Jon and used with permission of the author. All other rights reserved by the author.

Using Git in Windows

With our GitHub repository ready, and now that my Android development environment has been setup, it was time to install Git so I can actually start working. Git is a Linux tool and all my previous Git experience has only been inside that environment. But luckily Git has been ported to Windows, so I can use Git on my Windows machine without having to run it inside a VM. There are several options for running Git in Windows, and first I chose msysgit, the official Git for Windows project. I then abandoned that in favor of the GitHub application, which promised seamless connection to the GitHub website, including automatic maintenance of SSH keys.

The GitHub app has a nice GUI interface, and seems to be very easy to use. But I honestly haven’t used it much–the app also installs a Git shell, which I vastly prefer to the GUI. The Git shell emulates a Linux terminal, inside a Windows command prompt. Several of Linux commands are emulated inside the shell, such as cp, mv, rm, ls, cd, and others. Tab completion is also implemented which is wonderful. The emulated commands are not as powerful as their real versions (for example, typing “ls” works, but my preferred “ls -lh” doesn’t), but it’s still great to have this option. You can even open text files for editing from within the command prompt– just type notepad instead of nano or gedit. Lastly, a hugely useful addition to this Windows implementation that isn’t even in the Linux original:  the prompt in the shell uses symbols to help you keep track of your added, modified, and removed files, and changes color depending on your commit status!

From the blog Code Your Enthusiasm » WSU CS by Jon and used with permission of the author. All other rights reserved by the author.

Organizing our GitHub repository

Our Android project will have an online repository hosted at GitHub. I’ve never used GitHub, though at work I use a local install of the similar Gitorious service. So far, we don’t have anything in the repo besides a GPL notice. The repository does have an integrated wiki that I have put some work into already. James and I discussed how to organize the repo and we decided we wanted to follow a professional approach that an actual project team working on commercial software might follow. Here is an excellent description of the model we will be using.

Basically, there will be four permanent branches. The first two branches, jon-dev and james-dev, are personal development branches that will hold snapshots of the project as we are working on it. We will keep our individual work separate in these branches so nothing one person does can affect the other. Here we also have the freedom to absolutely break the app while not affecting the snapshots in the next two branches. The code in these branches cannot be guaranteed to  build into a perfect working app, but that is to be expected because this is the entry point for brand new contributions.

The third branch, develop, is where James and I will merge our work from our individual branches after we have gotten our code working the way we want. Snapshots in the develop branch should build into a relatively stable app, similar to nightly builds in a major open source project, though bugs may still be present.

The fourth and final permanent branch, master, is reserved for major releases of the app. Once the code in the develop branch has enough features implemented, and has been tested thoroughly, it can be merged into the master branch and tagged as a milestone build. Apps build from code in the master branch should be considered stable and without major bugs.

We can also create temporary hotfix branches as we need to. For example, if a bug is discovered in the master branch, we can create a branch to fix the bug, merge it back into master after the fix has been tested, and then delete the temporary branch.

From the blog Code Your Enthusiasm » WSU CS by Jon and used with permission of the author. All other rights reserved by the author.