In the blog post “Strategy Design Pattern in Python”, Giridhar Talla defines and discusses the Strategy Design Pattern first in a broader object-oriented approach, but then directly with Python implementation. Talla uses the Gang of Four’s definition of the Strategy Design Pattern to first create an abstract implementation of the design pattern, and then using a more concrete example to show the pattern in use. He also includes a UML diagram visualizing the design pattern.
The strategy design pattern was a topic of focus for my CS-343: Software Construction, Design, & Architecture class. We examined the pattern using a simple example in Java called DuckSimulator, which had different Quack and Fly strategies. While the value of the pattern was immediately evident, the concept of the pattern itself still confused me, especially when attempting to implement the design in Java for homework. I chose to study and write about this blog post because it took a straightforward approach like the in-class activity, but it is implemented in Python instead of Java. I decided that the best way to understand the abstract nature of the strategy design pattern was to consider its implementation in other object-oriented languages.
I found the blog post both informative and direct – Talla’s language is easy to follow, and his code snippets are clear and concise. What I found simultaneously helpful and confusing was his abstract implementation of the pattern using not a real-world example, but simply by creating Context and Strategy classes. This made it helpful to see exactly how each component interacts with one another without getting caught up in or confused trying to figure out what part of the example represents a strategy or a context. This abstract code chunk is a solid foundation for building a python script using the design pattern if you it to your specific real-world example.
The article did supplement my understanding of the design pattern by adding extra abstraction. On the other hand, however, I still find myself confused trying to implement the pattern in Java. Because of this, I plan to continue reading about the pattern and practicing implementing it. The code I write is often very dependent on using if/else branches to run algorithms differently based on object attributes, which is a problem this design pattern can mitigate. I plan to read the original Gang of Four chapter on the Strategy Design Pattern to further increase my understanding because being able to implement this pattern will greatly improve the efficiency of programs the pattern would work with.
Hi! I’m Christian Shadis, and as of this post, I am a senior at Worcester State University pursuing a Bachelor’s degree with a double major in Mathematics and Computer Science. This blog will be a place for me to write about what I’m learning in school, projects I’m doing, or anything else I think is worth sharing with the Internet. Hope to see you back here soon!
This past semester I have been spending a lot of time in my QA class working with JUnit 5. I want to be able to take my familiarity with JUnit and apply the same principles with unit testing in Python. I am leaning toward a data-centric career path and Python is widely used for data analytics, so this would be valuable information for me.
This post is not an expert-authored tutorial on Python unit testing because I, myself, am just getting started with it. In this post I will instead give tiny, bite-sized examples of just the basics, translating it from JUnit to Python unittest. I built identical, small classes in Java and Python, and will build tests to go with them. Below are the classes in Java and Python, respectively.
/**
 * Simple class with basic methods, written in Java
 * @author Christian Shadis
 */
public class main {
    public static void main(String[] args){
        int i = 0; // dummy code to keep compiler happy
    }

    public static int addTwoNumbers(int x, int y){
        return x + y;
    }

    public static String toCapital(String str){
        return str.toUpperCase();
    }
}
# Simple class with basic functions, written in Python
# Author: Christian Shadis

class main:
    def add_two_numbers(x, y):
        return x+y

    def to_capital(string):
        return string.upper()
Writing the unit tests in JUnit is simple: we import the JUnit assertions, and the @Test annotation. Then we create the test class, each of the two tests, setup, exercise, and verify just as always.
/**
 * Test Class for main.java
 * @author: Christian Shadis
 */
import static org.junit.jupiter.api.Assertions.*;
import org.junit.jupiter.api.Test;

public class maintest {

    @Test
    void testAddTwoNumbers(){
        int result; // setup
        result = main.addTwoNumbers(566, 42); // exercise
        assertEquals(result, 608); // verify
    }

    @Test
    void testToCapital(){
        String result; // setup
        result = main.toCapital("string"); // exercise
        assertEquals(result, "STRING"); // verify
    }
}
Luckily, writing unit tests is just as easy in Python as Java. We import the unittest library and the other class, define the class, and add a Test Case object as the parameter.
import unittest
from main import *

class maintest(unittest.TestCase):
import unittest
from main import *

class maintest(unittest.TestCase):

    def test_add_two_numbers(self):

        pass
    def test_to_capital(self):

        pass
Now we need a test case for each of our two functions, add_two_numbers and to_capital. Python’s unittest objects have very similar assertions as in JUnit. Use assertEqual(x, y) to check that x == y. This is the assertion we will use in this example, but any of the following are commonly used unittest assertions:
assertEqual
assertNotEqual
assertTrue
assertFalse
assertIs
assertIsNot
assertIsNone
assertIsNotNone
assertIn
assertNotIn
assertIsInstance
assertIsNotInstance
assertEqual takes two arguments and, as the name suggests, asserts their equality. See the implementation below:
    def test_add_two_numbers(self):
        result = main.add_two_numbers(33, 44)
        self.assertEqual(result, 77)

    def test_to_capital(self):
        result = main.to_capital("hi")
        self.assertEqual(result, "HI")
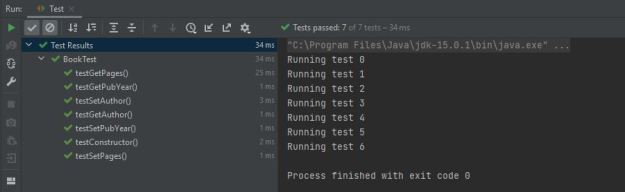
Run the tests and you will see them both pass. Below is a screenshot of the tests executing in Python and then in JUnit. As you can see, the Python tests are slightly faster than the Java tests, but not by much. I used IntelliJ IDEA and Pycharm IDE.
I have found the most helpful way to learn testing is to just play around with the unit tests, see what works and what doesn’t, see what causes failures and what those failures look like, and so forth. I would suggest any other beginner QA student to do the same. Playing around with different assertions and looking at the unittest documentation is a great way to learn this library. I hope this post gave you some insight on how to get started with unit testing your Python modules if you have done some work with JUnit in the past.
Christian Shadis, CS-443 Self-Directed Blog Post #4
For students like me with limited experience writing JUnit tests, it becomes easy to get lost in the repetition of “Setup, Exercise, Verify” and not realize that a simple, understandable feature of JUnit testing, annotations, can be used to improve the functionality and efficiency of your JUnit Test Suites. In this post I will explain the uses five JUnit 5 annotations and demonstrate them. The following annotations will be explained:
We begin with an extremely simple Java class “Book” and its similarly simple counterpart “BookTest”. See the code for the two classes below.
public class Book {

    private int pages;
    private String author;
    private int pubYear;

    public Book(int pages, String author, int pubYear){
        this.pages = pages;
        this.author = author;
        this.pubYear = pubYear;
    }

    public int getPages(){ return this.pages; }
    public String getAuthor(){ return this.author; }
    public int getPubYear(){ return this.pubYear; }

    public void setPages(int pages){ this.pages = pages; }
    public void setAuthor(String author){ this.author = author; }
    public void setPubYear(int pubYear){ this.pubYear = pubYear; }
}
import static org.junit.jupiter.api.Assertions.*;
import org.junit.jupiter.api.BeforeEach;
import org.junit.jupiter.api.Test;

public class BookTest {

    @Test
    void testConstructor(){
        Book book1 = new Book(100, "John Doe", 1999);
        boolean result = book1 instanceof Book;
        assertTrue(result);
    }

    @Test
    void testGetPages(){
        Book book1 = new Book(100, "John Doe", 1999);
        int result = book1.getPages();
        assertEquals(result, 100);
    }

    @Test
    void testGetAuthor(){
        Book book1 = new Book(100, "John Doe", 1999);
        String result = book1.getAuthor();
        assertEquals(result, "John Doe");
    }

    @Test
    void testGetPubYear(){
        Book book1 = new Book(100, "John Doe", 1999);
        int result = book1.getPubYear();
        assertEquals(result, 1999);
    }

    @Test
    void testSetPages(){
        Book book1 = new Book(100, "John Doe", 1999);
        book1.setPages(150);
        assertEquals(book1.getPages(), 150);
    }

    @Test
    void testSetAuthor(){
        Book book1 = new Book(100, "John Doe", 1999);
        book1.setAuthor("Jane Smith");
        assertEquals(book1.getAuthor(), "Jane Smith");
    }

    @Test
    void testSetPubYear(){
        Book book1 = new Book(100, "John Doe", 1999);
        book1.setPubYear(2001);
        assertEquals(book1.getPubYear(), 2001);
    }
}
@BeforeEach
The first annotation we will look at is @BeforeEach. This annotation is used for repetitive code that is executed during each test case. If you examined BookTest closely, you might have noticed that the first line of every test case is identical. This makes our suite the perfect candidate to use @BeforeEach. In order to implement, we must create a setUp test method, and put book1 as an instance variable – this way, scope does not become a nuisance. See the revised BookTest.java file below.
import static org.junit.jupiter.api.Assertions.*;
import org.junit.jupiter.api.BeforeEach;
import org.junit.jupiter.api.Test;

public class BookTest {

    Book book1;

    @BeforeEach
    void setUp(){
        book1 = new Book(100, "John Doe", 1999);
    }

    @Test
    void testConstructor(){
        boolean result = book1 instanceof Book;
        assertTrue(result);
    }

    @Test
    void testGetPages(){
        int result = book1.getPages();
        assertEquals(result, 100);
    }

    @Test
    void testGetAuthor(){
        String result = book1.getAuthor();
        assertEquals(result, "John Doe");
    }

    @Test
    void testGetPubYear(){
        int result = book1.getPubYear();
        assertEquals(result, 1999);
    }

    @Test
    void testSetPages(){
        book1.setPages(150);
        assertEquals(book1.getPages(), 150);
    }

    @Test
    void testSetAuthor(){
        book1.setAuthor("Jane Smith");
        assertEquals(book1.getAuthor(), "Jane Smith");
    }

    @Test
    void testSetPubYear(){
        book1.setPubYear(2001);
        assertEquals(book1.getPubYear(), 2001);
    }
}
@AfterEach
Analogous to @BeforeEach, @AfterEach will execute following each test case. There is no obvious implementation in our code, but I will demonstrate its use nonetheless. We can use @AfterEach to update a count variable indicating how many tests are run. We add a print statement to our setup method to print the test number, and add count as an instance variable, initialized to 0. @AfterEach will allow us to increment the count after each test case is run. Create a method tearDown() with the @AfterEach annotation, and add “count++;” as the body. The count declaration must also be revised to a public static modifier. The new instance variables, setUp(), and tearDown() methods are shown below.
public class BookTest {

    Book book1;
    private static int count = 0;


    @BeforeEach
    void setUp(){
        book1 = new Book(100, "John Doe", 1999);
        System.out.println("Running test " + count);
    }

    @AfterEach
    void tearDown(){
        count++;
    }
.
.
.
}
We now have methods that execute before and after every single test case.
@BeforeAll
@BeforeAll is used as an initialization method that executes before any other method. It is the first method in BookTest that will be run. We can use it in this example to instantiate our count variable to 0, and leave just the variable declaration with the instance variables. See the modified instance variables and new init() method below.
public class BookTest {

    private static int count;
    Book book1;

    @BeforeAll //runs first
    public static void init(){
        System.out.println("BeforeAll running: count set to 0.");
        count = 0;
    }
.
.
.
}
@ParameterizedTest
This annotation is useful for running test cases with multiple inputs. For example, imagine the developer of BookTest is unsure whether testSetAuthor() will pass when multi-word strings are passed as arguments. This scenario is the perfect situation to use a parameterized test. When using @ParameterizedTest, however, one must be sure to specify the source of the arguments, which is accomplished using the annotation @ValueSource. See the example below.
This annotation is used for when tests need to be run multiple times. For example, if we wanted to run testGetAuthor three times, we would use this annotation. When using @RepeatingTest, we must pass a parameter value which determines the number of repetitions, and name which names each repetition. See the example below.
@RepeatedTest(value = 3, name = "Repetition {currentRepetition}")
void testGetAuthor(){
String result = book1.getAuthor();
assertEquals(result, "John Doe");
}
Summary
We have now taken an extremely simple JUnit 5 test suite and used five different annotations to make the suite a bit more complex and comprehensive. There are many more annotations, all of which can be found in the JUnit documentation here. We can now run tests multiple times, create setup and teardown methods, and parameterize tests to run them with multiple argument inputs.
public class Book {
private int pages;
private String author;
private int pubYear;
public Book(int pages, String author, int pubYear){
this.pages = pages;
this.author = author;
this.pubYear = pubYear;
}
public int getPages(){ return this.pages; }
public String getAuthor(){ return this.author; }
public int getPubYear(){ return this.pubYear; }
public void setPages(int pages){ this.pages = pages; }
public void setAuthor(String author){ this.author = author; }
public void setPubYear(int pubYear){ this.pubYear = pubYear; }
}
import static org.junit.jupiter.api.Assertions.*;
import org.junit.jupiter.api.*;
import org.junit.jupiter.params.ParameterizedTest;
import org.junit.jupiter.params.provider.ValueSource;
public class BookTest {
private static int count;
Book book1;
@BeforeAll
public static void init(){
System.out.println("BeforeAll running: count set to 0.");
count = 0;
}
@BeforeEach
void setUp(){
book1 = new Book(100, "John Doe", 1999);
System.out.println("Running test " + count);
}
@AfterEach
void tearDown(){
count = count + 1;
}
@Test
void testConstructor(){
boolean result = book1 instanceof Book;
assertTrue(result);
}
@Test
void testGetPages(){
int result = book1.getPages();
assertEquals(result, 100);
}
@RepeatedTest(value = 3, name = "Repetition {currentRepetition}")
void testGetAuthor(){
String result = book1.getAuthor();
assertEquals(result, "John Doe");
}
@Test
void testGetPubYear(){
int result = book1.getPubYear();
assertEquals(result, 1999);
}
@Test
void testSetPages(){
book1.setPages(150);
assertEquals(book1.getPages(), 150);
}
@ParameterizedTest
@ValueSource(strings = {"Jane", "Jane Smith"})
void testSetAuthor(String str){
    book1.setAuthor(str);
    assertEquals(book1.getAuthor(), str);
}
@Test
void testSetPubYear(){
book1.setPubYear(2001);
assertEquals(book1.getPubYear(), 2001);
}
}
Two common testing techniques in Black-Box Software Testing are Boundary Value Testing (or Boundary Value Analysis) or Equivalence Partition Testing (or Equivalence Class Testing). Both techniques examine the output of a program given its inputs.
Consider a function eligibleForScholarship which accepts two inputs, SAT score (for simplicity, only considering 1600 scale) and GPA (on a 4.0 scale) and returns in dollars the total reward a student is eligible to receive. At CompUniversity, a student will receive a scholarship if their SAT score is at least 1200 and their GPA is at least 3.5. The amount of that scholarship is determined by the criteria in the table below.
SAT Score
SAT Score Award
0-1199
$0
1200-1399
$1000
1400-1600
$2500
In addition to the SAT reward, additional money is given based on GPA.
GPA
% of SAT award earned
0-3.49
0%
3.5-3.74
100%
3.75-3.89
120%
3.90-4.0
150%
For example, a student with an SAT score of 1450 and GPA of 3.8 will receive $2500 plus an additional 20% for a total of $3000. A student with an SAT score of 1600 and a GPA of 3.49 will receive $0.
If software tester wanted to write test bases based on Robust Boundary Value Analysis, they would arrive at the following set of test cases:
Disadvantages of Boundary Value Testing: There are possible outputs that this set of test cases never checks (e.g. $3000, $3750). Additionally, this set of test cases fails to test the behavior inside the program, instead focusing on outermost limits.
If the software tester instead wanted to write test cases based off of Strong Normal Equivalence Partitioning, they would arrive at the following set of test cases:
Test Case
SAT Score
GPA
Expected Output ($)
1 (0 <= sat < 1200, 0 <= gpa < 3.50)
1000
2.0
0
2 (1200 <= sat < 1400, 0 <= gpa < 3.50)
1300
2.0
0
3 (1400 <= sat <= 1600, 0 <= gpa < 3.50)
1500
2.0
0
4 (0 <= sat < 1200, 3.50 <= gpa < 3.75)
1000
3.6
0
5 (1200 <= sat < 1400, 3.50 <= gpa < 3.75)
1300
3.6
1000
6 (1400 <= sat <= 1600, 3.50 <= gpa < 3.75)
1500
3.6
2500
7 (0 <= sat < 1200, 3.75 <= gpa < 3.90)
1000
3.8
0
8 (1200 <= sat < 1400, 3.75 <= gpa < 3.90)
1300
3.8
1200
9 (1400 <= sat <= 1600, 3.75 <= gpa < 3.90)
1500
3.8
3000
10 (0 <= sat < 1200, 3.90 <= gpa <= 4.00)
1000
3.95
0
11 (1200 <= sat < 1400, 3.90 <= gpa < 4.00)
1300
3.95
1500
12 (1400 <= sat <= 1600, 3.90 <= gpa < 4.00)
1500
3.95
3750
Disadvantages of Equivalence Partitioning: This set of test cases does not successfully account for behavior at the boundaries of valid inputs, nor does it account for the behavior of the program with every possible combination of inputs.
The disadvantages of boundary value testing and equivalence partitioning can be addressed by instead implementing edge testing.
Edge Testing
In Edge testing, we want to examine any point at which behavior changes, and create test cases for all of those ‘boundaries’, along with values close to the boundaries on either side.
The SAT edge cases can be listed as {-1, 0, 1, 1199, 1200, 1201, 1399, 1400, 1401, 1599, 1600, 1601}. The GPA edge cases can be listed as {-0.01, 0.00, 0.01, 3.49, 3.50, 3.51, 3.74, 3.75, 3.76, 3.89, 3.90, 3.91, 3.99, 4.00, 4.01}.
Test cases can now be created by taking all pairwise combinations of edge cases (Worst-case). There are too many test cases to list here without taking up unnecessary space, but now our tests account for each and every possible combination of inputs.
Edge testing combines the best attributes from Boundary Value testing and Equivalence Partitioning into one comprehensive technique. Edge testing successfully tests the upper and lower bounds for each input, and it successfully examining inner behavior at each partition.
Edge testing has a major drawback: the number of test cases needed. In this example, there are 12 * 15 = 180 test cases, but it has unrivaled behavior coverage. The decision of which testing technique to use depends largely on the program for which the tests are being developed, but for a smaller number of partitions in the inputs, edge testing is a relatively simple but comprehensive technique for testing all possible behavior.
In this post, I will compare the implementations of Robust Boundary Value Testing and Equivalence Partitioning using simple examples and actual JUnit code.
For the purposes of this post, you have been elected ChairBee of HoneyComb Council in your neighborhood’s local beehive. Your main job is to determine whether a worker bee has produced enough honey to retire. There are two criteria by which you base your decision, age and number of flowers pollinated. As a bee, your brain was incapable of making this complex of a decision every time a bee requests retirement, so you decided to write a Java program to do the heavy lifting for you.
Your function needs two inputs: the number of flowers pollinated, and the age of the bee in days. Your decision is based on these conditions: A bee is eligible to retire at age 18, but only if they have pollinated at least 20 flowers.
boolean readyToRetire(int age, int flowersPollinated) throws IllegalArgumentException{

   if(age < 0 || age > 50)
      throw new IllegalArgumentException();
   if(flowersPollinated < 0 || flowersPollinated > 200)
      throw new IllegalArgumentException();
   if(age >= 18 && age <= 50) {
      if(flowersPollinated < 20)
         return false;
      else
         return true;
   }

   else
      return false;
}
Being the good little former working bee you are, you decide that no program is worth its weight in beetles (joke of an insect, really) if it doesn’t have a JUnit Test Suite to go along with it. You decide that you want to develop test cases with one of two methods: Boundary Value Testing or Equivalence Partitioning.
Boundary Value Testing
There are physical and arbitrary limits implemented on each input of the function. The age of a bee, obviously, cannot be a negative number, and for a creature with a life expectancy of 28 days, you cannot expect it to live past 50 days. Our acceptable inputs for age are 0 <= age <= 50. Likewise, a negative number of flowers being pollinated is impossible, and a bee in our hive is extremely unlikely to pollinate close to 150 flowers, let alone 200. Our acceptable inputs for flowers pollinated are 0 <= flowers <= 200. Thus, we implement a physical limit of 0 to both age and flowers pollinated, and arbitrary upper limits of 50 and 200, respectively.
In Robust Boundary Value testing, we take each boundary of an input, and one step in the positive and negative directions, and test each against the nominal (or ideal) value of the other input. We arrive at the following test cases:
Test Case
Age
Flowers Pollinated
Expected Output
1 <x1min-, x2nom>
-1
30
Exception
2 <x1min, x2nom>
0
30
False
3 <x1min+, x2nom>
1
30
False
4 <x1max-, x2nom>
49
30
True
5 <x1max, x2nom>
50
30
True
6 <x1max+, x2nom>
51
30
Exception
7 <x1nom, x2nom>
20
30
True
8 <x1nom, x2min->
20
-1
Exception
9 <x1nom, x2min>
20
0
False
10 <x1nom, x2min+>
20
1
False
11 <x1nom, x2max->
20
199
True
12 <x1nom, x2max>
20
200
True
13 <x1nom, x2max+>
20
201
Exception
Now we write JUnit 5 Test cases for each row in the table above. We will assume the readyToRetire function is inside a Bee class.
@Test
void test1(){
   Bee testBee = new Bee();
   assertThrows(IllegalArgumentException.class,
               () -> { testBee.readyToRetire(-1, 30); } );
}

@Test
void test2(){
   Bee testBee = new Bee();
   boolean result = testBee.readyToRetire(0, 30);
   assertFalse(result);
}

@Test
void test3(){
   Bee testBee = new Bee();
   boolean result = testBee.readyToRetire(1, 30);
   assertFalse(result);
}

@Test
void test4(){
   Bee testBee = new Bee();
   boolean result = testBee.readyToRetire(49, 30);
   assertTrue(result);
}

@Test
void test5(){
   Bee testBee = new Bee();
   boolean result = testBee.readyToRetire(50, 30);
   assertTrue(result);
}

@Test
void test6(){
   Bee testBee = new Bee();
   assertThrows(IllegalArgumentException.class,
               () -> { testBee.readyToRetire(51, 30); } );
}

@Test
void test7(){
   Bee testBee = new Bee();
   boolean result = testBee.readyToRetire(20, 30);
   assertTrue(result);
}

@Test
void test8(){
   Bee testBee = new Bee();
   assertThrows(IllegalArgumentException.class,
               () -> { testBee.readyToRetire(20, -1); } );
}

@Test
void test9(){
   Bee testBee = new Bee();
   boolean result = testBee.readyToRetire(20, 0);
   assertFalse(result);
}

@Test
void test10(){
   Bee testBee = new Bee();
   boolean result = testBee.readyToRetire(20, 1);
   assertFalse(result);
}

@Test
void test11(){
   Bee testBee = new Bee();
   boolean result = testBee.readyToRetire(20, 199);
   assertTrue(result);
}

@Test
void test12(){
   Bee testBee = new Bee();
   boolean result = testBee.readyToRetire(20, 200);
   assertTrue(result);
}

@Test
void test13(){
   Bee testBee = new Bee();
   assertThrows(IllegalArgumentException.class,
               () -> { testBee.readyToRetire(20, 201); } );
}
Equivalence Class Partitioning
Equivalence class partitioning arises from the foundational concept that with this function, there will be one of three results. An Exception will be thrown, true will be returned, or false will be returned. Based on our information about the criteria for deciding if a bee can retire, the behavior of the function can be modeled with a table.
age > 50
E
E
E
E
18 <= age <= 50
E
False
True
E
0 <= age < 18
E
False
False
E
age < 0
E
E
E
E
FP < 0
0 <= FP < 20
20 <= FP <= 200
FP > 200
Each cell in this table is an equivalence class and can represent a test case in the JUnit Test Suite. With your bee work ethic, you decide to implement Strong Robust Equivalence Testing, which is the most thorough method, and uses every cell in the table above as a test case.
We now have JUnit 5 Test Suites for both testing methods (boundary value testing and equivalence class testing). You are now prepared to serve your term as ChairBee knowing every decision will be made correctly, and having peace of mind that your test cases verified all desired behavior.
Equivalence class testing, at least with examples like this one, is a more thorough and robust technique that tests the programs behaviors as well as its input bounds, whereas boundary value testing focuses only on the extremes for each input. Each technique has its pros and cons, but I hope this simple example shed some light on implementing the theory behind boundary-value testing and equivalence class testing in JUnit 5.
I find teaching topics you are currently learning to be an extremely valuable way to supplement that learning.So,in this blog post, I will walk the reader through an in-class activity from my CS-443 Software Quality Assurance and Testing class, while providing further context and explanation to demonstrate understanding of the material.
If there’s anything I’ve learned in my three years as a Computer Science major, it’s that my code is definitely going to have bugs. Lots and lots of bugs. I remember spending hours trying to debug a program for one of my courses, only to realize that I had tried to compare two strings in Java with ‘==’ instead of the ‘equals()’ method. In those hours, I ran the JUnit test suite provided to us dozens of times. While test automation wouldn’t have solved my problem that day, it does solve a very real problem developers face: running tests manually and repeatedly. In this post, I will use my limited experience and outside reading to provide some top-level understanding of what testing automation is, and how to implement it in your projects.
It may be practical for a student to click the ‘Run’ button over and over again to troubleshoot their code, but in a professional environment with large projects (even multi-project builds), this quickly becomes cumbersome and costly. We can automate testing by forcing unit test suites to run any time a repository is updated – in this example I will be using Gradle and GitLab.
To begin, we must understand the basics of the concept of a build. According to https://www.techopedia.com/definition/3759/build, a software build is the process by which source code is converted into standalone executable scripts. Gradle is a well-known build tool that allows the developer to use test automation. Visit https://gradle.org/install/ to install Gradle on your computer.
Open a basic project. For this post, I will be using some very simple Java code from an in-class activity that models a Rectangle object:
public class Rectangle {

    private int height;
    private int width;

	public Rectangle(int height, int width) {
		this.height = height;
		this.width = width;
	}

        public int getArea() {
                return height * width;
        }

        public boolean isSquare() {
                return height == width;
        }
}
Now that we have our main code, we need to write some JUnit 5 test classes:
// We need to import some testing modules
import org.junit.jupiter.api.Test;
import static org.junit.jupiter.api.Assertions.*;

public class RectangleTest {

    @Test
    void testRectangleArea() {
        Rectangle r1 = new Rectangle(2, 3);
        int area = r1.getArea();
        assertEquals(6, area);
    }

    @Test
    void testRectangleNotSquare() {
        Rectangle r1 = new Rectangle(2, 3);
        boolean isSquare = r1.isSquare();
        assertFalse(isSquare);
    }
}
Now that we have a class and a test class, we are capable of manually running tests in our IDE. All tests, of course, will pass. But as we work on our project, expanding our code and our test classes, we want tests to run every time we push our changes to the remote repository – this way we know if any new changes have broken any old features. So, let’s configure this project to do exactly this.
The first step to automating our testing is to create a build with Gradle. Open a terminal, and navigate to the top-level folder of your project:
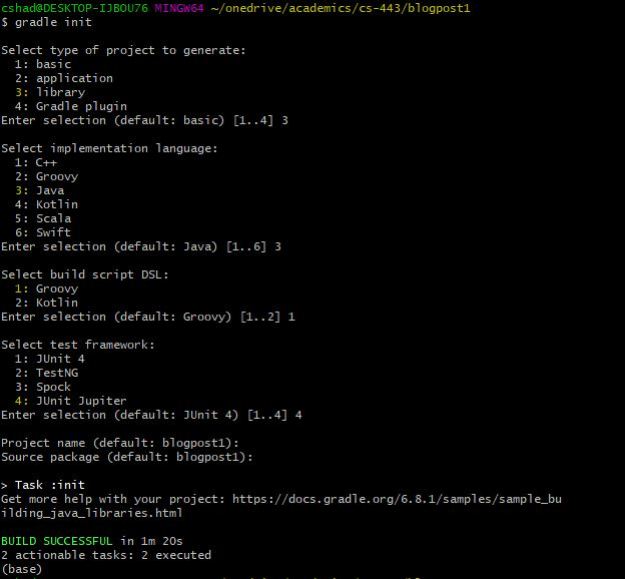
Run the command gradle -v to ensure Gradle is installed on your machine. If the version number of Gradle appears in your terminal, it means your installation is complete. Now run the command gradle init to establish the folder as a gradle project. Now go through the options, selecting all applicable choices. For example, I chose the following:
If you now examine your project folder, you will see an entirely different structure. In the folder lib/src, you will see two other folders: main and test. These folders are where our code for our classes and tests will be moved to. Move Rectangle.java (or your equivalent file) to lib\src\main\java\[package_name]. You will see another file, Library.java, in the desired location. Similarly, move RectangleTest.java (or your equivalent) to lib\src\test\java\[package_name]. You will see another file, LibraryTest.java, in the desired location.
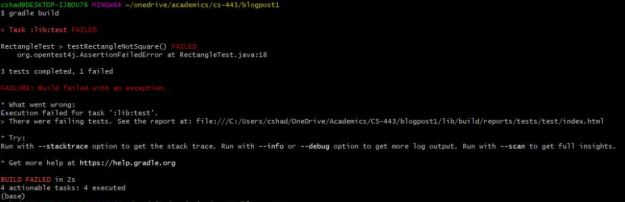
From the top-level directory, you are now able to run gradle build and gradle test commands. These commands will return no errors if all your unit tests pass. If one is faulty, however, you might see something like this:
Now we can also integrate this Gradle project with a Git repository. Create a new project on GitLab, and follow the instructions given for importing an existing folder to a new project. You will need to run git init command and set a remote origin URL.
Note: If this is your first time using GitLab, you will also need to create an SSH key pair – you can do that by clicking on SSH keys in the left-hand panel of User Settings and following the directions there.
Now that we have a git repository, try running the following commands to update it. First, navigate to the correct directory in your terminal. Now, run these commands:
If you did this correctly, your remote repository should now have all of your files in it! If we want to integrate Gradle with Git, we can trigger gradle build and gradle test to run every time we push a new commit to GitLab. This removes the need to run tests manually, and is useful in informing developers if all code is still working at the time of the push.
To accomplish this, we need to use GitLab’s Continuous Integration (CI) tool. Read more about this tool at https://docs.gitlab.com/ee/ci/. The idea behind the tool is to build and test the code before merging changes with the existing repository, adding an extra layer of protection for your code. GitLab uses a specific file, .gitlab-ci.yml , to format the execution of its continuous integration. There are templates available online, such as at https://gitlab.com/gitlab-org/gitlab-ce/blob/master/lib/gitlab/ci/templates/Gradle.gitlab-ci.yml. For simplicity, I copied and pasted the code below:
# This is the Gradle build system for JVM applications
# https://gradle.org/
# https://github.com/gradle/gradle
image: gradle:alpine

# Disable the Gradle daemon for Continuous Integration servers as correctness
# is usually a priority over speed in CI environments. Using a fresh
# runtime for each build is more reliable since the runtime is completely
# isolated from any previous builds.
variables:
  GRADLE_OPTS: "-Dorg.gradle.daemon=false"

before_script:
  - export GRADLE_USER_HOME=`pwd`/.gradle

build:
  stage: build
  script: gradle --build-cache assemble
  cache:
    key: "$CI_COMMIT_REF_NAME"
    policy: push
    paths:
      - build
      - .gradle

test:
  stage: test
  script: gradle check
  cache:
    key: "$CI_COMMIT_REF_NAME"
    policy: pull
    paths:
      - build
      - .gradle
Again, make sure this code is saved in a file called .gitlab-ci.yml (don’t forget that leading period!).
Before using CI, we need to check one more thing. Open the build.gradle file, located in the lib folder of your top-level project directory. Make sure to add version numbers of the Jupiter API and Engine if they are not already there:
We should now be ready to use GitLab’s CI tool to automatically run all unit tests every time the code is pushed – if any tests fail, the developer will even be notified by email.
Let’s give it a shot. Open your java class and add a comment at the bottom of the file. Then run git add ., git commit -m “Second commit”, and git push origin master.
If you navigate to the CI/CD tab on the left-hand side of GitLab and look at the pipeline, you will see the build and test commands running. If you have no errors, the status should change to passed. See the images below for a running pipeline versus a completed pipeline:
Running pipelinesPassed pipeline
Congratulations! Now every time you push changes to GitLab, all of your unit tests will be run. You have now implemented a simplistic version of automated unit testing on your own machine. I hope this has been a valuable insight to those getting started with testing automation.
Hi! I’m Christian Shadis, and as of this post, I am a student at Worcester State University pursuing a Bachelor’s degree with a double major in Mathematics and Computer Science. This blog will be a place for me to write about what I’m learning in school, projects I’m doing, or anything else I think is worth sharing with the Internet. Hope to see you back here soon!